Flood Fault Circuit Interrupter Could Save Lives

What if you didn’t have to risk your life to disconnect the power during a catastrophic storm? That’s a question many people in Houston were asking themselves as they watched water from Hurricane Harvey and other storms surge through the streets, swell in the gutters, and flood their homes.

Among these Houstonians were engineering students [Jon] and [Cyrus Jyan]. They watched as homeowners fought to safely disconnect their homes from the power grid and said, it shouldn’t have to be this way. They designed the Flood Fault Circuit Interrupter to monitor target areas and disconnect the power automatically when a credible threat is detected.

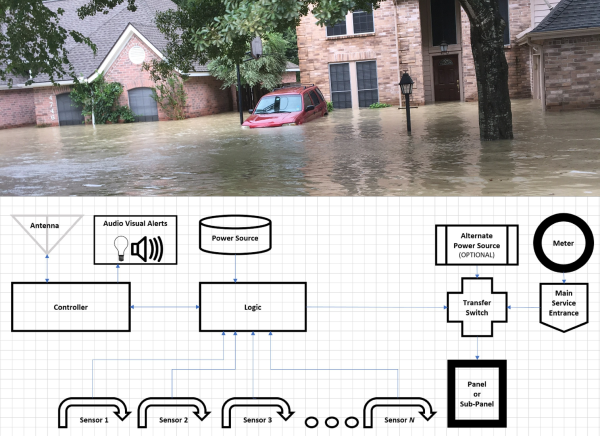
The FFCI is built on top of existing protection schemes like GFCIs and Arc Fault Circuit Interrupters. It isn’t meant to replace them, but instead tie them together and turn them off based on input from float switches.

As floodwaters rise, an EEPROM does a lookup and compare to decide if the threat is enough to shut it down. If so, an alarm signal to a shunt trip breaker can either throw the whole system to OFF, or else switch over to an alternate power source. The system is built around a standard security panel and keypad interface that supports 12 V alarm output. We particularly like the float switch enclosures that allow water to enter while keeping out debris.

Reflowduino: Put That Toaster Oven To Good Use

There are few scenes in life more moving than the moment the solder paste melts as the component slides smoothly into place. We’re willing to bet the only reason you don’t have a reflow oven is the cost. Why wouldn’t you want one? Fortunately, the vastly cheaper DIY route has become a whole lot easier since the birth of the Reflowduino – an open source controller for reflow ovens.

This Hackaday Prize entry by [Timothy Woo] provides a super quick way to create your own reflow setup, using any cheap means of heating you have lying around. [Tim] uses a toaster oven he paid $21 for, but anything with a suitable thermal mass will do. The hardware of the Reflowduino is all open source and has been very well documented – both on the main hackaday.io page and over on the project’s GitHub.

The board itself is built around the ATMega32u4 and sports an integrated MAX31855 thermocouple interface (for the all-important PID control), LiPo battery charging, a buzzer for alerting you when input is needed, and Bluetooth. Why Bluetooth? An Android app has been developed for easy control of the Reflowduino, and will even graph the temperature profile.

When it comes to controlling the toaster oven/miscellaneous heat source, a “sidekick” board is available, with a solid state relay hooked up to a mains plug. This makes it a breeze to setup any mains appliance for Arduino control.

We actually covered the Reflowduino last year, but since then [Tim] has also created the Reflowduino32 – a backpack for the DOIT ESP32 dev board. There’s also an Indiegogo campaign now, and some new software as well.

If a toaster oven still doesn’t feel hacky enough for you, we’ve got reflowing with hair straighteners, and even car headlights.

MoAgriS: A Modular Agriculture System

Hackaday.io user [Prof. Fartsparkle] aims to impress us again with MoAgriS, a stripped-down rig for bringing crops indoors and providing them with all they need.

This project is an evolution of their submission to last year’s Hackaday Prize, MoRaLiS — a modular lighting system on rails — integrating modules for light, water, airflow, fertilizer and their appropriate sensors. With an emphasis on low-cost, a trio of metal bars serve as the structure, power and data transmission medium with SAM D11 chips shepherding each plant.

Reinforced, angled PCBs extend rails horizontally allowing the modules to be mounted at separate heights. Light module? Up top. Water sensor? Low on the rails above the pot’s rim. You get the idea. 3D printed clamps attach the rails to the plant’s pot with a touch of paint to keep it from sticking out like a sore thumb among the leaves.

Airflow modules replicate wind currents — the lack of which results in thin, fragile stems — and light modules include a soft white LED to accompany and mitigate the full-spectrum LEDs’ pink neon-like glow. To manage watering the plants, [Prof. Fartsparkle] initially wanted to use one pump to distribute water to every plant, but found some smaller pumps at a low enough price-point to make one per plant viable — and simpler to integrate as a module as well!

If you prefer your gardening to take place outdoors, consider a robot assistant to tackle your weeding.

Intra-Oral Device Detects Opioid Overdose

As you may have heard, the U.S. is in the grips of an opioid epidemic. Overdose deaths from heroin, oxycontin, and fentanyl have quadrupled since 1999. The key to detecting opioid overdose before it’s too late is in monitoring respiration. Opioids in particular cause depressed respiration, which is slow and ineffective breathing that’s inadequate for the gas exchange that keeps us alive. Depressed respiration becomes fatal unless the patient is given nalaxone, an antidote that works by blocking opioid receptors in the brain.

[Curt White] is developing an intra-oral device to prevent opioid overdose via early detection. It tracks a patient’s inhale/exhale rate and sends the data over Bluetooth to an open-source website.  The tiny device uses an air pressure sensor, a humidity sensor, and a thermopile thermometer to accurately track a person’s full respiration waveform whether their mouth is open or closed. The brain is one of [Curt]’s hacked $35 activity trackers that we told you about a few days ago.

All of the hardware including the battery is embedded in a custom retainer made from thermoplastic. [Curt] used Tyvek and surgical tape to isolate the air pressure sensor. Both are waterproof and breathable, which means that air can get to the sensor, but not saliva. Hold your breath and click past the break to watch [Curt] demonstrate this amazing tool on himself.

Continue reading “Intra-Oral Device Detects Opioid Overdose”

The Current Advances Of PCB Motors

There’s something to be said about the falling costs of printed circuit boards over the last decade. It’s opened up the world of PCB art, yes, but it’s also allowed for some experimentation with laying down fine copper wires inside a laminate of fiberglass and epoxy. We can design our own capacitive touch sensors. If you’re really clever, you can put coils inside four-layer PCBs. If you’re exceptionally clever, you can add a few magnets and build a brushless motor out of a PCB.

We first saw [Carl]’s PCB motor at the beginning of the year, but since then we’ve started the Hackaday Prize, [Carl] entered this project in the Prize, and this project already made it to the final round. It’s really that awesome. Since the last update, [Carl] has been working on improving the efficiency and cost of this tiny PCB motor. Part of this comes from new magnets. Instead of a quartet of round magnets, [Carl] found some magnets that divide the rotor into four equal pieces. This gives the rotor a more uniform magnetic field across its entire area, and hopefully more power.

The first version of this 3D printed PCB motor used press-fit bushings and a metallic shaft. While this worked, an extra piece of metal will just drive up the cost of the completed motor. [Carl] has redesigned the shaft of the rotor to get rid of the metallic axle and replace it with a cleverly designed, 3D printed axle. That’s some very nice 3D printing going on here, and something that will make this motor very, very cheap.

Right now, [Carl] has a motor that can be made at any board house that can do four-layer PCBs, and he’s got a rotor that can be easily made with injection molding. The next step is closed-loop control of this motor. This is a challenge because the back-EMF generated by four layers of windings is a little weak. This could also be accomplished with a hall sensor, but for now, [Carl] has a working PCB motor. There’s really only one thing to do now — get the power output up so we can have real quadcopter badges without mucking around with tiny brushed motors.

[Carl] has put up a few videos describing how his PCB motor works; you can check those out below.
Continue reading “The Current Advances Of PCB Motors”

Pick And Place Machine Is Mirror Image Of 3D Printer

For his Hackaday prize entry, [Daren Schwenke] is creating an open-source pick-and-place head for a 3D printer which, is itself, mostly 3D printable. Some serious elbow grease has gone into the design of this, and it shows.

The really neat part of this project comes in the imaging of the part being placed. The aim is to image the part whilst it’s being moved, using a series of mirrors which swing out beneath the head. A Raspberry Pi camera is used to grab the photos, an LED halo provides consistent lighting, and whilst it looks like OpenPnP may have to be modified slightly to make this work, it will certainly be impressive to see.

Two 9g hobby servos are used: one to swing out the mirrors (taking 0.19 seconds) and one to rotate the part to the correct orientation (geared 2:1 to allow 360 degrees part rotation). Altogether the head weighs 59 grams – lighter than an E3D v6.

In order to bring this project to its current state, [Daren] has had to perform some auxiliary hacks.  The first was an aquarium to vacuum pump conversion – by switching around the valves and performing some other minor mods, [Daren] was able to produce a vacuum of 231mbar. The second was hacking a two-way solenoid valve from a coffee machine into a three-way unit. As [Daren] says, three-way valves are not expensive, but “a part in hand is worth two on Alibaba.”

Modular Robotics: When You Want More Robots In Your Robot

While robots have been making our lives easier and our assembly lines more efficient for over half a century now, we haven’t quite cracked a Jetsons-like general purpose robot yet. Sure, Boston Dynamics and MIT have some humanoid robots that are fun to kick and knock over, but they’re far from building a world-ending Terminator automaton.

But not every robot needs to be human-shaped in order to be general purpose. Some of the more interesting designs being researched are modular robots. It’s an approach to robotics which uses smaller units that can combine into assemblies that accomplish a given task.

We’ve been immersing ourselves in topics like this one because right now the Robotics Module Challenge is the current focus of the Hackaday Prize. We’re looking for any modular designs that make it easier to build robots — motor drivers, sensor arrays, limb designs — your imagination is the limit. But self contained robot modules that themselves make up larger robots is a fascinating field that definitely fits in with this challenge. Join me for a look at where modular robots are now, and where we’d like to see them going.

Continue reading “Modular Robotics: When You Want More Robots In Your Robot”