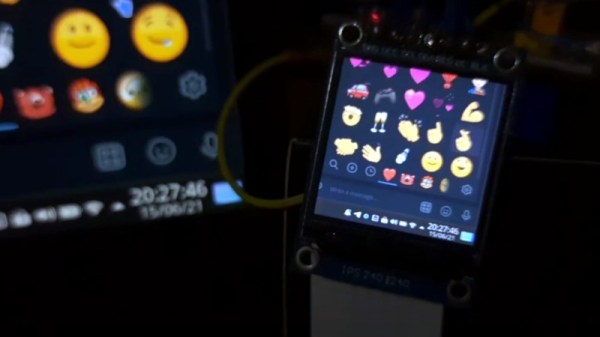
Reverse-Engineering An Unknown Microcontroller In E Ink Displays

For a monochrome display where refresh rate isn’t particularly important, there’s almost no better option than an E Ink display. They’re available in plenty of sizes and at various price points, but there’s almost no option cheaper than repurposing something mass-produced and widely available like an E Ink (sometime also called eInk or ePaper) price tag. At least, once all of the reverse engineering is complete.

[Dmitry Grinberg] has been making his way through a ton of different E Ink modules, unlocking their secrets as he goes. In this case he set about reverse engineering the unknown microcontroller on the small, cheap display show here. Initial research showed an obscure chip from the ZBS24x family, packaged with a SSD1623L2 E Ink controller. From there, he was able to solder to the communications wires and start talking to the device over ISP.

This endeavor is an impressive deep dive into the world of microcontrollers, from probing various registers to unlocking features one by one. It’s running an 8051 core so [Dmitry] gives a bit of background to help us all follow along, though it’s still a pretty impressive slog to fully take control of the system.

If you happen to have one of these price tags on hand it’s an invaluable resource to have to reprogram it, but it’s a great read in general as well. On the other hand, if you’re more interested in reverse-engineering various displays, take a look at this art installation which spans 50 years of working display technologies.

8-Bit Computer Addresses LEDs

Homebrew 8-bit computers tend to have fairly limited displays, often one or more seven-segment displays and an array of LEDs to show the values of RAM or perhaps some other states of the computer. [Duncan] is in the process of building just such an computer, but wondered if there was a way to create a more visually appealing display while still keeping the computer true to its 8-bit roots. With some interesting TTL logic he was able to create this addressable RGB LED display to some remarkable results.

The array works by controlling the WS2812B LED strips with a specific timing cycle which was pioneered by [Tim] for a different project. [Tim] was able to perform this timing cycle with some simple Assembly code, which means that [Duncan] could convert that code into TTL gate logic relatively easily. Using 74LS02 NOR chips gets the job done as far as timing goes, and the pulses are then fed into a shift register and support logic which then creates the signal for the LED strips.

When everything is said and done, [Duncan] has a fully addressable 16×16 RGB LED array as a display for his 8-bit computer without violating any of his design principles and keeping everything to discrete TTL logic chips and a stick of RAM. It’s a unique method of display that might go along really well with any other homebrew computer like this one that’s also built with 74LS chips.

MicroLEDs: Lighting The Way To A Solid OLED Competitor

We’re accustomed to seeing giant LED-powered screens in sports venues and outdoor displays. What would it take to bring this same technology into your living room? Very, very tiny LEDs. MicroLEDs.

MicroLED screens have been rumored to be around the corner for almost a decade now, which means that the time is almost right for them to actually become a reality. And certainly display technology has come a long way from the early cathode-ray tube (CRT) technology that powered the television and the home computer revolution. In the late 1990s, liquid-crystal display (LCD) technology became a feasible replacement for CRTs, offering a thin, distortion-free image with pixel-perfect image reproduction. LCDs also allowed for displays to be put in many new places, in addition to finally having that wall-mounted television.

Since that time, LCD’s flaws have become a sticking point compared to CRTs. The nice features of CRTs such as very fast response time, deep blacks and zero color shift, no matter the angle, have led to a wide variety of LCD technologies to recapture some of those features. Plasma displays seemed promising for big screens for a while, but organic light-emitting diodes (OLEDs) have taken over and still-in-development technologies like SED and FED off the table.

While OLED is very good in terms of image quality, its flaws including burn-in and uneven wear of the different organic dyes responsible for the colors. MicroLEDs hope to capitalize on OLED’s weaknesses by bringing brighter screens with no burn-in using inorganic LED technology, just very, very small.

So what does it take to scale a standard semiconductor LED down to the size of a pixel, and when can one expect to buy MicroLED displays? Let’s take a look. Continue reading “MicroLEDs: Lighting The Way To A Solid OLED Competitor”

Supersized Weather Station Uses Antique Analog Meters

For most of us, getting weather information is as trivial as unlocking a smartphone or turning on a computer and pointing an app or browser at one’s weather site of choice. This is all well and good, but it lacks a certain panache that old weather stations had with their analog dials and stained wood cases. The weather station that [BuildComics] created marries both this antique aesthetic with modern weather data availability, and then dials it up a notch for this enormous analog weather station build.

The weather station uses 16 discrete dials, each modified with a different label for the specific type of data displayed. Some of them needed new glass, and others also needed coils to be modified to be driven with a lower current than they were designed as well, since each would be driven by one of two Arduinos in this project. Each are tied to a microcontroller output via a potentiometer which controls the needle’s position for the wildly different designs of meter. The microcontrollers themselves get weather information from a combination of real-world sensors outside the home of [BuildComics] and from the internet, which allows for about as up-to-date information about the weather as one could gather first-hand.

The amount of customization of these old meters is impressive, and what’s even more impressive is the project’s final weight. [BuildComics] reports that it took two people just to lift it onto the wall mount, which is not surprising given the amount of iron in some of these old analog meters. And, although not as common in the real world anymore, these old antique meters have plenty of repurposed uses beyond weather stations as well.

Continue reading “Supersized Weather Station Uses Antique Analog Meters”

Mechanical Seven-Segment Display, Smaller And Better Than The Original

One thing we love here at Hackaday is when we get to track the evolution of a project over time. Seeing a project grow over time is pretty typical — scope creep is real, after all. But watching a project shrink can be a real treat too, as early versions get refined into sleeker and more elegant solutions.

This slimmed-down mechanical seven-segment display is a perfect example of that downsizing trend. When we saw [IndoorGeek]’s first vision of an electromechanical display, it was pretty chunky. Then as now, each segment is a 3D-printed piece with a magnet attached to the rear. The segments hover over solenoid coils, which when energized repel the magnet and protrude the segment, forming the desired digit. The old version used large, hand-wound coils, though, making the display pretty bulky front to back.

Version 2 of the display takes a page from [Carl Bugeja]’s playbook and replaces the wound coils with PCB coils. We’ve seen [Carl]’s coils on both rigid substrates and flex PCBs; [IndoorGeek] used plain old FR4 here. The coils occupy four layers so they have enough oomph to extend and retract each segment, and the PCB includes space for H-bridge drivers for each segment. The PCB forms the rear cover for the display, which is also considerably slimmed down for this version. What’s the same, though, is how good this display looks, especially with strong side-lighting — the shadows cast by the extended segments are striking against the plain white face of the display.

Congratulations to [IndoorGeek] on a great-looking build and a useful improvement over the original.

Continue reading “Mechanical Seven-Segment Display, Smaller And Better Than The Original”

DIY 8-Bit Computer Knows All The Tricks

Some projects are a rite of passage within their respected fields. For computer science, building one’s own computer from scratch is certainly among those projects. Of course, we’re not talking about buying components online and snapping together a modern x86 machine. We mean building something closer to a fully-programmable 8-bit computer from the ground up, like this one from [Federico] based on 74LS logic chips.

The computer was designed and built from scratch which is impressive enough, but [Federico] completed this project in about a month as well. It can be programmed manually through DIP switches or via a USB connection to another computer, and also includes an adjustable clock which can perform steps anywhere from 1 Hz to 32 kHz. Complete with a 1024 byte memory, a capable ALU, four seven-segment LEDs and (in the second version of the computer) a 2×16 LCD disply, this 8-bit computer has it all.

Not only is this a capable machine designed by someone who clearly knows his way around a logic chip, but [Federico] has also made the code and schematics available on his GitHub page. It’s worth a read even without building your own, but if you want to go that route without printing an enormous PCB you can always follow the breadboard route.

Thanks to [killergeek] for the tip!

Continue reading “DIY 8-Bit Computer Knows All The Tricks”

A Novel Micro Desktop Display For Your Raspberry Pi

Since its debut back in 2012 there have been a variety of inventive displays used with the Raspberry Pi. Perhaps you remember the repurposed Motorola phone docks, or you have one of those little displays that plugs into the expansion port. Inevitably the smaller options become disappointing as desktop displays, because while the advert triumphantly shows them sporting a Raspberry Pi OS desktop the reality is almost unusable. Until now.

Along comes [igbit] with a solution in the form of a little SPI display with a different approach to displaying a desktop. Instead of displaying a matchbox-sized desktop over the whole screen it divides into two halves. At the top is a representation of the desktop, while below it is a close-up on the area around the mouse pointer.

Unexpectedly its mode of operation is very accessible to the non-Linux guru, because it works through a Python script that takes screenshots of both areas and passes them as a composite to the display. An area the size of the magnified window is drawn around the mouse pointer, allowing it to be easily located on the tiny desktop. It relies on the main display being pushed to the HDMI output, so if the Pi is otherwise headless then its configuration has to be such that it forces HDMI use. The result isn’t something that would help you with the more demanding desktop tasks, but it provides a neat solution to being able to use a Pi desktop on a tiny screen.

Of course, in a pinch you can always use your mobile phone.