Type 1 diabetes remains a problem despite having an apparently simple solution: since T1D patients have lost the cells that produce insulin, it should be possible to transplant those cells into their bodies and restore normal function. Unfortunately, it’s not actually that simple, and it’s all thanks to the immune system, which would attack and destroy transplanted pancreas cells, whether from a donor or grown from the patient’s own stem cells.
That may be changing, though, at least if this implantable insulin-producing bioreactor proves successful. The device comes from MIT’s Department of Chemical Engineering, and like earlier implants, it relies on encapsulating islet cells, which are the insulin-producing cells within the pancreas, inside a semipermeable membrane. This allows the insulin they produce to diffuse out into the blood, and for glucose, which controls insulin production in islet cells, to diffuse in. The problem with this arrangement is that the resource-intensive islet cells are starved of oxygen inside their capsule, which is obviously a problem for the viability of the implant.
The solution: electrolysis. The O2-Macrodevice, as the implant is called, uses a tiny power-harvesting circuit to generate oxygen for the islet cells directly from the patient’s own interstitial water. The circuit applies a current across a proton-exchange membrane, which breaks water molecules into molecular oxygen for the islet cells. The hydrogen is said to diffuse harmlessly away; it seems like that might cause an acid-base imbalance locally, but there are plenty of metabolic pathways to take care of that sort of thing.
The implant looks promising; it kept the blood glucose levels of diabetic mice under control, while mice who received an implant with the oxygen-generating cell disabled started getting hyperglycemic after two weeks. What’s really intriguing is that the study authors seem to be thinking ahead to commercial production, since they show various methods for mass production of the cell chamber from standard 150-mm silicon wafers using photolithography.
Type 1 diabetics have been down the “artificial pancreas” road before, so a wait-and-see approach is clearly wise here. But it looks like treating diabetes less like a medical problem and more like an engineering problem might just pay dividends.
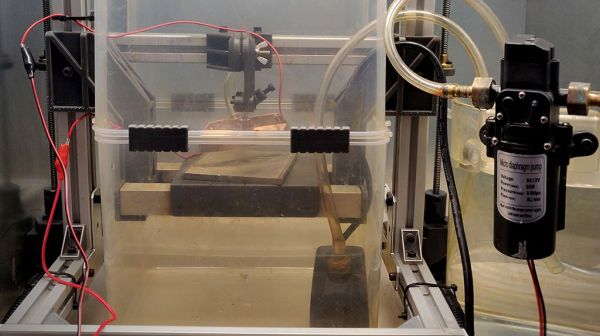
![Automated hydrogen generator setup, courtesy of [Hyperspace Pirate]'s dog drinking bowl.](https://hackaday.com/wp-content/uploads/2023/10/automated_hydrogen_generator_basics.jpg)
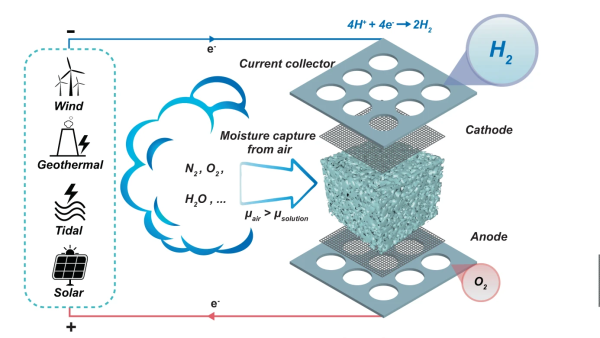

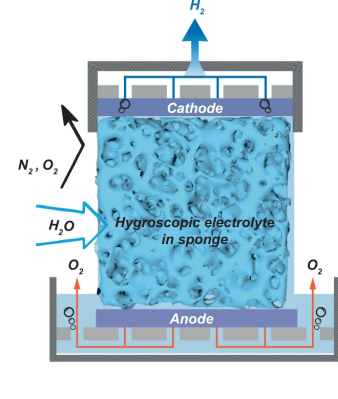 sponge fully covered both electrodes, so as the hygroscopic material extracted water from the air, the micro-channels in the structure filled up with liquid, with it touching both ends of the cell, forming the circuit and allowing the electrolysis to proceed.