Count Your Fans With This Stylish ESP8266 Display

Continuous self-affirmation is a vital component to the modern lifestyle. Of course you know the world loves you, but exactly how much do they love you? Checking your phone every few minutes to see if you’ve gained any followers is gauche, and perhaps more to the point, doesn’t let you show off when you’ve got visitors over. In the modern era, the up-and-coming social media star needs a stylish way to display just how popular they are for the world to see.

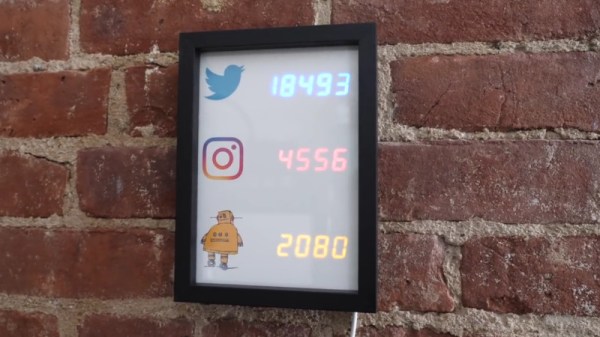
That’s the idea behind this very slick social media counter created by [Becky Stern]. Built into a standard shadow box frame and using LED displays glowing through a printed piece of paper, the finished product looks more like modern art than the usual hacker fare.

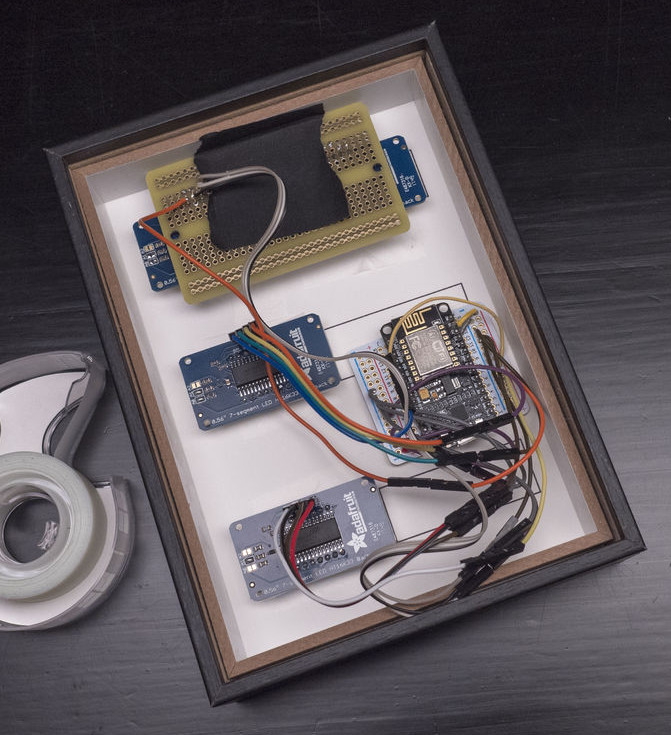
The counter is powered by a NodeMCU, but you could drop in your favorite variant of the ESP8266 and things would work more or less the same. For the displays, [Becky] is using four Adafruit 7-Segment LED modules, which are easily controlled via I2C which keeps the wiring to a minimum.

It’s interesting to note that since her follower count on Twitter has already hit five digits, two of the display modules are used next to each other for that particular service. Her Instructables and Instagram counters only have one display each however, limiting her counts on those services to 9,999 each. There’s probably something to be learned here in terms of the relative follower counts you can expect on the different social networks if you’re targeting your content to the hacker and maker crowd, but we’ll leave the analysis to those with a better handle on such matters.

Hardware aside, [Becky] spends a lot of time in the video talking about the code she’s come up with to pull her stats from the various services and push them out to the LED displays at a regular interval. It’s nice to see so much attention and explanation given to the software side of a project like this, as more often than not you’re left to your own to figure out what the source code is doing.

This project is quite similar to the YouTube Play Button hack we covered a few months back, but the addition of multiple social networks in one device is a nice improvement over the basic concept.

Continue reading “Count Your Fans With This Stylish ESP8266 Display”

Hacking A Sonoff WiFi Switch

The ESP8266 platform has become so popular that it isn’t just being used in hobby and one-off projects anymore. Companies like Sonoff are basing entire home automation product lines around the inexpensive WiFi card. What this means for most of us is that there’s now an easily hackable and readily available product on the market that’s easily reprogrammed and used with tools that we’ve known about for years now, as [Dan] shows in his latest project.

[Dan] has an aquaponics setup in his home, and needs some automation to run the lights. Reaching for a Sonoff was an easy way to get this done, but the out-of-the-box device can only be programmed in the simplest of ways. To get more control over the unit, he wired a USB-to-Serial UART to the female headers on the board and got to programming it.

The upgraded devices are fully programmable and customizable now, and this would be a great hack for anyone looking to get more out of a Sonoff switch. A lot of the work is already done, like building a safe enclosure, wiring it, and getting it to look halfway decent. All that needs to be done is a little bit of programming. Of course, if you’d like to roll out your own home automation setup from scratch that can do everything from opening the garage door to alerting you when your dog barks, that’s doable too. You’ll just need a little more hardware.

Router Rebooter Eliminates Hassles

Some low-end or older routers might get you a decent WiFi network in your house or apartment, but often these cheaply made devices are plagued with subtle software problems that cause the router itself to become unresponsive after a few days of operating. One solution is to just power cycle the router by hand whenever the Internet disappears, but a better solution is to build something that does that for you.

[Charlie] had this problem as the de facto IT person in his family, and didn’t want to keep getting bothered for such a simple problem. His solution involves a relay, an ESP8266, and a Wemos D1 mini. The device connects to the Internet through the router and occasionally sends out pings to another address. If it can’t ping the address successfully after a certain time period, the device power cycles the router by activating the relay.

Since this isn’t the newest idea out there, there are many ways to solve this problem if you are constantly annoyed by router issues, whether from your own router or from friends and family who treat you as their personal IT department. One solution doesn’t involve any extra hardware at all as long as you have a computer near your router/modem already, and others solve this problem when it happens to the modem rather than the router.

Continue reading “Router Rebooter Eliminates Hassles”

Alexa Controls This Projector Thanks To ESP8266

[jfessard] doesn’t have extra-sensory perception, but does have an ESP8266. The little board seems to pop up in every hack these days. Inspired by not wanting to get up from the bean-bag chair or leave the electronics-housing cabinet wide open to use an HDMI switcher, [jfessard] hacked together an Alexa-compatible projector control via the ESP8266!

The core functionality here is the ability to turn the projector on and off, and to switch the HDMI source. [jfessard] connected the Panasonic PT-AE3000U projector to a Monoprice HDX-401TA 4×1 HDMI switcher. Tucked away in the cabinet below the projector, it is controlled using a IR LED transmitter breakout board sitting at the end of a fairly long set of jumper wire. The projector control itself is through a RS232 interface.

To make this easy to use with Amazon’s Alexa, [jfessard] turned to some libraries for the ESP8266 D1 Mini. The fauxmoesp library makes it look like a WeMo device, and the IRemoteESP8266 library made remote control code cloning a snap. One really frustrating part of this hack was the MAX232-style breakout board; getting a board to work when it’s labelled backwards takes a bit of head-scratching to figure out.

If the the projector ever gets too noisy, we suggest this hack that shushes the machine. For the moment, we’d rather take another look at this laser projector that mimics a cool ‘laser sky’ effect.

Build An Excellent Coffee Roaster With A Satisfyingly Low Price Tag

There’s a lot of mysticism around coffee roasting, but in the end it couldn’t be simpler. Take a bunch of beans, heat them up evenly, and stop before they get burned. The rest is details.

And the same goes for coffee roasters. The most primitive roasting technique involves stirring the beans in a pan or wok to keep them from scorching on the bottom. This works great, but it doesn’t scale. Industrial drum roasters heat a rotating drum with ridges on the inside like a cement mixer to keep the beans in constant motion while they pass over a gas fire. Fluidized-bed roasters use a strong stream of heated air to whirl the beans around while roasting them evenly. But the bottom line is that a coffee roaster needs to agitate the beans over a controllable heat source so that they roast as evenly as possible.

My DIY coffee roaster gave up the ghost a few days ago and I immediately ordered the essential replacement part, a hot air popcorn popper, to avert a true crisis: no coffee! While I was rebuilding, I thought I’d take some pictures and share what I know about the subject. So if you’re interested in roasting coffee, making a popcorn popper into a roaster, or even just taking an inside look at a thoroughly value-engineered kitchen machine, read on!

Continue reading “Build An Excellent Coffee Roaster With A Satisfyingly Low Price Tag”

How Low Can An ESP8266 Go?

We’ve been tuned into coin cell designs lately given the coin cell challenge, so we were interested in [CNLohr]’s latest video about pushing the ESP8266 into the lowest-possible battery drain with coin cells. The result is a series of hacks, based on a reverse-engineered library and depends on a modified router, but that gets the power consumption down by more than a factor of ten!

Although the ESP8266 has a deep sleep mode that draws only 20 microamps or so, that isn’t as rosy as it seems. If you could go to sleep for a while, wake up for just a moment, send your data, and then go back to sleep, that might be one thing. But when you use conventional techniques, the device wakes up and has to do about ten seconds of work (at high power) to connect to a nearby access point. Then it can do what you want and go back to sleep. That ten-second hit is a killer on small batteries.

Since that’s all you can do with the standard libraries, the next step was to find [pvvx] who has reverse engineered a great deal of the libraries and provides a library with no WiFi capability. That’s a two-edged sword. The pro is you get a 30 ms startup from a deep sleep. The downside is — well — you don’t have WiFi.

Continue reading “How Low Can An ESP8266 Go?”

ESP8266 Beacon Announces Your Arrival

It used to be people were happy enough to just have to push a button in their car and have the garage door open. But pushing a button means you have to use your hands, like it’s a baby toy or something. We’re living in the 21st century, surely there must be a better way! Well, if you’ve got a home automation system setup and a spare ESP8266 laying around, [aderusha] may have your solution with MQTTCarPresence.

The theory of operation here is very clever. The ESP8266 is powered via the in-dash USB port, which turns on and off with the engine. When the engine is started, the ESP8266 is powered up and immediately connects to the WiFi network and pushes an MQTT message to Home Assistant. When Home Assistant gets the notification that the ESP8266 has connected, it opens the garage door.

When [aderusha] drives out of the garage and away from the house, the ESP8266 loses connection to the network, and Home Assistant closes the door. The same principle works when he comes home: as the car approaches the house it connects to the network and the garage door opens, and when the engine is shut off in the garage, the door closes again.

The hardware side of the setup is really just a WeMos D1 mini Pro board, though he’s added an external antenna to make sure the signal gets picked up when the vehicle is rolling up. He’s also designed a very slick 3D printed case to keep it all together in a neat little package.

We’ve covered automated entry systems based on the ESP8266 before, though usually the ESP stays at home. Be sure to check out the awesome series [Elliot Williams] has on the wonders of MQTT if you’re looking to setup your own automation system.