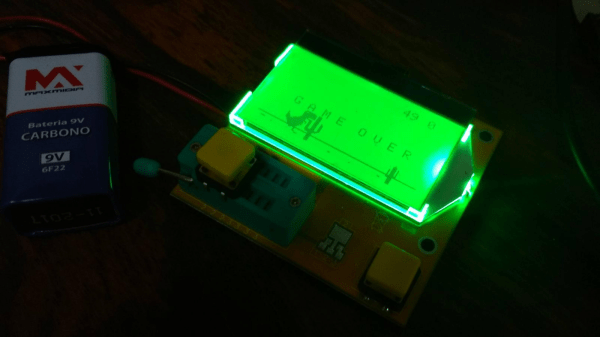
Tony The Pinball Wizard 3D Prints Full Sized Pinball Machine

[Tony] has designed and 3D printed a full-sized pinball machine and it’s absolutely incredible. And by 3D-printed, we mean 3D-printed! Even the spring for the plunger printed plastic.

The bumper design is particularly interesting. The magic happens with two rings of conductive filament. the bottom one is stationary while the top one is a multi material print with a flexible filament. When the ball runs into the bumper the top filament flexes and the lower rings contact. Awesome. Who wants to copy this over to a joystick or bump sensor for a robot first? Send us a tip!

The whole document can be read as a primer on pinball design. [Tony] starts by describing the history of pinball from the French courts to the modern day. He then works up from the play styles, rules, and common elements to the rationale for his design. It’s fascinating.

Then his guide gets to the technical details. The whole machine was designed in OpenSCAD. It took over 8.5 km of eighty different filaments fed through 1200+ hours of 3D printing time (not including failed prints) to complete. The electronics were hand laid out in a notebook, based around custom boards, parts, and two Arduinos that handle all the solenoids, scoring, and actuators. The theme is based around a favorite bowling alley and other landmarks.

It’s a labor of love for sure, and an inspiring build. You can catch a video of it in operation after the break.

SNES EPROM Programmer With Arduino

Most video game manufacturers aren’t too keen on homebrew games, or people trying to get more utility out of a video game system than it was designed to have. While some effort is made to keep people from slapping a modchip on an Xbox or from running an emulator for a Playstation, it’s almost completely impossible to stop some of the hardware hacking that is common on older cartridge-based games. The only limit is usually the cost of an EPROM programmer, but [Robson] has that covered now with his Arduino-based SNES EPROM programmer.

Normally this type of hack involves finding any cartridge for the SNES at the lowest possible value, burning an EPROM with the game that you really want, and then swapping the new programmed memory with the one in the worthless cartridge. Even though most programmers are pricey, it’s actually not that difficult to write bits to this type of memory. [Robson] runs us through all of the steps to get an Arduino set up to program these types of memory, and then puts it all together into a Super Nintendo where it looks exactly like the real thing.

If you don’t have an SNES lying around, it’s possible to perform a similar end-around on a Sega Genesis as well. And, if you’re more youthful than those of us that grew up in the 16-bit era, there’s a pretty decent homebrew community that has sprung up around the Nintendo DS and 3DS, too.

Thanks to [Rafael] for the tip!

Navigation Thing: Four Days, Three Problems, And Fake Piezos

The Navigation Thing was designed and built by [Jan Mrázek] as part of a night game activity for high school students during week-long seminar. A night-time path through a forest had stations with simple tasks, and the Navigation Thing used GPS, digital compass, a beeper, and a ring of RGB LEDs to provide a bit of “Wow factor” while guiding a group of students from one station to the next. The devices had a clear design direction:

“I wanted to build a device which a participant would find, insert batteries, and follow the beeping to find the next stop. Imagine the strong feeling of straying in the middle of the night in an unknown terrain far away from civilization trusting only a beeping thing you found. That was the feeling I wanted to achieve.”

The Navigation Things (there are six in total) guide users to fixed waypoints with GPS, a digital compass, and a ring of WS2812 LEDs — but the primary means of feedback to the user is a beeping that gets faster as you approach the destination. [Jan] had only four days to make all six units, which was doable. But as most of us know, delivering on a tight deadline is often less about doing the work you know about, and more about effectively handling the unexpected obstacles that inevitably pop up in the process.

Continue reading “Navigation Thing: Four Days, Three Problems, And Fake Piezos”

Turning Broken Toy Into Laser Target Practice

[Mathieu] wrote in with his laser target practice game. It’s not the most amazing hack in the history of hackery, but it’s an excellent example of the type of simple and fun things you can do with just a little bit of microcontrollering.

Flasergun8irst off, the gun is a broken toy gun that used to shoot something other than red collimated light beams. The Arduino knockoff inside reacts to a trigger pull and fires the laser for around 200 milliseconds. The gun also has a “gas gauge” that fills up with repeated shots and cools down over time. And therein lies the game — a simple race to ten, where each player only has a fixed number of shots over time.

The targets are simply a light sensor, scorekeeping LED display, and a buzzer that builds tension by beeping at you as the countdown timer ticks down. The bodies are made out of 3D-printed corners that connect some of [Mathieu]’s excess wooden goat-cheese lids.

All the code is up on GitHub so you can make your own with stuff that you’ve got lying around the house. The “gun” can be anything that you can embed a laser in that makes it aimable. Good clean fun!

It’s A Clock! It’s A Puzzle! It’s The GoonieBox!

[Dr.Duino] recently completed the latest piece of what he calls “Interactive Furniture” – the GoonieBox. It took over 800 hours of design and assembly work and the result is fascinating. Part clock and part puzzle box, it’s loaded with symbols, moving parts, lights, riddles, sounds, switches, and locked compartments. It practically begs visitors to take a closer look.

The concept of Interactive Furniture led [Dr.Duino] to want to create a unique piece of decor that visitors could interact with. That alone wasn’t enough — he wanted something that wouldn’t require any explanation of how it worked; something that intrinsically invited attention, inspection, and exploration. This quest led to creating The GoonieBox, named for its twin inspirations of the 1985 film The Goonies as well as puzzles from the game “The Room“.

Embedded below are two short videos: the first demonstrates the functions of the box, and the second covers the build process. There’s laser-cut wood, plenty of 3D printed parts, and a whole lot of careful planning and testing.

Continue reading “It’s A Clock! It’s A Puzzle! It’s The GoonieBox!”

Arcade Button Pressing Game

When every month brings out a fresh console blockbuster game that breaks new boundaries of cinematic immersion in its gameplay, it’s easy to forget that sometimes the simplest of game interfaces can be rewarding.

Hele Norges Knapp” (“All of Norway’s Button”), is a good example. As you might expect, it’s a button, a large arcade-style one, and the gameplay is simple. Press the button as many times as you can in 30 seconds. It’s a project from Norwegian Creations, and it was produced as a promotion that toured the country for one of Norway’s debit card payment systems.

The blog post and video is frustratingly light on hardware or software details, and their is nothing about it in their GitHub presence. But they tell us that at its heart is a Teensy 3.2 with an audio board, driving the big 7-segment displays for the scoreboard and the WS2801 LED lighting.

The button itself is Adafruit’s 100mm Massive Arcade Button, and given that it was pressed over a million times by eager Norwegians it would seem this project has proved its robustness.

The video below the break has details of construction and of the game in action, and there is another far more corporate promotional video on Facebook featuring a host of Bright Young People honing their button action in a sun-kissed Norway that looks almost tropical. The game itself does look as though it could be an amusing diversion in the same vein as those fairground strength tests.

Continue reading “Arcade Button Pressing Game”

Open Source SNES To USB Converter Lets You Emulate Legally

[Andrew Milkovich] was inspired build his own Super Nintendo cartridge reader based on a device we covered an eternity (in internet years) ago. The device mounts a real cartridge as a USB mass storage device, allowing you to play your games using an emulator directly from the cart.

This uses a Teensy++ 2.0  at its core. [Andrew] had to desolder the EEPROM pins from the SNES cartridge and reverse engineer the pinouts himself, but the end result was a device that could successfully read the cartridge without erasing it, no small accomplishment. The finished cartridge reader is build on some protoboard and we’d like to complement [Andrew] on his jumper routing on the underside of that board.

Of course, the experience of any console is just not the same without the original controller. So [Andrew] went a step further and made his own SNES controller to USB converter. This had the venerable Atmel ATmega328 at its core, and can be used separate from the cartridge reader if desired.