Classic Triumph Gets A Modern Digital Dash

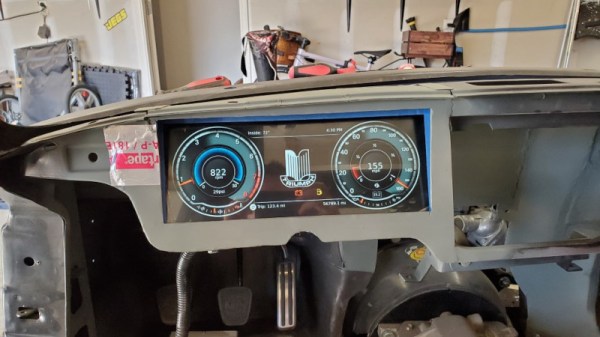
Analog gauges gave way to all manner of fancy electroluminescent and LED gauges in the ’80s, but the trend didn’t last long. It’s only in the last decade or so that LCD digital gauges have really started to take off in premium cars. [Josh] is putting a modern engine and drivetrain into his classic Triumph GT6, and realised that he’d have to scrap the classic mechanical gauge setup. After not falling in love with anything off the shelf, he decided to whip up his own solution from scratch.

The heart of the build is a Raspberry Pi 4, which interfaces with the car’s modern aftermarket ECU via CANBUS thanks to the PiCAN3 add-on board. Analog sensors, such as those for oil pressure and coolant temperature, are interfaced with a Teensy 4.0 microcontroller which has the analog to digital converters necessary to do the job. Display is via a 12.3″ super-wide LCD sourced off Aliexpress, with the graphics generated by custom PixiJS code running in Chromium under X.

The result is comparable with digital displays in many other modern automobiles, speaking to [Josh]’s abilities not just as a programmer but a graphic designer, too. As a bonus, if he gets sick of the design, it’s trivial to change the graphics without having to dig into the car’s actual hardware.

Gauge upgrades are common on restomod projects; another route taken is to convert classical mechanical gauges to electronic drive. If you’re cooking up your own sweet set of gauges in the garage, be sure to drop us a line! Video after the break.

Continue reading “Classic Triumph Gets A Modern Digital Dash”

V12 Corvette Gets Electronic Gauge Mod

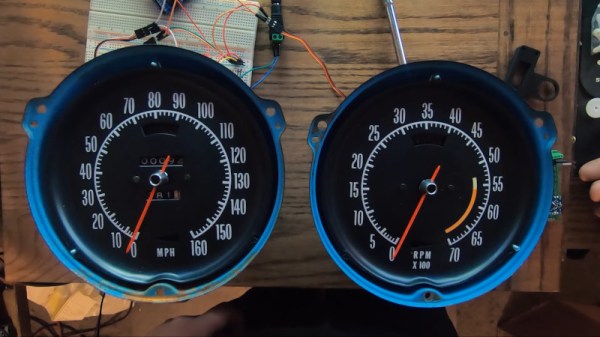
[Wesley Kagan] is building a Corvette with a V12 engine swap. Much of the driveline will be entirely replaced, which means the components to drive the mechanical speedometer and tachometer will no longer be present in the final car. Instead, [Wesley] came up with his own electronic gauge conversion to do the job.

It’s a build that respects the original aesthetic of the car, reusing the original gauges but driving them differently. In place of the original mechanical drives from the transmission and distributor respectively, the speedometer and tach instead get servos installed in the back with a 3D printed gear train. The odometer gets its own continuous rotation servo, too. An Arduino Nano is used to drive the servos, using data from a GPS module and the car’s ignition system.

Files are available for anyone wishing to 3D print parts to modify their own gauges. We can’t wait to see how the gauges look when finally installed. We can imagine some teething problems with slew rate or update speed, but we’re sure it’s nothing [Wesley] can’t engineer out with a few revisions. Custom gauges are something we’ve seen a few times around these parts; this digital setup is particularly useful for engine data. Video after the break.

Continue reading “V12 Corvette Gets Electronic Gauge Mod”

Turbo Subaru Gets DIY Gauges

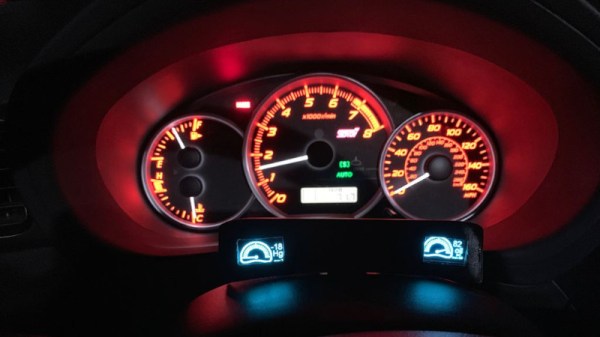
For the average motorist, the speedometer and the fuel indicator are the primary gauges of interest. Owners of performance or modified cars tend to like having more information on the way the car is running. [JustinN1] is firmly in that camp, and built some WiFi-enabled gauges for his Subaru WRX STi.

The gauges run on the ESP32 platform, chosen for its WiFi hardware and its ease of use with the Arduino platform. This makes programming a snap, and interfacing to a smartphone easy. OLED displays were chosen for their good visibility in both day and night conditions, which is important for automotive applications.

[JustinN1] developed both a boost/vacuum gauge and an oil pressure gauge, both useful for keeping an eye on what the engine is doing. Measuring boost is as simple as using an off-the-shelf analog air pressure sensor. The oil pressure sensor is a resistive part, and must is hooked up through a resistor divider to create an analog voltage for the ESP32 to read.

Code is on Github, and there’s even a version that displays a grinning face when you get into higher boost levels. There are also a series of housings to suit various mounting choices, to help give the gauges a more finished look. We’ve seen other gauge builds too, like this gear indicator for a Suzuki motorcycle. Video after the break.

Continue reading “Turbo Subaru Gets DIY Gauges”

Old Nixie Display Rides Again As 3D-Printer Filament Meter

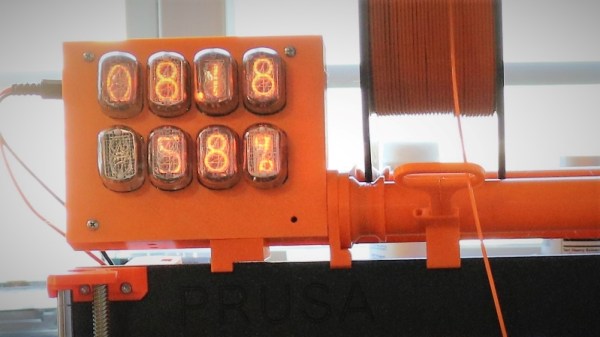
We’re not sure about the name of this Nixie tube filament meter that [Scott M. Baker] built. He calls it a “filadometer”, perhaps a portmanteau of “filament” and “odometer”, in which case it makes sense. It may not flow trippingly from the tongue and we can’t come up with anything better, but whatever moniker you use it’s actually a pretty cool build.

The filadometer started life as something completely different and utterly typical for Nixie tube projects – a temperature and humidity gauge. [Scott] decided to recycle the eight-tube display to keep track of his Prusa, and in doing so he reveals a pretty remarkable degree of forethought in his design process. The original Nixie display has all the usual trappings – the driver chips, the shift registers, and the high voltage power supply. What stands out is the modularity of his design: the tube sockets and drivers live on a backplane PCB, with a Raspberry Pi and a separate HV supply board plugging into it. The original display had a Model B Pi, so there was plenty of room for a new Zero W. A new printed case and a little programming to capture the filament use from Octoprint is all it took to put this nifty little build back in action. The video below shows the details.

We’re always excited to see new videos from [Scott] because we learn so much from looking over his virtual shoulder. If you haven’t checked out his stuff, take a look at his homage to the 8″ floppy or his dual-port memory hack for retro gaming.

Continue reading “Old Nixie Display Rides Again As 3D-Printer Filament Meter”

Adding Upgrades To A Stock Motorcycle

In today’s world of over-the-air firmware upgrades in everything from cars to phones to refrigerators, it’s common for manufacturers of various things to lock out features in software and force you to pay for the upgrades. Even if the hardware is the same across all the models, you can still be on the hook if you want to unlock anything extra. And, it seems as though Suzuki might be following this trend as well, as [Sebastian] found out when he opened up his 2011 Vstrom motorcycle.

The main feature that was lacking on this bike was a gear indicator. Even though all the hardware was available in the gearbox, and the ECU was able to know the current gear in use, there was no indicator on the gauge cluster. By using an Arduino paired with an OBD reading tool (even motorcycles make use of OBD these days), [Sebastian] was able to wire an LED ring into the gauge cluster to show the current gear while he’s riding.

The build is very professionally done and is so well blended into the gauge cluster that even we had a hard time spotting it at first. While this feature might require some additional lighting on the gauge cluster for Suzuki to be able to offer this feature, we have seen other “missing” features in devices that could be unlocked with a laughably small amount of effort.

Continue reading “Adding Upgrades To A Stock Motorcycle”

Changing Color Under Pressure

When you saw the picture for this article, did you think of a peacock’s feather? These fibers are not harvested from birds, and in fact, the colors come from transparent rubber. As with peacock feathers, they come from the way light reflects off layers of differing materials, this is known as optical interference, and it is the same effect seen on oil slicks. The benefit to using transparent rubber is that the final product is flexible and when drawn, the interference shifts. In short, they change color when stretched.

Most of the sensors we see and feature are electromechanical, which has the drawback that we cannot read them without some form of interface. Something like a microcontroller, gauge, or a slew of 555 timers. Reading a single strain gauge on a torque wrench is not too tricky, but simultaneously reading a dozen gauges spread across a more complex machine such as a quadcopter will probably require graphing software to generate a heat map. With this innovation it could now be done with an on-board camera in real-time. Couple that with machine learning and perhaps you could launch Skynet. Or build a better copter.

The current proof-of-concept weaves the fibers into next-generation bandages to give an intuitive sense of how tightly a dressing should be applied. For the average first-aid responder, the rule is being able to slide a finger between the fabric and skin. That’s an easy indicator, but it only works after the fact whereas saying that the dressing should be orange while wrapping gives constant feedback.

Old School Gauges Let You Know Which Way The Wind Blows

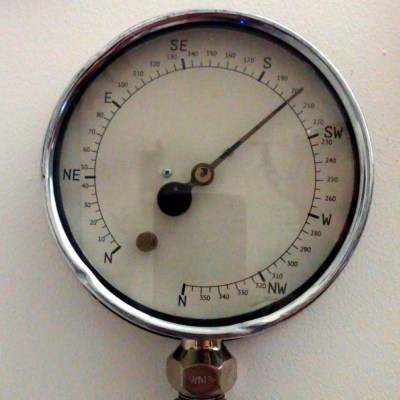
When your passion is a sport that depends on Mother Nature’s cooperation, you need to keep a close eye on weather conditions. With this in mind, and not one to let work distract him from an opportunity to play, [mechanicalsquid] decided to build a wind-monitoring gauge with an old-school look to let him know when the wind is right for kitesurfing.

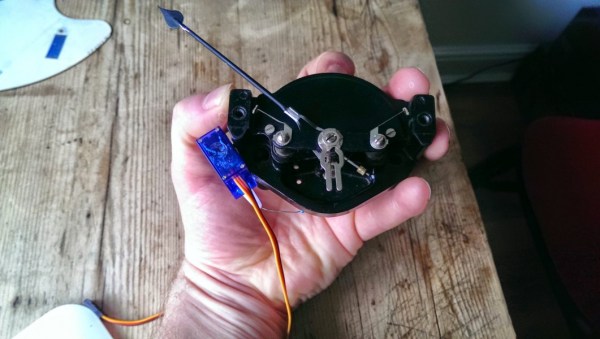
old-school-meter-for-windBeing an aficionado of big engineering helped [mechanicalsquid] come up with a style for his gauge – big old dials and meters. We hesitate to apply the “steampunk” label to every project that retasks old technology, but it sure looks like a couple of the gauges he used could have been for steam, so the moniker probably fits here. Weather data for favorite kitesurfing and windsurfing locales is scraped from the web and applied to the gauges to indicates wind speed and direction. [mechanicalsquid] made a valiant effort to drive the voltmeter coil directly from the Raspberry Pi, but it was not to be. Servos proved inaccurate, so steppers do the job of moving the needles on both gauges. Check out the nicely detailed build log for this one, too.

For more weather station fun be sure to check out this meter-based weather station with a slightly more modern look. And for another build in the steampunk style, this vintage meter and Nixie power display is sure to impress.