LiPo Replacement Keeps Portable Scanner In The Action

If there’s anything people hate more than being locked into a printer manufacturer’s replacement cartridges, it’s proprietary batteries. Cordless power tools are the obvious example in this space, but there are other devices that insist on crappy battery packs that are expensive to replace when they eventually die.

One such device is the Uniden Bearcat BC296D portable scanner that [Robert Guildig] found for a song at a thrift store, which he recently gave a custom LiPo battery upgrade. It came equipped with a nickel-cadmium battery pack, which even under the best of circumstances has a very limited battery life. Using regular AA batteries wasn’t an option, but luckily the space vacated by the OEM battery pack left a lot of room for mods. Those include a small module with BMS functions and a DC-DC converter, a 2,400 mAh 4.2 V LiPo pillow pack, and a new barrel connector for charging. With the BMS set for six volts and connected right to the old battery pack socket, the scanner can now run for seven hours on a one-hour charge. As a bonus, the LiPo pack should last a few times longer than the NiCd packs, and be pretty cheap to replace when it finally goes too. There’s a video after the hop with all the details.

If you’re looking at a similar battery replacement project, you might want to check out [Arya]’s guide to everything you need to know about lithium-ion circuitry.

Continue reading “LiPo Replacement Keeps Portable Scanner In The Action”

2023 Cyberdeck Contest: A Toddler’s Cyberdeck

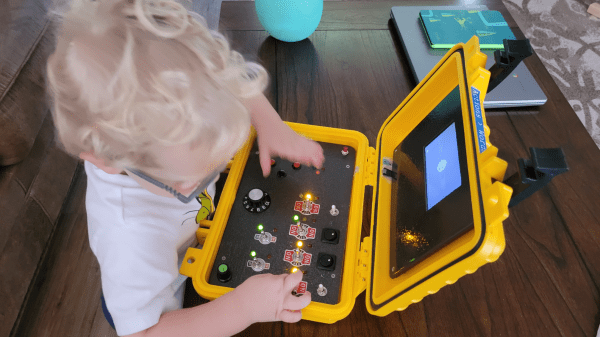
[Josh] has a child and what do children like more than stuffing random things into their mouths? Pushing buttons, twiddling knobs, and yanking things of course! So [Josh] did what any self-respecting hacker would do and built his little man a custom cyberdeck.

The build follows the usual route of some electronics wedged into a pelican-style waterproof case — which is a good choice for this particular owner — a repurposed all-in-one LCD video player in the lid and a bunch of switches in the base. The player is apparently a V100-base SBC the likes of which are used in shops for those annoying looping promotional videos, but it doesn’t really matter if all it’s doing is being a focus point.

There is no connection from the base to the ‘display’ but that doesn’t matter here. The base is the fun part, with lots of old-school toggle switches and rotary knobs to play with and a load of LEDs to flash in mysterious ways. The guts of this are controlled via an Arduino Mega 2560, with copious amounts of hot glue on display in true hacker style. On the coding side of things, [Josh] used ChatGPT to produce the code from his prompting and Wokwi  to simulate it before deployment to the hardware.

Portable 1990s POS Will Strain Your Back

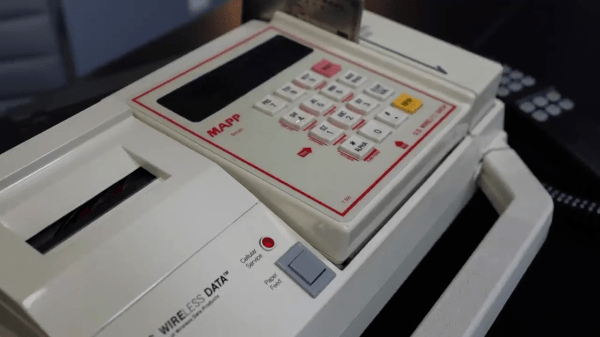
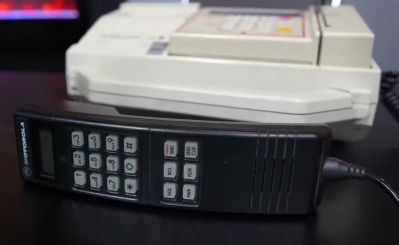
[JR] over at [Tech Throwback] got ahold of an unusual piece of gear recently — a portable Point of Sale (POS) credit card machine from the late 1990s (video, embedded below the break ). Today these machines can be just a small accessory that works in conjunction with your smart phone, but only the most dedicated merchants would lug this behemoth around. The unit is basically a Motorola bag phone, a credit card scanner, a receipt printer, a lead-acid battery, and a couple of PCBs crammed into a custom carrying case

Handset Detail

Despite having a lot of documentation, [JR] struggles to find any information on this U.S. Wireless POS-50. He finds that the credit card scanner is an Omron CAT-95 authorization terminal, and the Motorola SCN-2397B phone appears to come from the Soft-PAK series.

He is able to power it up, but can’t do much with is because he is missing the authorization password. But regardless, with the demise of the Advanced Mobile Phone System for over a decade, this 850 MHz band analog phone can’t connect to the network anymore.

If you happen to know anything about this old POS, or used a similar luggable system for accepting credit cards in the 1990s, let us know in the comments below.

Continue reading “Portable 1990s POS Will Strain Your Back”

An ESP32 Dev Board As A Framework Laptop Module

The Framework laptop will no doubt already have caught the eye of more than one Hackaday reader, as a machine designed for upgrade and expansion by its users. One of its key features is a system of expansion modules. The modules are USB-C devices in a form factor that slides into the expansion bays on the Framework Laptop. Framework encourages the development of new modules, which is something [Spacehuhn] has taken on with an ESP32-S3 development board.

The board itself is what you’d expect, the ESP is joined by a multicolor LED and one of those Stemma/Quiik connectors for expansion. The case is handily provided by Framework themselves, and all the files for the ESP32 module can be found in a GitHub repository. We’re guessing it will find application in experimenting with WiFi networks rather than as a standalone microcontroller. Either way, it shows the route for any Framework owners into making their own add-ons. Take a look, we’ve placed the video below the break.

As you might expect we’ve given a lot of coverage to the Framework laptop since its launch, in particular, our colleague [Arya Voronova] is a fan and has shown us many alternative uses for the parts.

Continue reading “An ESP32 Dev Board As A Framework Laptop Module”

Mechanical Keyboard As Travel Saxophone

Those who play larger musical instruments, things like drums, piano, harp, tuba, upright bass, or Zeusaphone, know well the challenges of simply transporting their chosen instrument to band practice, a symphony hall, or local watering hole. Even those playing more manageably-sized instruments may have similar troubles at some point especially when traveling where luggage space is at a premium like on an airplane. That’s why [jcard0na] built this electronic saxophone, designed to be as small as possible.

Known as the “haxophone”, the musical instrument eschews the vibrating column of air typical of woodwind instruments in favor of an electronic substitute. Based around the Raspberry Pi, the device consists of a custom HAT with a number of mechanical keyboard switches arrayed in a way close enough to the layout of a standard saxophone that saxophonists will be able to intuitively and easily play. Two pieces of software run on the Pi to replicate the musical instrument, one that detects the player’s breaths and key presses, and another that synthesizes this information into sound.

While [jcard0na] notes that this will never replicate the depth and feel of a real instrument, it does accomplish its design goal of being much more easily transportable than all but the most soprano of true saxophones. As a musical project it’s an excellent example of good design as well, much like this set of electronic drums with a similar design goal of portability.

A 12" LCD screen sits between speakers (on lower half of bezel) and joycon controllers are attached on the upper half of the bezel.

Portable Monitor Extension For Nintendo Switch

Handheld consoles are always a tradeoff between portability and screen real estate. [Pavlo Khmel] felt that the Nintendo Switch erred too much on the side of portability, and built an extension to embiggen his Switch. (YouTube)

[Khmel] repurposed a Dell XPS 12 LCD panel for the heart of this hack and attached it to an LCD controller board to serve as an external monitor for the Switch. A 3D printed enclosure envelops the screen and also contains a battery, speakers, and a dock for the console. Along the top edges, metal rails let you slide in the official Joy-Cons or any number of third party controllers, even those that require a power connection from the Switch.

Since the Switch sees this as being docked, it allows the console to run faster and at higher resolution than if it were in handheld mode. The extension lasts about 5 hours on battery power, and the Switch inside will still be fully charged if you don’t mind being constrained to its small screen while you charge it’s bigger-screened exoskeleton.

Need more portable goodness? Be sure to check out our other handheld and Nintendo Switch hacks.

Continue reading “Portable Monitor Extension For Nintendo Switch”

Sketch of a Tandy TRS-80 Model 100 with Arduino Mega 2560

TRS-80 Model 100 Gets Arduino Heart Transplant

When [Stephen Cass] found himself with a broken Tandy TRS-80 Model 100 portable computer, the simplest solution was to buy another broken one and make one working computer from two non-working computers. However, this left him with a dilemma — what to do with the (now even more) broken one left over?

LCD layout is unusual by modern standard, but optimized for fast updates

Naturally, he did what a lot of us would do and used modern hardware to interface with the original parts that still work. In this case it meant replacing the motherboard with an Arduino Mega 2560.

Luckily, the Model 100 has a substantial fanbase and there’s a lot of helpful information available online, including the detailed service manual, that helped [Stephen] to understand how to drive the unusual display.  The LCD has a resolution of 240×64 pixels, which are broken down into eight zones of 50×32 pixels, and two zones of 40×42 pixels.  Each zone is then further divided into four banks, eight pixels tall, so that each column of eight pixels corresponds to a single byte.

Every one of the ten zones is controlled by an individual HD44102 driver IC, connected to a 30-bit wide bus for selecting the correct chip, bank and column.

With the Arduino handling the data, the old LCD still needed a -5 V supply for contrast and an RC filter to smooth out the PWM signal [Stephen] is using to adjust the viewing angle.

With the new interface, [Stephen] is able to access all of the pixels on the original display, and to use modern graphics libraries such as displayio. With the display issue solved, he intends to use a separate Teensy 4.1 to connect with the keyboard matrix and provide a VT100 terminal interface.

Schematic of the HD44102 driver circuit

Upcycling old, broken hardware can be a lot of fun and is always educational.  Understanding why certain design decisions were made at a time when the engineering trade-offs were different can lead to insights that are directly relevant to modern designs when resources get tight. In this case, the quirky LCD drivers were a response to making the display of text as efficient as possible, so as not to overburden the processor.

The TRS-80 computers are ripe for hacking, with their “built-for-service” designs, and we’ve featured a few in the past.  Some have replaced the motherboard with something newer, like [Stephen], whereas others have also replaced the display, or connected them to the cellphone network.

Have you found new ways to get old hardware working? Tell us in the comments below or send us a message on the Hackaday tips line.

Thanks to [nb0x0308] for the tip!