DIY Scientific Calculator Powered By Pi Zero

It’s the eternal question hackers face: do you built it, or do you buy it? The low cost and high availability of electronic gadgets means we increasingly take the latter option. Especially since it often ends up that building your own version will cost more than just buying a commercial product; and that’s before you factor in the time you’ll spend working on it.
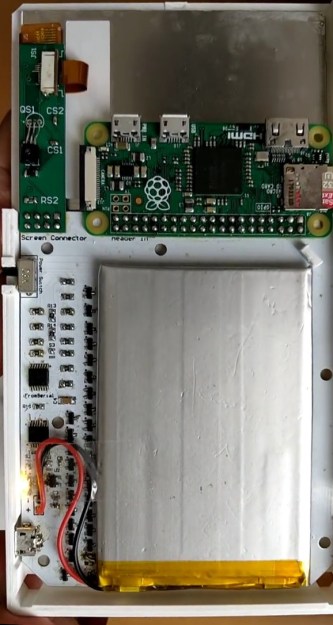
But such concerns clearly don’t phase [Andrea Cavalli]. Sure he could just buy a scientific calculator, but it wouldn’t really be his scientific calculator. Instead, he’s taking the scenic route and building his own scientific calculator from scratch. The case is 3D printed, the PCB is custom, and even the software is his own creation.

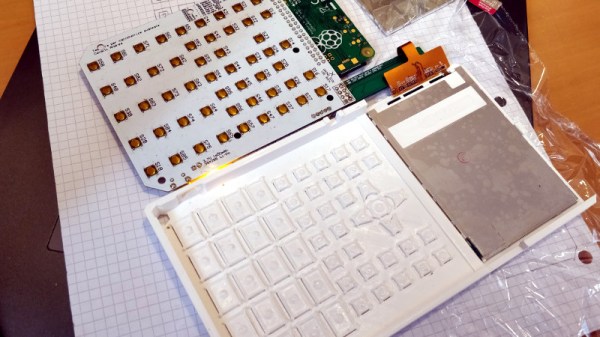
His PCB hooks right up to the GPIO pins of the internal Raspberry Pi Zero, making interfacing with the dome switch keyboard very easy. The board also holds the power management hardware for the device, including the physical power switch, USB connection for charging, and TPS79942DDCR linear regulator.

The case, including the buttons, is entirely 3D printed. At this point the buttons don’t actually have any labels on them, which presumably makes the calculator more than a little challenging to use, but no doubt [Andrea] is working on that for a later revision of the hardware. A particularly nice detail is the hatch to access the Pi’s micro SD card, making it easy to update the software or completely switch operating systems without having to take the calculator apart.

After the kernel messages scroll by, the Pi boots right into the Java calculator environment. This gives the user a fairly standard scientific calculator experience, complete with nice touches like variable highlighting. The Mario mini-game probably isn’t strictly required, but if you’re writing the code for your own calculator you can do whatever you want.

Here at Hackaday we’ve seen a calculator that got a Raspberry Pi upgrade, a classic scientific calculator emulated with an Arduino, and of course we’ve raved about the NumWorks open source graphing calculator. Even with such stiff competition, we think this project is well on its way to being one of the most impressive calculators we’ve ever come across.

Continue reading “DIY Scientific Calculator Powered By Pi Zero”

Shooting For The First Time With Help From A Raspberry Pi

Like many people, [Mike] has a list of things he wants to do in life. One of them is “fire a gun with a switch,” and with a little help from some hacker friends, he knocked this item off last weekend.

For those wondering why the specificity of the item, the backstory will help explain. [Mike] has spinal muscular atrophy, a disease that was supposed to end his life shortly after it began. Thirty-seven years later, [Mike] is still ticking items off his list, but since he only has voluntary control of his right eyebrow, he faces challenges getting some of them done. Enter [Bill] and the crew at ATMakers. The “AT” stands for “assistive technologies,” and [Bill] took on the task of building a rig to safely fire a Glock 17 upon [Mike]’s command.

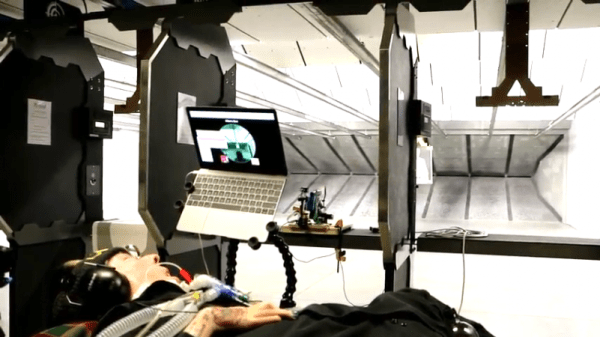
Before even beginning the project, [Bill] did his due diligence, going so far as to consult the Bureau of Alcohol, Tobacco, and Firearms (ATF) and arranging for private time at a local indoor gun range. The business end of the rig is a commercially available bench rest designed to control recoil from the pistol, which is fired by a servo connected to the trigger. The interface with [Mike]’s system is via a Raspberry Pi and a Crikit linked together by a custom PCB. A PiCam allowed [Mike] to look down the sights and fire the gun with his eyebrow. The videos below show the development process and the day at the range; to say that [Mike] was pleased is an understatement.

We’re not sure what else is on [Mike]’s list, but we see a lot of assistive tech projects around here — we even had a whole category of the 2017 Hackaday Prize devoted to them. Maybe there’s something else the Hackaday community can help him check off.

Continue reading “Shooting For The First Time With Help From A Raspberry Pi”

Laser Draws Weather Report

Have you ever wished that a laser could tell you the weather? If you have, then [tuckershannon] has you covered. He’s created a machine that uses a laser and some UV sensitive paper to draw the temperature and a weather icon! And that’s not all! It’s connected to the internet, so it can also show the time and print out messages.

Building on [tuckershannon]’s previous work with glow-in-the-dark drawing, the brains inside this machine is a Raspberry Pi Zero. The laser itself is a 5mw, 405nm laser pointer with the button zip-tied down. Two 28BYJ-48 stepper motors are used to orient the laser, one for the rotation and another for the height angle. Each stepper motor is connected to a motor driver board and then wired directly to the Pi.

The base and arm that holds the laser were designed in SolidWorks and then 3d printed. The stepper motors are mounted perpendicular to one another and then the laser pointer mounted at the end. The batteries have been removed from the laser and the terminals are also wired directly to the raspberry pi. The Pi is then connected to Alexa via IFTTT so that it can be controlled by voice from anywhere.

The real beauty of [tucker]’s laser drawing machine is that is will draw out the temperature and weather icon, as well as drawing the time in either digital or analog forms! We’ve seen [tuckershannon]’s work before. The precursors to this project were his clock which uses a robotic arm with a UV LED on it to draw the time and another clock which uses similar robotic arm only with a laser attached. Let’s hope we get to see the rest of [tucker]’s progress!

Continue reading “Laser Draws Weather Report”

Location Sharing With Google Home

With Google’s near-monopoly on the internet, it can be difficult to get around in cyberspace without encountering at least some aspect of this monolithic, data-gathering giant. It usually takes a concerted effort, but it is technically possible to do. While [Mat] is still using some Google products, he has at least figured out a way to get Google Home to work with location data without actually sharing that data with Google, which is a step in the right direction.

[Mat]’s goal was to use Google’s location sharing features through Google Home, but without the creepiness factor of Google knowing everything about his life, and also without the hassle of having to use Google Maps. He’s using a few things to pull this off, including a NodeRED server running on a Raspberry Pi Zero, a free account from If This Then That (IFTTT), Tasker with AutoRemote plugin, and the Google Maps API key. With all of that put together, and some configuration of IFTTT he can ask his Google assistant (or Google Home) for location data, all without sharing that data with Google.

This project is a great implementation of Google’s tools and a powerful use of IFTTT. And, as a bonus, it gets around some of the creepiness factor that Google tends to incorporate in their quest to know all the data.

Continue reading “Location Sharing With Google Home”

Polaroid Gets Thermal Printer And Raspberry Pi

Despite what you may have read in the comments, we here at Hackaday are not unaware that there’s something of a “Pi Fatigue” brewing. Similar to how “Arduino” was once a dirty word around these parts, projects that are built around the world’s most popular Linux SBC are occasionally getting dismissed as lazy. Hacker crams Raspberry Pi into an old electronic device, applies hot glue liberally, posts a gallery on Imgur, and boom! Lather, rinse, repeat.

We only mention this because the following project, despite featuring the Raspberry Pi Zero grafted into a vintage Polaroid camera, is anything but lazy. In the impeccably detailed and photographed write-up, [mitxela] explains how the Pi Zero and a thermal camera recreated the classic Polaroid experience of going from shutter button to physical picture in seconds. The workmanship and attention to detail on this build is simply phenomenal, and should quell any doubts our Dear Readers may have about Raspberry Pi projects. For now, anyway.

The video after the break will show you the modded camera in operation and goes over a few highlights of the build, but for this one you really should take the time to read the entire process start to finish. [mitxela] starts off by disassembling the Polaroid camera, complete with plenty of fantastic pictures that show how this legendary piece of consumer electronics was put together. If you’ve never seen the inside of one of these cameras, you might be surprised to see what kind of interesting hardware is lurking underneath that rather unassuming exterior. From the screw-less construction to the circuits with paper substrate, a lot of fascinating engineering went into getting this camera to a mass-market price. Frankly, the teardown alone is worth checking out.

But once the camera has been stripped down to the bare frame, the real fun begins. At the conceptual level, [mitxela] replaces the camera optics with a cheap webcam, the “brains” with a Raspberry Pi Zero, and the film mechanism with the type of thermal printer used for receipts. But how he got it all connected is why this project is so impressive. Nearly every decision made during the design and construction of this camera was for the purposes of reducing boot-time. Nobody wants a camera that takes 30, 15, or even 10 seconds to boot. It has to be available as soon as you need it.

Getting this Linux-powered camera boot up in as little as 2 seconds took a lot of clever software hacks that you’ll absolutely want to check out if you’ve ever considered building an embedded Linux device. You can’t just throw a stock Raspbian image on an SD card and hope for the best. [mitxela] used buildroot to craft a custom Linux image containing only what was needed for the camera to operate, plus a bunch of esoteric tweaks that the Junior Penguin Wrangler would likely never consider. Like shaving a full second off of the boot time by disabling dumping kernel messages to the serial port during startup.

[mitxela] brought his camera to show off at the recent Hackaday London meetup, but it was far from the first time we’ve come across his handiwork. From his servo-powered music box earlier this year to his penchant for tiny MIDI devices, he’s consistently impressed our cold robot hearts.

Continue reading “Polaroid Gets Thermal Printer And Raspberry Pi”

Raspberry Pi Zero Drives Tiny RC Truck

We’re not sure which is more fun – putting together a little RC truck with parts laying around on your workbench, or driving it around through a Linux terminal. We’ll take the easy road and say they’re both equally fun. [technodict] had some spare time on his hands and decided to build such a truck.

He started off with a great little chassis that can act as the base for many projects. Powering the four motors is a cheap little dual H bridge motor driver and a couple rechargeable batteries. But the neatest part of this build is that it’s controlled using a little bit of python and driven directly from a terminal, made possible by the Raspberry Pi Zero of course.

With Raspberry Pi Zero now having built in WiFi and Bluetooth – we should see a lot more projects popping up with one at its heart. Be sure to visit [technodict’s] blog for full source and details. And let us know how you could use that little chassis for your next mobile project!

A Dreamcast VMU With A Secret

Since the Raspberry Pi range of boards first appeared back in 2012, we’ve seen them cleverly integrated into a host of inventive form factors. Today we bring you the latest offering in this space, [Kite]’s Raspberry Pi Zero W installed in the case of a Sega Dreamcast VMU. The result is a particularly nicely executed build in which the Pi with a few of its more bulky components removed or replaced with low-profile alternatives sits on the opposite side of a custom PCB from a small LCD display.

The PCB contains the relevant buttons, audio, and power supply circuitry, and when installed in a VMU shell makes for a truly professional quality tiny handheld console. In a particularly nice touch the Pi’s USB connectivity is brought out alongside the SD card on the end of the Zero, under the cap that would have originally protected the VMU’s connector. Some minimal paring away of Sega plastic was required but the case is surprisingly unmodified, and there is plenty of space for a decent-sized battery.

The VMU, or Visual Memory Unit, makes an interesting choice for an enclosure, because it is a relic of one of console gaming’s dead ends. It was the memory card for Sega’s last foray into the console market, the Dreamcast, and unlike those of its competitors it formed a tiny handheld console in its own right. Small games for the VMU platform were bundled with full titles, and there was a simple multiplayer  system in which VMUs could be linked together. Sadly the Dreamcast lost the console war of the late 1990s and early 2000s to Sony’s PlayStation 2, but it remains a console of note.

VMUs are not the most common of gaming survivors, but we’ve shown you one or two projects using them. There was an iPod conversion back in 2010, and much more recently some mind-blowing reverse engineering and emulation on the original VMU hardware.

Thanks [Giles Burgess] for the tip.