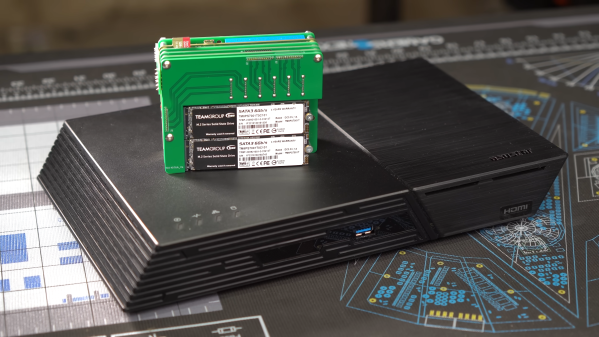
This CRT-Style Pi Portable Gets All The Details Right

A quick glance at the “Pi Terminal” built by [Salim Benbouziyane], and you might think he pulled an old CRT monitor out of a video editing bay and gutted it. Which, of course, is the point. But what you’re actually looking at is a completely new construction, featuring a fully 3D printed enclosure, a clever PCB control panel, and some very slick internal engineering.

[Salim] started the design by recreating the principle components of the build, namely the 8 inch 4:3 IPS LCD panel and Raspberry Pi 4, digitally in CAD. This let him design the enclosure around the parts, rather than trying to cram everything in after the fact. After printing the case, which clearly took considerable inspiration from broadcast video monitors of the early 2000s, he then painstakingly post-processed the parts using tips and techniques picked up from prop builders. To really finish things off, he designed his control panel as a PCB so he could have it professionally fabricated, and used heat set inserts to hold everything tight. Continue reading “This CRT-Style Pi Portable Gets All The Details Right”

Raspberry Pi Weather Station Features Wireless Sensor Nodes

Online weather services are great for providing generic area forecasts, but they don’t provide hyperlocal data specific to your location. [Harald Kreuzer] needed both and built a Raspberry Pi Weather Station that provides weather forecasts for the next 7 days as well as readings from local sensors. The project is completely open source and based on a Raspberry Pi base station which connects to ESP32 based sensor nodes and online services to nicely present the data on a 7″ touch screen display.

The architecture is quite straightforward. The ESP32 based sensor nodes publish their readings to an MQTT broker running on the Raspberry Pi. The Pi subscribes to these sensor node topics to pick up the relevant sensor data. This makes it easy to add additional sensor nodes in future. Weather forecast data is collected by connecting to the OpenWeatherMap API. All of the collected information is then displayed through an app built using the Kivy: open source Python app development framework. Continue reading “Raspberry Pi Weather Station Features Wireless Sensor Nodes”

Old 3D CAD Mouse Gets New Lease Of Life

[Jacek Fedorynski] had an old Magellan/SpaceMouse 3D mouse with a serial interface which made it impossible for him to use with modern hardware and software. The problem he faced was two pronged – the absence of serial interfaces in the hardware and the lack of appropriate drivers for the operating system. So he built a low cost, simple adapter to use his RS-232 Magellan/SpaceMouse with modern software.

The hardware required to build the adapter was minimal. A Raspberry Pi Pico, a MAX3238 based RS-232 adapter, a null modem adapter and a DB9 gender changer. Of course, a combination null modem – gender changer would have made things even simpler. Four of the GPIO pins from the Pico are mapped to the serial RX, TX, RTS and CTS pins.

On the software side, the code emulates a 3DConnexion SpaceMouse Compact, so it can be used with software like Fusion 360, 3ds Max, SolidWorks, Inventor, Maya and many others. On the host computer, only the standard 3DxWare driver package is needed. On the host computer, the old Magellan/SpaceMouse 3D will appear like a modern SpaceMouse Compact connected over USB. The only downside to this is that the SpaceMouse Compact has just two programmable buttons, so only two of the many buttons on the old Magellan mouse can be mapped.

Flashing the code to the Pico is also straightforward using the BOOTSEL mode. Hold down the BOOTSEL button when plugging in the Pico and it appears as a drive onto which you can drag a new UF2 file. Just drag-n-drop [Jacek]’s magellan.uf2 firmware and you’re done.

If you’d rather build your own, modern 3D mouse, check out the DIY Cad Mouse You Can Actually Build.

Laptop connected via Ethernet to Raspberry Pi-based secure radio device with antenna

Secure LoRa Mesh Communication Network

The Internet has allowed us to communicate more easily than ever before, and thanks to modern cell-phone networks, we don’t even have to be tied down to a hard line anymore. But what if you want something a little more direct? Maybe you’re in an area with no cell-phone coverage, or you don’t want to use public networks for whatever reason. For those cases, you might be interested in this Secure Communication Network project by [Thomas].

By leveraging the plug-and-play qualities of the Raspberry Pi 4 and the Adafruit LoRa Radio Bonnet, [Thomas] has been able to focus on the software side of this system that really turns these parts into something useful.

Window showing secure text communications
Messages are tagged as “authenticated” when a shared hashing code is included in the message

Rather than a simple point-to-point radio link, a mesh network is built up of any transceivers in range, extending the maximum distance a message can be sent, and building in resilience in case a node goes down. Each node is connected to a PC via Ethernet, and messages are distributed via a “controlled flooding” algorithm that aims to reduce unnecessary network congestion from the blind re-transmission of messages that have already been received.

Security is handled via RSA encryption with 256-byte public/private keys and additional SHA256 hashes for authentication.

The packet-size available through the LoRa device is limited to 256 bytes, of which 80 bytes are reserved for headers. To make matters worse, the remaining 176 bytes must contain encrypted data, which is almost always more lengthy than the raw message it represents. Because of this, longer messages are fragmented by the software, with the fragments sent out individually and re-assembled at the receiving end.

If you’re in need of a decentralized secure radio communications system, then there’s a lot to like about the project that [Thomas] has documented on his Hackaday.io page. He even includes an STL file for a 3D printed case. If you need to send more than text, then this Voice-over-LoRa Mesh Network project may be more your style.

An Unexpected Amiga Network Interface

The retrocomputer enthusiast has increasingly to grapple with not only runaway computer prices but the astronomical cost of vintage peripherals. A welcome solution in some cases comes from the Raspberry Pi, which has proved itself fast enough to emulate those add-ons for a lot less outlay. A good one comes from [Niklas Ekström], who’s made a Pi-based network adapter for the Commodore Amiga 1200. Better still it doesn’t hog the main expansion port or the PCMCIA slot, instead it sits on the 1200’s rarely-used real-time-clock port. Software wise it uses an updated version of his earlier project for the Amiga 500. It provides access to the Pi command prompt, as well as a SANA driver and a mounted filesystem.

While many of us view the Amiga from 2023 as a retro gaming platform, for those of us who used it at the time it was a desktop productivity machine on a more affordable budget than the Macintosh. At the time the thought of having a UNIX-like operating system running on a super-powerful co-processor in your Amiga would have been beyond our wildest dreams, but whether it provides enough now to make a 1992 machine compete on the desktop is debatable. Who wants to run Firefox from the Pi in an X server on the Amiga?

Building A NAS That Really Looks Like A NAS

Building your own network attached storage (NAS) for personal use isn’t all that difficult. A single board computer, a hard disk and a power supply in an enclosure is all the hardware you need. Then, choose from one of several open source NAS software solutions and you’re up and running. [tobychui] decided to notch things up by designing a NAS that really looks like a NAS. It’s tailored to his specific requirements and looks like a professional product to boot. The design features dual 3.5 inch HDD bays, a small footprint, is low cost, compatible with a variety of single board computers, and can handle high data transfer speeds by using RAM and SD card for buffering.

Not only has he done a great job with the hardware design, but he’s also developed a companion software for the NAS. “ArozOS” is a web desktop operating system that provides full-fledged desktop experience within a browser. ArozOS has a great user interface and features a lot of networking, file, disk management and security functions. He has also developed a launcher application to enable over-the-air (OTA) software updates.

Assembling the device will need some planning and preparation, even though most of the hardware is off the shelf. You will need a SATA to USB 2.0 adapter, a SBC (Orange Pi Zero, Raspberry Pi 4, Orange Pi Zero 2, etc) , three buck converters — one each to provide 12 V to the two hard disks and a third to provide 5 V to the SBC. You’ll also need a 12 V / 6 A or 24 V / 3 A external power brick, or a USB-C 65 W GaN charger with a triggering module to set the desired voltage and current.

There is also one custom power distribution board which is essentially a carrier board to mount the buck converters and connectors for power and USB data. For the 3D prints, [tobychui] recommends printing at the highest resolution for a nice finish.

The off the shelf SATA to USB adapter will need to be taken apart before it can be fixed to the 3D printed SATA adapter plate and might pose the most challenge during construction, but the rest of the assembly is fairly straightforward. Once assembly is complete, [tobychui] walks you through installation of the ArozOZ software, mounting the drives and making them accessible over the network.

Have you got your data backup act in order ? If not, it’s still not too late to make it a new Year’s resolution. And if you need help figuring things out, check out New Year Habits – What Do You Do For Data Storage?

Continue reading “Building A NAS That Really Looks Like A NAS”

Developing An Open Source Bike Computer

While bicycles appear to have standardized around a relatively common shape and size, parts for these bikes are another story entirely. It seems as though most reputable bike manufacturers are currently racing against each other to see who can include the most planned obsolescence and force their customers to upgrade even when their old bikes might otherwise be perfectly fine. Luckily, the magic of open source components could solve some of this issue, and this open-source bike computer is something you’ll never have to worry about being forced to upgrade.

The build is based around a Raspberry Pi Zero in order to keep it compact, and it uses a small 2.7 inch LCD screen to display some common information about the current bike ride, including location, speed, and power input from the pedals. It also includes some I2C sensors including pressure and temperature as well as an accelerometer. The system can also be configured to display a map of the current ride as well thanks to the GPS equipment housed inside. It keeps a log in a .fit file format as well so that all rides can be archived.

When compared against a commercial offering it seems to hold up pretty well, and we especially like that it’s not behind a walled garden like other products which could, at any point, decide to charge for map upgrades (or not offer them at all). It’s a little more work to set up, of course, but worth it in the end. It might also be a good idea to pair it with other open source bicycle components as well.

Thanks to [Richard] for the tip!