Pac Man Clock

Pac-Man Clock Eats Time, Not Pellets

[Bob’s] Pac-Man clock is sure to appeal to the retro geek inside of us all. With a tiny display for the time, it’s clear that this project is more about the art piece than it is about keeping the time. Pac-Man periodically opens and closes his mouth at random intervals. The EL wire adds a nice glowing touch as well.

The project runs off of a Teensy 2.0. It’s a small and inexpensive microcontroller that’s compatible with Arduino. The Teensy uses an external real-time clock module to keep accurate time. It also connects to a seven segment display board via Serial. This kept the wiring simple and made the display easy to mount. The last major component is the servo. It’s just a standard servo, mounted to a customized 3D printed mounting bracket. When the servo rotates in one direction the mouth opens, and visa versa. The frame is also outlined with blue EL wire, giving that classic Pac-Man look a little something extra.

The physical clock itself is made almost entirely from wood. [Bob] is clearly a skilled wood worker as evidenced in the build video below. The Pac-Man and ghosts are all cut on a scroll saw, although [Bob] mentions that he would have 3D printed them if his printer was large enough. Many of the components are hot glued together. The electronics are also hot glued in place. This is often a convenient mounting solution because it’s relatively strong but only semi-permanent.

[Bob] mentions that he can’t have the EL wire and the servo running at the same time. If he tries this, the Teensy ends up “running haywire” after a few minutes. He’s looking for suggestions, so if you have one be sure to leave a comment. Continue reading “Pac-Man Clock Eats Time, Not Pellets”

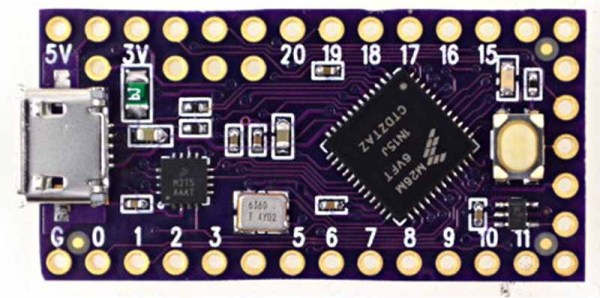
The Teensy LC. LC Means Low Cost.

For one reason or another, we’ve been seeing a lot of builds featuring the Teensy 3.1 filtering in on the tip line recently. In retrospect, it’s somewhat obvious; it’s a good board that’s cheap and fast. Yes, somehow [Paul] hit all three in the good/cheap/fast mutually exclusive triumvirate.

Now, there’s a new Teensy. It’s the Teensy LC – Low Cost. It’s not as powerful as the Teensy 3.1, but it does give you the power of an ARM for something that’s just about as cheap as a board with an ATMega.

The chip [Paul] chose for the Teensy LC is the Freescale MKL26Z64 (datasheet here and 876-page reference manual here. PDFs of course). This is a 32-bit Cortex-M0+ running at 48 MHz with 64k of Flash and 8k of RAM. There are 27 digital I/O pins on this one, and the Teensy LC has been designed to be pin-compatible with the Teensy 3.0 and 3.1.

On board are 13 analog inputs, 8 PWM outputs, on 12-bit DAC output, three serial ports, two SPI ports, and two I2C ports. Most of the pins can drive 5mA with a few capable of driving 20mA, and there is a single 5v output pin for driving WS2812 Neopixel LEDs.

Since this is a cut-down version of the Teensy, everything available on the Teensy 3.1 just can’t fit into the BOM of the Teensy LC. The pins aren’t 5V tolerant, there’s no CAN bus, and there are only 4 DMA channels instead of 16 on the Teensy 3.1. Still, it’s a great ARM answer to the ATMega Trinket or other small dev boards.

REFLOW CHÂTEAU

[Will] had a few reasons for turning a toaster oven into a reflow oven – he needed a project for an ECE lab, the lab’s current reflow oven was terrible, and the man is trying to keep [Will] down by not allowing toaster ovens in dorm rooms. What was born out of necessity actually turned into a great project – a reflow oven with touchscreen controls.

The toaster oven used for this build is a model [Will] picked up at Sears. It’s actually pretty unique, advertised as a ‘digital toaster’. This isn’t marketing speak – there’s actually a thermistor in there, and the stock toaster is closed loop. After disassembling the toaster and getting rid of the guts, [Will] whipped up a PCB for a Teensy 3.1 and the Adafruit capacative touch shield.

With the Teensy and touch screen, [Will] came up with an interface that looks ten times better than anything you would find on a Chinese auction site. It’s a great build, and since it’s kept in the electronics lab, will certainly see a lot of use.

Using HID Tricks To Drop Malicious Files

[Nikhil] has been experimenting with human interface devices (HID) in relation to security. We’ve seen in the past how HID can be exploited using inexpensive equipment. [Nikhil] has built his own simple device to drop malicious files onto target computers using HID technology.

The system runs on a Teensy 3.0. The Teensy is like a very small version of Arduino that has built-in functionality for emulating human interface devices, such as keyboards. This means that you can trick a computer into believing the Teensy is a keyboard. The computer will treat it as such, and the Teensy can enter keystrokes into the computer as though it were a human typing them. You can see how this might be a security problem.

[Nikhil’s] device uses a very simple trick to install files on a target machine. It simply opens up Powershell and runs a one-liner command. Generally, this commend will create a file based on input received from a web site controlled by the attacker. The script might download a trojan virus, or it might create a shortcut on the user’s desktop which will run a malicious script. The device can also create hot keys that will run a specific script every time the user presses that key.

Protecting from this type off attack can be difficult. Your primary option would be to strictly control USB devices, but this can be difficult to manage, especially in large organizations. Web filtering would also help in this specific case, since the attack relies on downloading files from the web. Your best bet might be to train users to not plug in any old USB device they find lying around. Regardless of the methodology, it’s important to know that this stuff is out there in the wild.

Using RC Transmitters With Flight Simulators

It’s winter, and that means terrible weather and very few days where flying RC planes and helicopters is tolerable. [sjtrny] has been spending the season with RC flight simulators for some practice time. He had been using an old Xbox 360 controller, but that was really unsuitable for proper RC simulation – a much better solution would be to use his normal RC transmitter as a computer peripheral.

The usual way of using an RC transmitter with a computer is to buy a USB simulator adapter that emulates a USB game pad through a port on the transmitter. Buying one of these adapters would mean a week of waiting for shipping, so [sjtrny] did the logical thing and made his own.

Normally, a USB simulator adapter plugs in to a 3.5mm jack on the transmitter used for a ‘buddy box’, but [sjtrny] had an extra receiver sitting around. Since a receiver simply outputs signals to servos, this provides a vastly simpler interface for an Arduino to listen in on. After connecting the rudder, elevator, aileron, and throttle signals on the receiver to an Arduino, a simple bit of code and the UnoJoy library allows any Arduino and RC receiver to become a USB joystick.

[sjtrny] went through a second iteration of hardware for this project with a Teensy 3.1. This version has higher resolution on the joystick axes, and the layout of the code isn’t slightly terrible. It’s a great project for all the RC pilots out there that can’t get a break in the weather, and is also a great use for a spare receiver you might have sitting around.

BLDC Controller With The Teensy 3.1

[Will] is on the electric vehicle team at Duke, and this year they’re trying to finally beat a high school team. This year they’re going all out with a monocoque carbon fiber body, and since [Will] is on the electronics team, he’s trying his best by building a new brushless DC motor controller.

Last year, a rule change required the Duke team to build a custom controller, and this time around they’re refining their earlier controller by making it smaller and putting a more beginner-friendly microcontroller on board. Last years used an STM32, but this time around they’re using a Teensy 3.1. The driver itself is a TI DRV8301, a somewhat magical 3 phase 2A gate driver.

The most efficient strategy of driving a motor is to pulse the throttle a little bit and coast the rest of the time. It’s the strategy most of the other teams in the competition use, but this driver is over-engineered by a large margin. [Will] put up a video of the motor controller in action, you can check that out below.

Continue reading “BLDC Controller With The Teensy 3.1”

phone controller

Breathe New Life Into Payphones With Asterisk

Payphones used to be found on just about every street corner. They were a convenience, now replaced by the ubiquitous mobile phone. These machines were the stomping grounds for many early computer hackers, and as a result hold a place in hacker history. If you’ve ever wanted to re-live the good ol’ days, [hharte’s] project might be for you.

[hharte] has been working to make these old payphones useful again with some custom hardware and software. The project intends to be an interface between a payphone and an Asterisk PBX system. On the hardware side, the controller board is capable of switching various high voltage signals required for coin-line signaling. The controller uses a Teensy microcontroller to detect the hook status as well as to control the relays. The current firmware features are very basic, but functional.

[hharte] also wrote a custom AGI script for Asterisk. This script allows Asterisk to detect the 1700hz and 2200hz tones transmitted when coins are placed into the machine. The script is also in an early stage, but it will prompt for money and then place the call once 25 cents has been deposited. All of the schematics and code can be found on the project’s github page.

[Thanks mies]