A Web API For Your Pi

There are many ways to attach a project to the Internet, and a plethora of Internet-based services that can handle talking to hardware. But probably the most ubiquitous of Internet protocols for the average Joe or Jane is the web browser, and one of the most accessible of programming environments lies within it. If only somebody with a bit of HTML and Javascript could reach a GPIO pin on their Raspberry Pi!
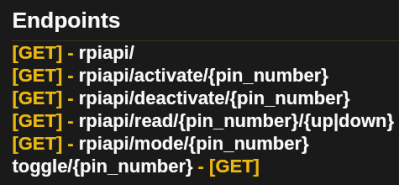
If that’s your wish, then help could be at hand in the form of [Victor Ribeiro]’s RPiAPI. As its name suggests, it’s an API for your Raspberry Pi, and in particular it provides a simple web-accessible endpoint wrapper for the Pi’s GPIO library from which its expansion port pins can be accessed. By crafting a simple path on the address of the Pi’s web server each pin can be read or written to, which while it’s neither the fastest or most accomplished hardware interface for the platform, could make it one of the easiest to access.

Security comes courtesy of Apache password protected directories via .htaccess files, so users would be well-advised to consider the implications of connecting this to a public IP address very carefully. But for non experts in security it still has the potential to make a very useful tool in the armoury of ways to control hardware from the little single board computer. It’s not the first try at this idea as we’ve seen a PHP example early in the Pi’s lifetime as well as one relying upon MySQL, but it does seem to be a simpler option than the others.

This Word Clock Has Dirty Alphanumeric Mouth

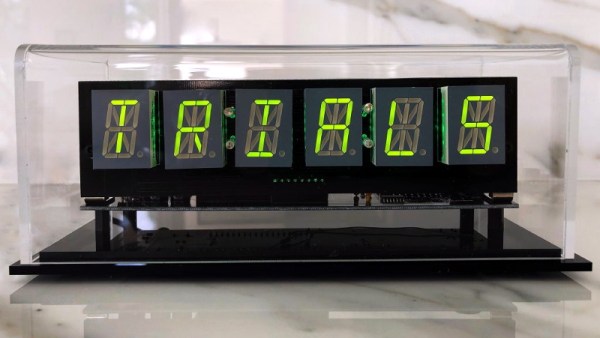
Clocks which use words to tell the time in place of numbers are an increasingly popular hacker project, but we have to admit that before seeing this gorgeous clock from [Mitch Feig], we didn’t realize how badly we wanted to see one that could curse like a sailor.

But don’t worry, the WordClock-1 knows more than just the bad words. Rather than using an array of illuminated letters as we’ve seen in previous clocks, this one uses six alphanumeric LED displays. So not only can it display the time expressed with words and numbers, but it can show pretty much any other text you might have in mind.

[Mitch] is partial to having his clock toss a swear word on the display every few seconds, but perhaps you’d rather have it show some Klingon vocabulary to help you brush up. The lack of extended characters does limit its language capabilities somewhat, but it still manages to include Spanish, Italian, French, and Croatian libraries.

The ESP32 powered clock comes as a kit, and [Mitch] has provided some very thorough documentation that should make assembling it fairly straightforward as long as you don’t mind tackling a few SMD components. Additional word databases are stored on an SD card, and you can easily add your own or edit the existing ones with nothing more exotic than a text editor. The clock itself is configured via a web interface, and includes features like RGB LED effects and support for pulling the time down from an external GPS receiver.

Of course, if you’re content with what we can apparently now refer to as “old style” word clocks, we’ve seen plenty of projects which should serve as inspiration for anyone looking to roll their own textual timepiece.

Continue reading “This Word Clock Has Dirty Alphanumeric Mouth”

Homekit Compatible Sonoff Firmware Without A Bridge

Generally speaking, home automation isn’t as cheap or as easy as most people would like. There are too many incompatible protocols, and more often than not, getting everything talking requires you to begrudgingly sign up for some “cloud” service that you didn’t ask for. If you’re an Apple aficionado, there can be even more hoops to jump through; getting your unsupported smart home devices working with that Cupertino designed ecosystem often involves running your own HomeKit bridge.

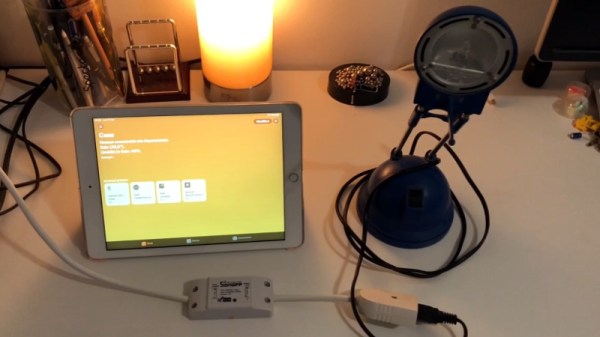
To try and simplify things, [Michele Gruppioni] has developed a firmware for the ubiquitous Sonoff WIFI Smart Switch that allows it to speak native HomeKit. No more using a Raspberry Pi to act as a mediator between your fancy Apple hardware and that stack of $4 Sonoff’s from AliExpress, they can now talk to each other directly. In the video after the break you can see that the iPad identifies the switch as unofficial device, but since it’s compliant with the HomeKit API, that doesn’t prevent them from talking to each other.

Not only will this MIT licensed firmware get your Sonoff Basic, Sonoff Slampher, or Sonoff S26 talking with your Apple gadgets, but it also provides a web interface and REST API so it retains compatibility with whatever else you might be running in your home automation setup. So while the more pedestrian users of your system might be turning the porch light on with their iPhones, you can still fire it up with a Bash script as nature intended.

Of course, if you don’t mind adding a Raspberry Pi bridge to the growing collection of devices on your network, we’ve got plenty of other HomeKit-enabled projects for you to take a look at.

Continue reading “Homekit Compatible Sonoff Firmware Without A Bridge”

Stepping Up Your Python Printf Debugging Game

Debuggers come in all shapes and sizes, offering a variety of options to track down your software problems and inspecting internal states at any given time. Yet some developers have a hard time breaking the habit of simply adding print statements into their code instead, performing manual work their tools could do for them. We say, to each their own — the best tools won’t be of much help if they are out of your comfort zone or work against your natural flow. Sometimes, a retrospective analysis using your custom-tailored debug output is just what you need to tackle an issue.

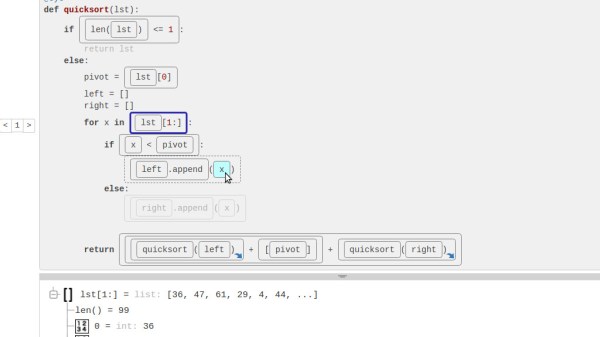
If the last part sounds familiar and your language of choice happens to be Python, [Alex Hall] created the Bird’s Eye Python debugger that records every expression inside a function and displays them interactively in a web browser. Every result, both partial and completed, and every value can then be inspected at any point inside each individual function call, turning this debugger into an educational tool along the way.

With a little bit of tweaking, the web interface can be made remote accessible, and for example, analyze code running on a Raspberry Pi. However, taking it further and using Bird’s Eye with MicroPython or CircuitPython would require more than just a little bit of tweaking, assuming there will be enough memory for it. Although it wouldn’t be first time that someone got creative and ran Python on a memory limited microcontroller.

Web Matrix Control Proves Power Of ESP8266

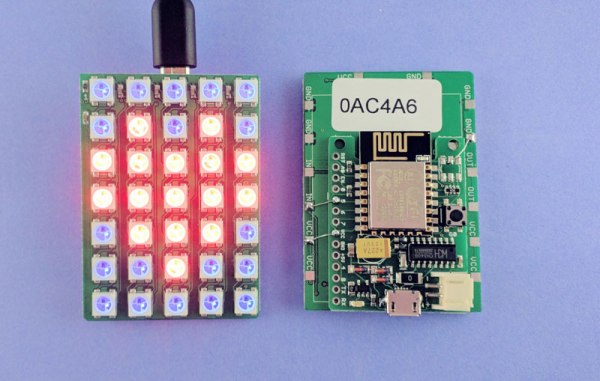
LED matrix projects are all over the place, but this one is interesting for its simplicity: it’s an LED matrix that is driven straight from an ESP8266 board. [Ray] put it together as a quick project for his students to teach the basics of LED programming.

It’s built using a WS2812 LED matrix board he designed himself and his own ESPToy ESP8266 dev board. But the gist of the hardware is simply an ESP8266 and some WS2812’s. Where this gets interesting is with the user interaction side of things. The ESP makes WiFi and web serving easy, and [Ray] has build a simple HTTP GET API into the firmware. This is a great combination for the web dashboard and JavaScript-based animation programs [Ray] is demonstrating in the video below.

Just get on the same network and load up the module’s WiFi address for a graphical representation of the 5×7 LED matrix. Pick a color, turn pixels on or off, or choose a predefined pattern and send it to the hardware. This is a powerful way to get use input and with this as a guide it’s fast to set up for pretty much an application you can think of. Just work your way through the documents he put together for the workshop (Zip file link), including all of the code and the slides he used to run the workshop.

Continue reading “Web Matrix Control Proves Power Of ESP8266”

Thermostat

Custom Raspberry Pi Thermostat Controller

Thermostats can be a pain. They often only look at one sensor in a multi-room home and then set the temperature based on that. The result is one room that’s comfortable and other rooms that are not. Plus, you generally have to get up off the couch to change the temperature. In this day and age, who wants to do that? You could buy an off-the-shelf solution, but sometimes hacking up your own custom hardware is just so much more fun.

[redditseph] did exactly that by modifying his home thermostat to be controlled by a Raspberry Pi. The temperature is controlled by a simple web interface that runs on the Pi. This way, [redditseph] can change the temperature from any room in his home using a computer or smart phone. He also built multi-sensor functionality into his design. This means that the Pi can take readings from multiple rooms in the home and use this data to make more intelligent decisions about how to change the temperature.

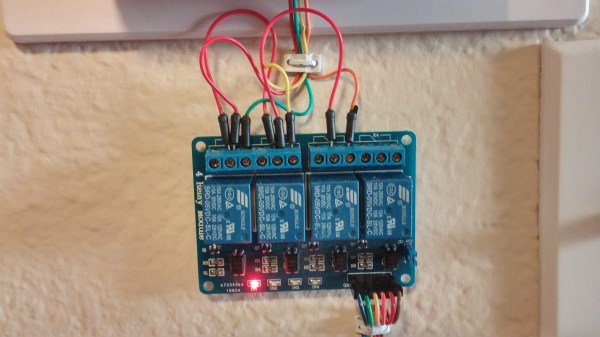
The Pi needed a way to actually talk to the thermostat. [redditseph] made this work with a relay module. The Pi flips one side of the relays, which then in turn switches the buttons that came built into the thermostat. The Pi is basically just emulating a human pressing buttons. His thermostat had terminal blocks inside, so [redditseph] didn’t have to risk damaging it by soldering anything to it. The end result is a functional design that has a sort of cyberpunk look to it.

[via Reddit]

Web Interface For The FRAM LaunchPad

webUILaunchpad The Internet of Things is here in full force. The first step when adding to the Internet of Things is obvious, adding a web interface to your project. [Jaspreet] wrote in to tell us about his project that adds a web interface to his MSP430 based project, making it easy to add any project to the internet of things.

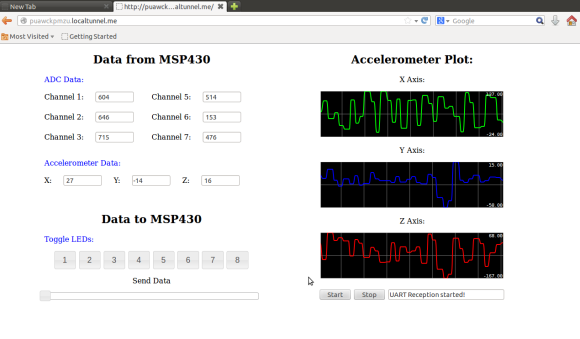
Creating a web interface can be a bit overwhelming if you have never done it before. This project makes it easy by using a dedicated computer running Linux to handle all of the web related tasks. The LaunchPad simply interfaces with the computer using USB and Python, and the computer hosts the webpage and updates it in real time using Node.js. The result is a very professional looking interface with an impressively responsive display that can control the on-board LEDs, read analog values from the integrated ADC, and stream accelerometer data. Be sure to see it in action after the break!

We could see this project being expanded to run on the Raspberry Pi with a multitude of sensors. What will you add a web interface to next? Home automation? A weather station? Let us know!

Continue reading “Web Interface For The FRAM LaunchPad”