A Better Battery Arduino

We’ve seen [Johan]’s AA-battery-sized Arduino/battery crossover before, but soon (we hope!) there will be a new version with more MIPS in the same unique form factor! The original Aarduino adhered to classic Arduino part choices and was designed to run as the third “cell” in a 3 cell battery holder to relay temperature readings via a HopeRF RFM69CW. But as [Johan] noticed, it turns out that ARM development tools are cheap now. In some cases very cheap and very open source. So why not update an outstanding design to something with a little more horsepower?

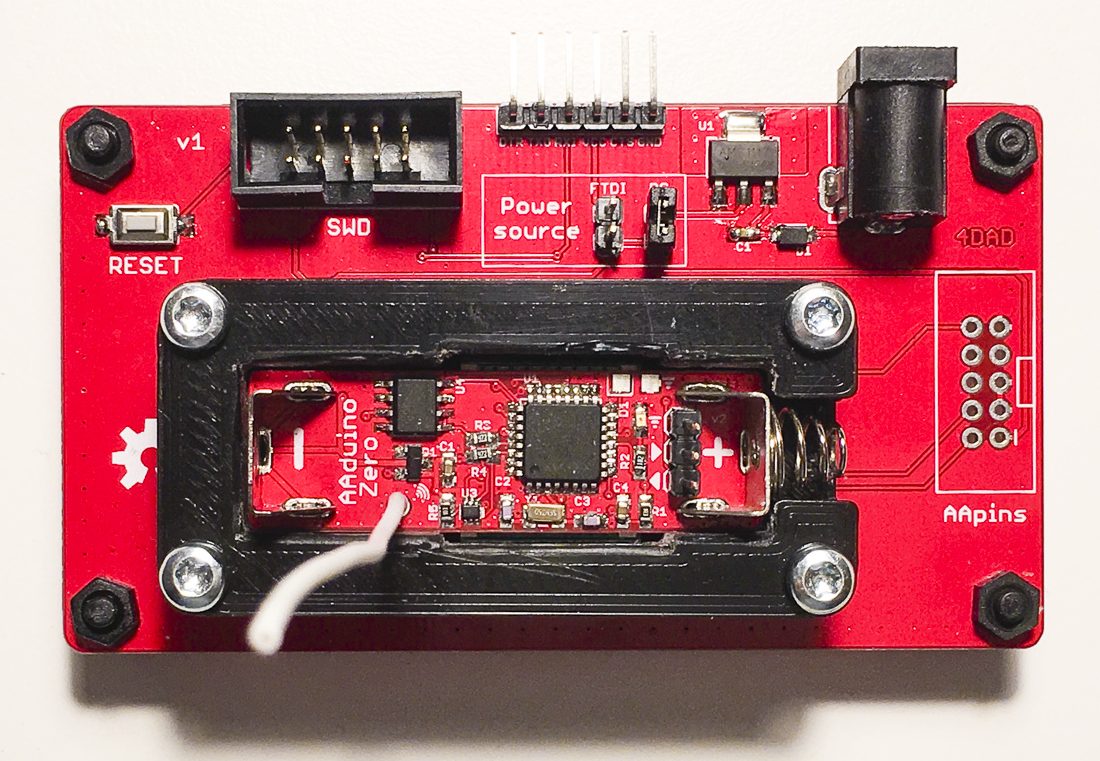
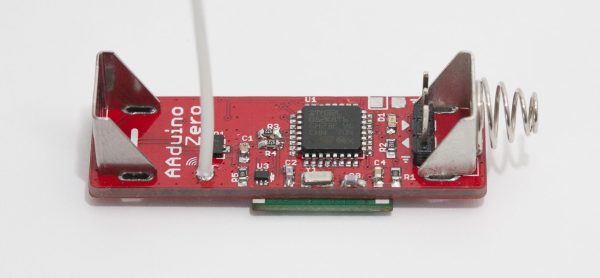
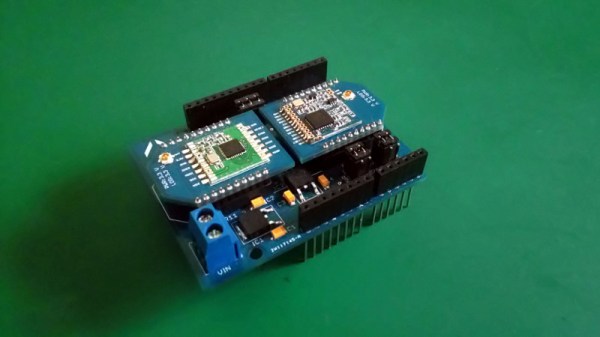
The Aarduino Zero uses the same big PTH battery terminals and follows the same pattern as the original design; the user sticks it in a battery holder for power and it uses an RFM69CW for wireless communication. But now the core is an STM32L052, a neat low power Cortex-M0+ with a little EEPROM onboard. [Johan] has also added a medium size serial flash to facilitate offline data logging or OTA firmware update. Plus there’s a slick new test fixture to go along with it all.

So how do you get one? Well… that’s the rub. It looks like when this was originally posted at the end of 2017 [Johan] was planning to launch a Crowd Supply campaign that hasn’t quite materialized yet. Until that launches the software sources for the Zero are available, and there are always the sources from the original Aarduino to check out.

Watch The Snappy, Insect-like Moves Of This DIY Quadruped Robot

Some legged robots end up moving with ponderous deliberation, or wavering in unstable-looking jerks. A few unfortunates manage to do both at once. [MusaW]’s 3D Printed Quadruped Robot, on the other hand, moves in rapid motions that manage to look sharp and insect-like instead of unstable. Based on an earlier design he made for a 3D printable quadruped frame, [MusaW] has now released this step-by-step guide for building your own version. All that’s needed is the STL files and roughly $50 in parts from the usual Chinese resellers to have the makings of a great weekend project.

The robot uses twelve SG90 servos and an Arduino nano with a servo driver board to control them all, but there’s one additional feature: Wi-Fi control is provided thanks to a Wemos D1 Mini (which uses an ESP-8266EX) acting as a wireless access point to serve up a simple web interface through which the robot can be controlled with any web browser.

Embedded below is a brief video. The first half is assembly, and the second half demonstrates the robot’s fast, sharp movements.

Continue reading “Watch The Snappy, Insect-like Moves Of This DIY Quadruped Robot”

Touch Anything And Everything

Powering IoT devices is often a question of batteries or mains power, but in rare exceptions to this rule there is no power supply (PDF Warning). At the University of Wisconsin-Madison and the University of California, San Diego, researchers have gone the extra mile to make advanced backscatter devices, and these new tags don’t need the discrete components we have seen in previous versions. They are calling it LiveTag, and it doesn’t need anything aside from a layer of foil printed or etched on a flexible ceramic-PTFE laminate. PTFE is mostly seen in the RF sector as a substrate for circuit boards.

We have seen some of the wild creations with wifi backscatter that range from dials to pushbuttons. RF backscatter works by modulating the RF signals in which we are continuously swimming. Those radio waves power the device and disrupt the ambient signals, which disruption can be detected by a receiver. With a BOM that looks like a statement more than a list, integration with many devices becomes a cost-effective reality. Do not however broadcast important data because you cannot expect great security from backscatter.

[Via IEEE Spectrum]

PTPM Energy Scavenger Aims For Maintenance-Free Sensor Nodes

[Mile]’s PTPM Energy Scavenger takes the scavenging idea seriously and is designed to gather not only solar power but also energy from temperature differentials, vibrations, and magnetic induction. The idea is to make wireless sensor nodes that can be self-powered and require minimal maintenance. There’s more to the idea than simply doing away with batteries; if the devices are rugged and don’t need maintenance, they can be installed in locations that would otherwise be impractical or awkward. [Mile] says that goal is to reduce the most costly part of any supply chain: human labor.

The prototype is working well with solar energy and supercapacitors for energy storage, but [Mile] sees potential in harvesting other sources, such as piezoelectric energy by mounting the units to active machinery. With a selectable output voltage, optional battery for longer-term storage, and a reference design complete with enclosure, the PPTM Energy Scavenger aims to provide a robust power solution for wireless sensor platforms.

Why Have Only One Radio, When You Can Have Two?

There are a multitude of radio shields for the Arduino and similar platforms, but they so often only support one protocol, manufacturer, or frequency band. [Jan Gromeš] was vexed by this in a project he saw, so decided to create a shield capable of supporting multiple different types. And because more is so often better, he also gave it space for not one, but two different radio modules. He calls the resulting Swiss Army Knife of Arduino radio shields the Kite, and he’s shared everything needed for one on a hackaday.io page and a GitHub repository.

Supported so far are ESP8266 modules, HC-05 Bluetooth modules, RFM69 FSK/OOK modules, SX127x series LoRa modules including SX1272, SX1276 and SX1278, XBee modules (S2B), and he claims that more are in development. Since some of those operate in very similar frequency bands it would be interesting to note whether any adverse effects come from their use in close proximity. We suspect there won’t be because the protocols involved are designed to be resilient, but there is nothing like a real-world example to prove it.

This project is unique, so we’re struggling to find previous Hackaday features of analogous ones. We have however looked at an overview of choosing the right wireless tech.

SPINES Design Makes For Modular Energy Harvesting

The SPINES (Self-Powered IoT Node for Environmental Sensing) Mote is a wireless IoT environmental sensor, but don’t let the neatly packed single PCB fool you into thinking it’s not hackable. [Macro Yau] specifically designed SPINES to be highly modular in order to make designing an energy harvesting sensor node an easier task. The way [Macro] sees it, there are two big hurdles to development: one is the energy harvesting itself, and the other is the software required to manage the use of every precious joule of that harvested energy.

[Macro] designed the single board SPINES Mote in a way that the energy harvesting portion can be used independently, and easily integrated into other designs. In addition, an Arduino library is being developed to make it easy for the power management to be done behind the scenes, allowing a developer to concentrate on the application itself. A solar-powered wireless sensor node is one thing, but helping people get their ideas up and running faster in the process is wonderful to see.

Launching Fireworks With Raspberry Pi This Fourth Of July

It’s that time of year again in the United States, and the skies will soon be alight with pyrotechnic displays, both professional and amateur. Amazing fireworks are freely available, sometimes legally, sometimes not. For the enthusiasts that put on homebrew displays, though, the choice between watching your handiwork or paying attention to what you’re doing while running the show is a tough one. This Raspberry Pi fireworks show controller aims to fix that problem.

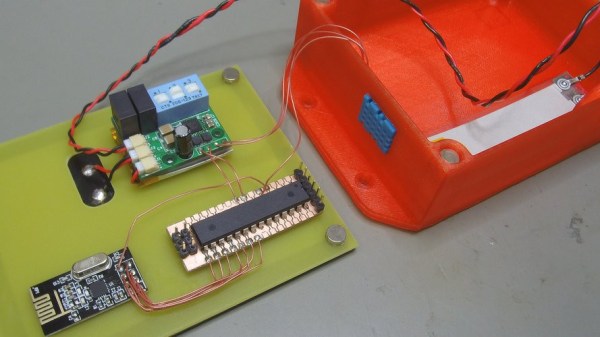
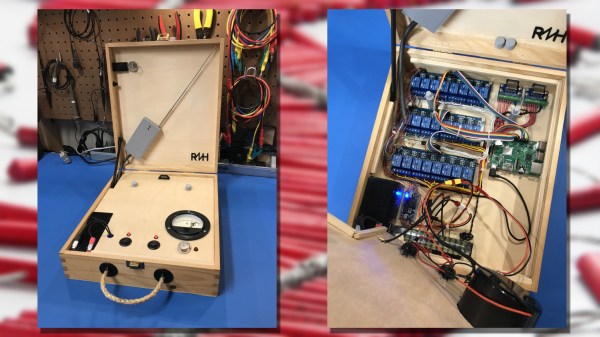
[netmagi] claims his yearly display is a modest affair, but this controller can address 24 channels, which would be a pretty big show in any neighborhood. Living inside an old wine box is a Raspberry Pi 3B+ and three 8-channel relay boards. Half of the relays are connected directly to breakouts on the end of a long wire that connect to the electric matches used to trigger the fireworks, while the rest of the contacts are connected to a wireless controller. The front panel sports a key switch for safety and a retro analog meter for keeping tabs on the sealed lead-acid battery that powers everything. [netmagi] even set the Pi up with WiFi so he can trigger the show from his phone, letting him watch the wonder unfold overhead. A few test shots are shown in the video below.

As much as we appreciate the DIY spirit, it goes without saying that some things are best left to the pros, and pyrotechnics is probably one of those things. Ever wonder how said pros pull it off? Here’s a behind-the-scenes look.

Continue reading “Launching Fireworks With Raspberry Pi This Fourth Of July”