No Hole In One: Perseverance Strikes Out On First Mars Core Attempt

There’s a military adage that no plan survives first contact with the enemy. While we haven’t gone to war with Mars, at least not yet, it does seem to be a place where the best-laid scientific plans are tested in the extreme. And the apparent failure of Perseverance to retrieve its first Martian core sample is yet another example of just how hard it is to perform geotechnical operations on another planet.

To be sure, a lot about the first sampling operation went right, an especially notable feat in that the entire process is autonomous. And as we’ve previously detailed, the process is not simple, involving three separate robotic elements that have to coordinate their operations perfectly. Telemetry indicates that the percussive drill on the end of the 2.1 m robotic arm was able to use its hollow coring bit to drill into the rock of Jezero crater, and that the sample tube inside the coring bit was successfully twisted to break off the core sample.

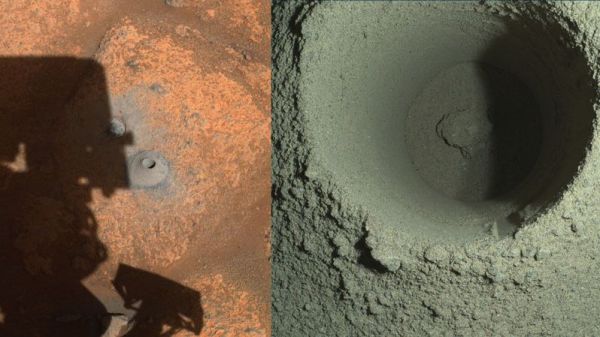
But what was supposed to happen next — jamming of the small core sample inside the sample tube — appears not to have happened. This was assessed by handing the sample tube off to the Sample Handling Arm in the belly of Perseverance, where a small probe is used to see how much material was recovered — none, in this case. NASA/JPL engineers then began a search for the problem. Engineering cameras didn’t reveal the core sample on the Martian surface, meaning the sample handling robots didn’t drop it. The core sample wasn’t in the borehole either, which would have meant the camming mechanism designed to retain the core didn’t work. The borehole, though, looked suspicious — it appears not to be deep enough, as if the core sample crumbled to dust and packed into the bottom of the hole.

If this proves to be the cause of the failure, it will be yet another example of Martian regolith not behaving as expected. For InSight, this discovery was a death knell to a large part of its science program. Thankfully, Perseverance can pick up and move to better rock, which is exactly what it will be doing in September. They still have 42 unused sample tubes to go, so here’s to better luck next time.

[Featured images: NASA/JPL-Caltech]

DeWalt Literal Hack Upgrades Battery

There are several important decisions you make in your life: Coke or Pepsi; vi or emacs; PC or Mac. But, lately, you need to pick a battery ecosystem for your tools. DeWalt? Black & Decker? Or just cheapies from Harbor Freight? But what happens when your vendor of choice changes their batteries? That’s the situation [jleslie48] found when a DeWalt 14.4V battery died. All the new tools require 18V batteries, so buying an old battery for one tool didn’t make sense. Time to literally hack the old tool to accept the new battery.

Presumably, nothing in the drill will mind the higher voltage. It is all a matter of mechanics and nothing a Dremel tool won’t fix. Since the tool was old and the 18V batteries relatively new, [jleslie48] decided to limit modifications to the tool only leaving the batteries intact for use with the newer tools.

The only problem once you remove the pins and clips that interfere with the battery fit, it won’t actually stay on the drill. We might have turned to duct tape or zip ties, but bungee cord works, too, as you can see in the finished product.

Honestly, though, the bungee is good because you can stretch it to remove the battery for charging. We might have just cannibalized the drill for its motor, but next time you have a tool with no battery, it might be worth looking to see if you could modify the tool.

Bungees are great for robots, too. Or, you can lay siege on your neighbors.

3D Printed Parts Make For A Quick Electric Scooter Build

Sometimes, walking even a short distance can grow boring if it’s a part of your regular routine. [Alexandre Chappel] found himself in just such a position, so elected to quickly whip up a scooter to get around on.

The build is very much of the “parts laying around the shop” genre. An old skateboard deck was fitted with nice rubber scooter wheels and a set of handlebars thanks to a series of 3D printed parts. Unfortunately, the first revision had problems with flex in the skateboard deck, which isn’t designed to take the full weight of an adult human standing on one leg. Another skateboard deck was pressed into service, reinforced with a metal pipe for added strength.

From there, [Alexandre] set about creating a front-wheel-drive system using a power drill, several shaft extensions, and a right-angle drive. Clamped to the handlebar tube, the drill’s trigger is controlled via a twist throttle linked up by a string.

It’s not the easiest scooter to ride, with a bit too much torque from a standing start and somewhat scary handling characteristics at times. However, we’re sure with some practice and some tweaks, [Alexandre] will have a useful ride on his hands. If you prefer something wilder, however, consider this walking scooter build. Video after the break.

Continue reading “3D Printed Parts Make For A Quick Electric Scooter Build”

Put A Hardened Edge On Mild Steel With Just A Drill Bit. Sort Of.

People have been working metal for so long that the list of tips and tricks is now nearly infinite. So it’s always a joy to pick up a new trick, especially one as simple as putting a hardened edge on mild steel using a drill bit as a filler rod.

This tip comes to us by way of [Jody], aka “The Weldmonger” on YouTube. Subscribing to his channel is a sure way to keep your welding ego in check; you may be good, but [Jody] is better, and he’s willing to share as much of his experience in video format as possible. For this tip, he starts with a cheap chipping hammer, the universal welder’s tool that helps remove the glass-like slag that forms during shielded-metal arc welding, or what’s commonly known as stick welding. The mild steel of the hammer makes it hard to keep an edge, so [Jody] pulled out his TIG welder and laid down a bead on the cutting edge using an old drill bit as a fill rod. The video below shows the process in all its simplicity.

The tool steel of the drill bit is far harder than the mild steel of the hammer, but still soft enough to take an edge, and the resulting tool is much improved. We’ve seen something similar to this before, when hard-facing filler rod was built up on the edge of a mild steel slug to make a cutter for internal weld seams. We liked that hack, but knowing the same thing can be done with something we’ve all likely got in abundance in the shop is a neat trick. Thanks, [Jody]!

Continue reading “Put A Hardened Edge On Mild Steel With Just A Drill Bit. Sort Of.”

This DIY Drill Press Is Very Well Executed

Plenty of projects we see here could easily be purchased in some form or other. Robot arms, home automation, drones, and even some software can all be had with a quick internet search, to be sure. But there’s no fun in simply buying something when it can be built instead. The same goes for tools as well, and this homemade drill press from [ericinventor] shows that it’s not only possible to build your own tools rather than buy them, but often it’s cheaper as well.

This mini drill press has every feature we could think of needing in a tool like this. It uses off-the-shelf components including the motor and linear bearing carriage (which was actually salvaged from the Z-axis of a CNC machine). The chassis was built from stock aluminum and bolted together, making sure to keep everything square so that the drill press is as precise as possible. The movement is controlled from a set of 3D printed gears which are turned by hand.

The drill press is capable of drilling holes in most materials, including metal, and although small it would be great for precision work. [ericinventor] notes that it’s not necessary to use a separate motor, and that it’s possible to use this build with a Dremel tool if one is already available to you. Either way, it’s a handy tool to have around the shop, and with only a few modifications it might be usable as a mill as well.

Continue reading “This DIY Drill Press Is Very Well Executed”

Roll Your Own – Toilet Paper

Toilet paper has become a hot button issue over the last month or so, and the pandemic prompted panic buying, and consequent shortages. Now there are adequate supplies, at least where this is being written, but sometimes one’s rolls aren’t the domestic items we’re all used to. This happened to [Ebenezer], who had some of the large size rolls suitable for toilet roll dispensers rather than a domestic bathroom. To solve this problem he made a makeshift toilet roll winder.

The adventures of small dogs aside, we all know that toilet rolls unroll themselves very easily indeed but are a significant pain to get back on the roll once they have done so. Rolling toilet paper must therefore be an exact science of velocity and tension, which he approached with a 3D printed shaft that mounts a toilet roll tube in a Ryobi drill. Getting the tension right was a bit tricky, but we’re extremely impressed with the result. Like him we’d have expected some side-to-side movement, but there was very little and a near perfect toilet roll was the result.

This is a simple hack, but one extremely well executed, and that it does something we might normally consider near-impossible is a bonus. Of course, should you wish to ration your toilet paper, you can always print it.

Printed It: Collet Drill Stop

You’d think that being quarantined in your home would be perfect for hackers and makers like us, as we all have a project or two that’s been sitting on the back burner because we didn’t have the time to tackle it. Unfortunately, some are finding that the problem now is actually getting the parts and tools needed to do the job. When there’s a bouncer and a line outside the Home Depot like it’s a nightclub on Saturday night, even the simplest of things can be difficult to source when making in the time of COVID.

Which is exactly the situation I found myself in recently when I needed to drill a bunch of holes to the same depth. The piece was too big to put in the drill press, and while I contemplated just wrapping the bit in some tape to serve as a makeshift stop, I wasn’t convinced it would be accurate or repeatable enough. It occurred to me that a set of drill stop collars would be easy enough to design and 3D print, but before I fired up OpenSCAD, I decided to see what was already available online.

Which is how I found the “Collet Drill Stop” from Adam Harrison. Rather than the traditional ring and setscrew arrangement, his design uses a printable collet that will clamp down on the bit at an arbitrary position without tools. So not only could I avoid a trip to the store by printing this design out, it looked like it would potentially be an upgrade over what I would have bought.

Of course, it’s wise not to take anything for granted when dealing with 3D printing. The only way I could be sure that Adam’s design would work for me was to commit it to plastic and try it out.

Continue reading “Printed It: Collet Drill Stop”