Greeking Out With Arduinos

Learning a new language is hard work, but they say that the best way to learn something is to teach it. [Angeliki Beyko] is learning Greek, and what better way to teach than to build a vocabulary flash-card game from Arduinos, color screens, 1602 text screens, and arcade buttons? After the break, we have a video from the creator talking about how to play, the hardware she chose, and what to expect in the next version.

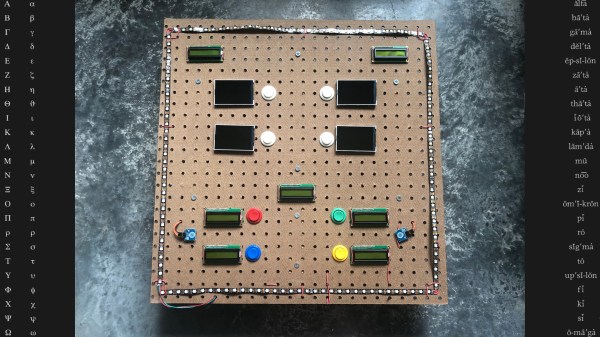
Pegboard holds most of the hardware except the color screens, which are finicky when it comes to their power source. The project is like someone raided our collective junk drawers and picked out the coolest bits to make a game. Around the perimeter are over one hundred NeoPixels to display the game progress and draw people like a midway game. Once invested, you select a category on the four colored arcade buttons by looking at the adjacent LCD screens’ titles. An onboard MP3 shield reads a pseudo-random Greek word and displays it on the top-right 1602 screen in English phonetics. After that, it is multiple choice with your options displaying in full-color on four TFT monitors. A correct choice awards you a point and moves to the next word, but any excuse to mash on arcade buttons is good enough for us.

[Angeliki] does something we see more often than before, she’s covering what she learned, struggled with, would do differently, and how she wants to improve. We think this is a vital sign that the hacker community is showcasing what we already knew; hackers love to share their knowledge and improve themselves.

Typing Greek with a modern keyboard will have you reaching for an alt-code table unless you make a shortcut keyboard, and if you learn Greek, maybe you can figure out what armor they wore to battle.

Continue reading “Greeking Out With Arduinos”

Commodore 64 Mini Man Makes Matching Mini Monitor

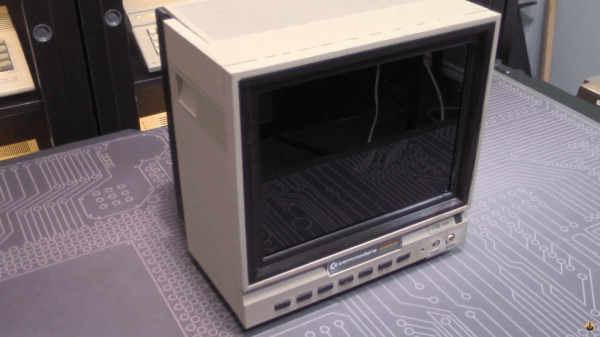
While putting together a retro computer is a great project and can teach a lot about the inner workings of electronics, hooking that 70s- or 80s-era machine up to a modern 144 Hz 1440p display tends to be a little bit anticlimactic. To really recreate the true 8-bit experience it’s important to get a CRT display of some sort, but those are in short supply now as most are in a landfill somewhere now. [Tony] decided to create a hybrid solution of sorts by 3D printing his own Commodore replica monitor for that true nostalgia feel.

This build is a matching mini scale replica of the Commodore 1702 monitor, a color monitor produced by Commodore specifically for their machines. At the time it was top-of-the-line and even included an early predecessor of the S-Video method of video signalling. This monitor was modeled in Fusion 360 and then sent to the 3D printer for assembly, then populated with a screen with a period-correct 4:3 aspect ratio, required electronics for handling the Commodore’s video signal, and even includes an upgrade over the original monitor: stereo speakers instead of the single-channel speaker that was featured in the 80s.

While this monitor doesn’t use a CRT, it’s an impressive replica nonetheless, right down to the Commodore serial number sticker on the back. If you need a Commodore 64 to go along with it, there are plenty of possibilities available to consider like this emulated C64 on a Raspberry Pi or these refurbished OEM Commodores.

Continue reading “Commodore 64 Mini Man Makes Matching Mini Monitor”

New Depths For IMac Repair

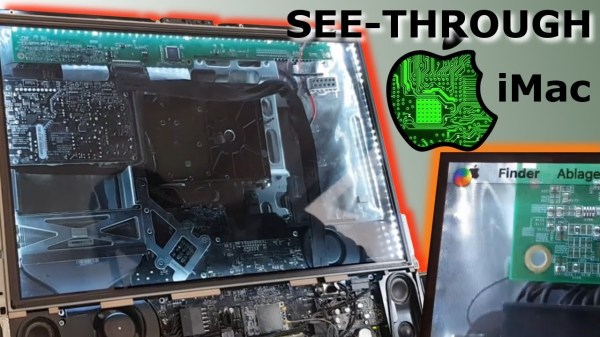
There’s not much economic sense in fixing a decade-old desktop computer, especially when it’s the fancy type with the screen integrated into the body of the computer, and the screen is the thing that’s broken. Luckily for [JnsBn] aka [BEAN] the computer in question was still functional with a second monitor, so he decided to implement a cheap repair to get the screen working again by making it see-through.

The only part of the screen that was broken was the backlight, which is separate from the display unit itself. In order to view at least something on the screen without an expensive replacement part, he decided to remove the backlight altogether but leave the display unit installed. With a strip of LEDs around the edge, the screen was visible again in addition to the inner depths of the computer. After a coat of white Plasti Dip on the inside of the computer, it made for an interesting effect and made the computer’s display useful again.

While none of us, including the creator, recommend coating the inside of an iMac with Plasti Dip due to the risk of fire and/or other catastrophic failure, there’s not much to lose otherwise. Just don’t shove this one into the wall. Continue reading “New Depths For IMac Repair”

An HDMI Input For A Laptop Screen, Minus Laptop

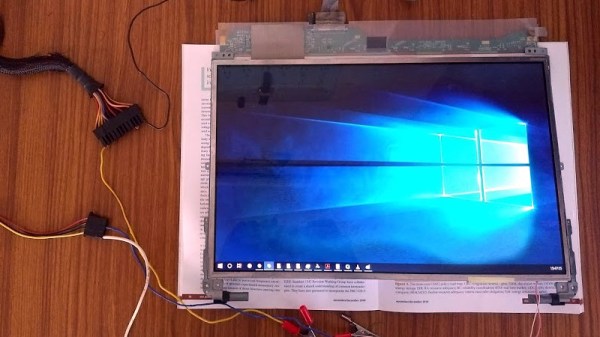
The lack of HDMI inputs on almost all laptops is a huge drawback for anyone who wants to easily play a video game on the road, for example. As to why no manufacturers offer this piece of convenience when we all have easy access to a working screen of this size, perhaps no one can say. On the other hand, if you want to ditch the rest of the computer, you can make use of the laptop screen for whatever you want.

This project from [Avner] comes to us in a few parts. In the first section, the teardown of the laptop begins and a datasheet for the screen is discovered, which allows [Avner] to prepare an FPGA to drive the screen. The second part involves building an HDMI sink, which is a device which decodes the signal from an HDMI source into its constituent parts so it can be sent to the FPGA. The final section of the project involves actually sending a video to this impressive collection of hardware in order to get a video to appear on the old laptop screen.

This build is worth checking out if you’ve ever dealt with anything involving digital video. It goes into great depth on a lot of the technical details involving HDMI, video devices, and hardware timing issues. This is a great build and, even though we’ve seen similar projects, definitely worth diving into if you have some time on your hands and a spare laptop screen.

Corn Starch Fixes A Game Boy Screen

Nintendo’s Game Boy was the handheld of the 1990s. Like many of their products, it was famous for its ability to stand up to punishment from angry children and military strikes alike. Its biggest weakness is perhaps its unbacklit LCD screen. Retrogamers and chiptuners alike find themselves modifying and replacing these regularly.

A common problem during these swaps is “Newton rings” – an issue where the polarizer comes into contact with the LCD glass, causing unsightly visual artifacts. Thankfully, there is a simple fix. It’s possible to keep the two separated with the application of microscopic particles, too small to see. [esotericsean] uses cornstarch, while [bogamanz] favors diatomaceous earth. For best results, a makeup brush can be used to apply a fine coating, and compressed air used to clean out the Game Boy and remove any excess.

It’s rare to fix a delicate screen problem with a household staple, but gratifying when it works. The results are hard to see on camera, but many report this fixing the frustrating issue. So, if you’re planning to backlight your Game Boy, keep this in your bag of tricks. It’ll allow you to get the best possible result, and may be useful on other old-school LCDs as well. Video after the break.

Continue reading “Corn Starch Fixes A Game Boy Screen”

From SPIDriver To I2CDriver

Communicating with microcontrollers and other embedded systems requires a communications standard. SPI is a great one, and is commonly used, but it’s not the only one available. There’s also I2C which has some advantages and disadvantages compared to SPI. The problem with both standards, however, is that modern computers don’t come with either built-in. To solve that problem and allow easier access to debugging in SPI, [James Bowman] built the SPIDriver a few months ago, and is now back by popular demand with a similar device for I2C, the I2CDriver.

Much like the SPIDriver, the I2C driver is a debugging tool that can be used at your computer with a USB interface. Working with I2C is often a hassle, with many things going on all at once that need to sync up just right in order to work at all, and this device allows the user to set up I2C devices in a fraction of the time. To start, it has a screen built in that shows information about the current device, like the signal lines and a graphical decoding of the current traffic. It also shows an address space map, and has programmable pullup resistors built in, and can send data about the I2C traffic back to its host PC for analysis.

The I2CDriver is also completely open source, from the hardware to the software, meaning you could build one from scratch if you have the will and the parts, or make changes to the code on your own to suit your specific needs. If you’re stuck using SPI still, though, you can still find the original SPIDriver tool to help you with your debugging needs with that protocol as well.

Many Uses For A Single Button

When building projects with a simple goal in mind, it’s not unheard of for us to add more and more switches, buttons, and complexity as the project goes through its initial prototyping stages. Feature creep like this tends to result in a tangled mess rather than a usable project. With enough focus, though, it’s possible to recognize when it’s happening and keep to the original plans. On the other hand, this single-button project with more than one use seems to be the opposite of feature creep. (YouTube, embedded below.)

[Danko]’s project has one goal: be as useful as possible while only using a single button and a tiny screen. Right now the small handheld device can be used as a stopwatch, a counter, and can even play a rudimentary version of flappy bird. It uses an Arduino Pro Mini, a 64×48 OLED screen running on I2C, and has a miniscule 100 mAh 3.7V battery to power everything. The video is worth watching if you’ve never worked with this small of a screen before, too.

Getting three functions out of a device with only one button is a pretty impressive feat, and if you can think of any other ways of getting more usefulness out of something like this be sure to leave it in the comments below. [Danko] is no stranger to simple projects with tiny screens, either. We recently featured his homebrew Arduino calculator that uses an even smaller screen.

Continue reading “Many Uses For A Single Button”