Amateur radio has a couple of sweet allocations in the VHF bands, but because the signals don’t reflect off the ionosphere like shortwave signals, the use is limited basically to line-of-sight. One workaround is to use a repeater with a tall antenna, but that requires a lot of infrastructure or a mountainside lair.
What if you could just fly your antenna up in a drone? Well, for starters, you’d run out of batteries pretty quickly unless you could power it remotely. And if you try to tether it, the supply wires end up being too heavy to lift. Or do they?!?!
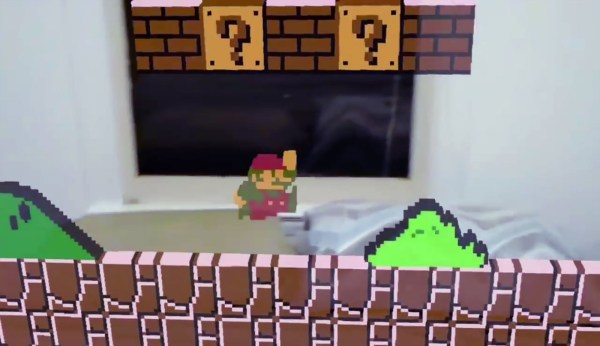
[Andrew Peterson] was looking for a way to indulge in his retro gaming passions in a more contemporary manner. His 3D NES emulator “N3S” for Windows brings Nintendo classics to the HoloLens, turning pixels into voxels, and Super Mario into an augmented reality gingerbread man.
To run NES games on the HoloLens, [Andrew’s] emulator uses the Nestopia libretro core. Since AR glasses cry for an augmentation of the game itself, the N3S re-emulates the NES’ picture processing unit (PPU), allowing it to interpret a Nintendo game’s graphics in a 3D space. [Andrew] also put together a comprehensive explanation of how the original Nintendo PPU works, and how he re-implemented it for the HoloLens.
The current version of the N3S PPU emulator automatically generates voxels by simply extruding the original pattern data from the game’s ROM, but [Andrew] is thinking about more features. Users could sculpt their own 3D versions of the original graphic elements in an inbuilt editor, and model sets could then be made available in an online database. From there, players would just download 3D mods for their favorite games and play them on the HoloLens.
According to [Andrew], the emulator reaches the limits of what the current pre-production version of the HoloLens can render fluently, so the future of this project may depend on future hardware generations. Nevertheless, the HoloLens screen capture [Andrew] recorded makes us crave for more augmented retro gaming. Enjoy the video!
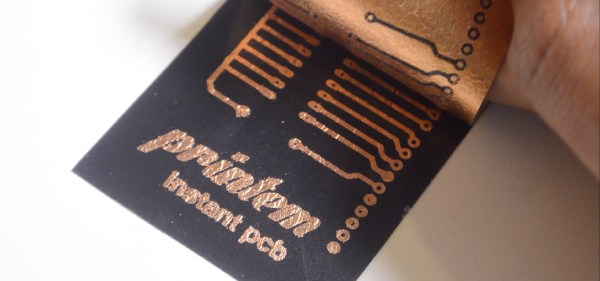
We are going to great lengths to turn a quick idea into an electronic prototype, be it PCB milling, home etching or manufacturing services that ship PCBs around the world. Unwilling to accept the complications of PCB fabrication, computer science student [Varun Perumal Chadalavada] came up with an express solution for PCB prototyping: Printem – a Polaroid-like film for instant-PCBs.
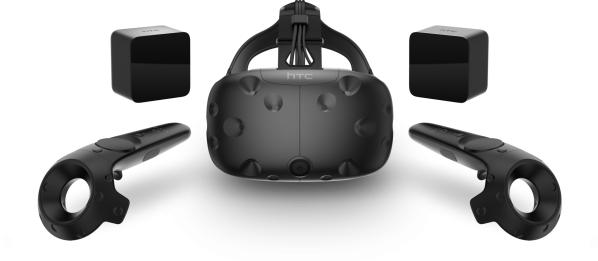
The HTC Vive is a virtual reality system designed to work with Steam VR. The system seeks to go beyond just a headset in order to make an entire room a virtual reality environment by using two base stations that track the headset and controller in space. The hardware is very exciting because of the potential to expand gaming and other VR experiences, but it’s already showing significant potential for hackers as well — in this case with robotics location and navigation.
Autonomous robots generally utilize one of two basic approaches for locating themselves: onboard sensors and mapping to see the world around it (like how you’d get your bearings while hiking), or sensors in the room which tell the robot where it is (similar to your GPS telling you where you are in the city). Each method has its strengths and weaknesses, of course. Onboard sensors are traditionally expensive if you need very accurate position data, and GPS location data is far too inaccurate to be of use on a smaller scale than city streets.
[Limor] immediately saw the potential in the HTC Vive to solve this problem, at least for indoor applications. Using the Vive Lighthouse base stations, he’s able to locate the system’s controller in 3D space to within 0.3mm. He’s then able to use this data on a Linux system and integrate it into ROS (Robot Operating System). [Limor] hasn’t yet built a robot to utilize this approach, but the significant cost savings ($800 for a complete Vive, but only the Lighthouses and controller are needed) is sure to make this a desirable option for a lot of robot builders. And, as we’ve seen, integrating the Vive hardware with DIY electronics should be entirely possible.
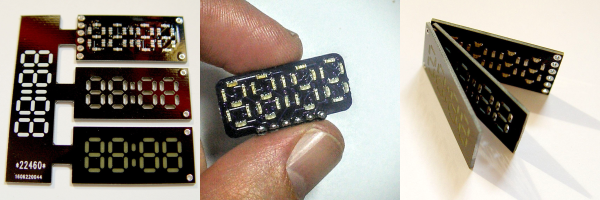
Cutting out precise shapes requires a steady hand, a laser cutter, or a CNC mill, right? Nope! All you need is PCB design software and a fabrication facility that’ll do the milling for you. That’s the secret sauce in [bobricius]’s very pleasing seven-segment display design.
His Hackaday.io entry doesn’t have much detail beyond the pictures and the board files, but we’re not sure we need that many either. The lowest board in the three-board stack has Charlieplexed LEDs broken out to six control pins. Next up is a custom-routed spacer board — custom routed by the PCB house, that is. And the top board in the stack is another PCB, this one left clear of copper where the light shines out.
We want to see this thing lit up! We’ve played around with using PCB epoxy material as a LED diffuser before ourselves, and it can look really good. The spacers should help even out the illumination within segments, while preventing bleed across them. Next step? A matrix of WS2812s with custom-routed spacers and diffusers. How awesome would that be?
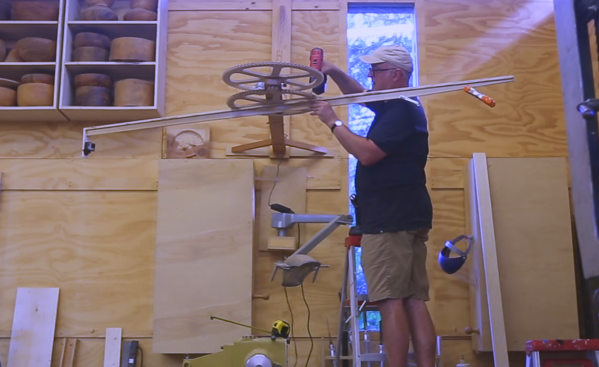
The combination of time-lapse photography and slow camera panning can be quite hypnotic – think of those cool sunset to nightfall shots where the camera slowly pans across a cityscape with car lights zooming by. [Frank Howarth] wanted to replicate such shots in his shop, and came up with this orbiting overhead time-lapse rig for his GoPro.
[Frank] clearly cares about the photography in his videos. Everything is well lit, he uses wide-open apertures for shallow depth of field shots, and the editing and post-production effects are top notch. So a good quality build was in order for this rig, which as the video below shows, will be used for overhead shots during long sessions at the lathe and other machines. The gears for this build were designed with [Matthias Wandel]’s gear template app and cut from birch plywood with a CNC router. Two large gears and two small pinions gear down the motor enough for a slow, smooth orbit. The GoPro is mounted on a long boom and pointed in and down; the resulting shots are smooth and professional looking, with the money shot being that last look at [Frank]’s dream shop.
If you haven’t seen [Frank]’s YouTube channel, you might want to check it out. While his material of choice is dead tree carcasses, his approach to projects and the machines and techniques he employs are great stuff. We featured his bamboo Death Star recently, and if you check out his CNC router build, you’ll see [Frank] is far from a one-trick pony.
DIY medical science is fun stuff. One can ferret out many of the electrical signals that make the body run with surprisingly accessible components and simple builds. While the medical community predictably dwells on the healthcare uses of such information, the hacker is free to do whatever he or she wants.
A good first start is to look at the relatively strong electrical signals coming off of the heart and other muscles. [Bernd Porr] has put together a simple bioamplifier circuit, and his students have made a series of videos explaining its use that’s well worth your time if you are interested in these things. Continue reading “All About Biosignals”→