OpenCV Running On A Tiny Microcontroller

At first blush, it might seem like projects that make extensive use of computer vision or machine learning would need to be based on powerful computing platforms with plenty of clock cycles and memory to handle this type of application. While there is some truth to this, as the field progresses it becomes possible to experiment with these tools on low-power devices as well. Take this OpenCV project which is built entirely on an ESP32 for example.

With that being said, there are some modifications that need to be made to the ESP32 in order to use OpenCV in any meaningful way. The most important of these is the use of the ESP32-DOWDQ6 module which increases the available memory of the ESP32 to allow it to make better use of camera functions. Even then, the ESP32 can’t run the entire OpenCV application, so a shrunken version of OpenCV is required before the device can run it natively. Once those two obstacles are out of the way, though, doing things like edge detection, as this project demonstrates, are well in the realm of possibility.

If running OpenCV on something as small as an ESP32 is possible, it is even easier to run on something orders of magnitude more powerful and yet still inexpensive, such as the Raspberry Pi. While the project’s code is available on its GitHub page for those interested, there are plenty of other OpenCV projects that we have featured on more powerful platforms as well, like this clock which falls off of the wall whenever someone looks at it.

Continue reading “OpenCV Running On A Tiny Microcontroller”

Network Time Protocol On The ESP32

Network Time Protocol (NTP) is one of the best ways to keep networked computers synchronized to the same time. It’s simple, lightweight, and not only allows computers to maintain a time standard together, but it also allows some computer manufacturers to save some money on hardware costs. The Raspberry Pi is perhaps the most well-known example of a low-cost computer without the extra expense of a real-time clock (RTC). While the Pi sets up NTP essentially automatically, other microcontrollers like the ESP32 don’t, but it is possible to configure them to use this time standard with some work.

For this project the MicroPython implementation for the ESP32 is required. MicroPython is a way of running Python code on microcontrollers or other embedded systems without all of the overhead that Python would normally require. Luckily enough, the NTP libraries are built right in so once MicroPython is running on the ESP32 it’s nearly as easy as calling the library. Of course you will have to make sure there is an internet connection, and then grab the time, sync it to the machine, and then set the timezone.

For a bonus exercise, the project’s creator [Bhavesh] suggests attempting to configure Daylight Savings Time, although this can be a surprisingly difficult problem to solve. In the meantime, there are a few other ways of installing a clock on a microcontroller like this one. An RTC module is an obvious choice, but you can also get incredibly accurate time by using a GPS module as well.

Gaming Mouse Becomes Digital Camera

Ever since the world decided to transition from mechanical ball mice to optical mice, we have been blessed with computer pointing devices that don’t need regular cleaning and have much better performance than their ancestors. They do this by using what is essentially a tiny digital camera to monitor changes in motion. As we’ve seen before, it is possible to convert this mechanism into an actual camera, but until now we haven’t seen something like this on a high-performance mouse designed for FPS gaming.

For this project [Ankit] is disassembling the Logitech G402, a popular gaming mouse with up to 4000 dpi. Normally this is processed internally in the mouse to translate movement into cursor motion, but this mouse conveniently has a familiar STM32 processor with an SPI interface already broken out on the PCB that could be quickly connected to in order to gather image data. [Ankit] created a custom USB vendor-specific endpoint and wrote a Linux kernel module to parse the data into a custom GUI program that can display the image captured by the mouse sensor on-screen.

It’s probably best to not attempt this project if you plan to re-use the mouse, as the custom firmware appears to render the mouse useless as an actual mouse. But as a proof-of-concept project this high-performance mouse does work fairly well as a camera, albeit with a very low resolution by modern digital camera standards. It is much improved on older mouse-camera builds we’ve seen, though, thanks to the high performance sensors in gaming mice.

Lawn Mower Carburetor Improves Mileage On Old Sedan

Before the Ford marketing department started slapping Maverick badges on pickup trucks, the name had been attached to compact cars from the 70s instead. These were cheap even by Ford standards, and were built as a desperate attempt to keep up with Japanese imports that were typically higher quality and more efficient than most American cars at the time. Some people called them the poor man’s Mustang. While Ford and the other American car companies struggled to stay relevant during the gas crisis, it turns out that they could have simply slapped a lawn mower carburetor on their old Mavericks to dramatically improve fuel efficiency.

The old Maverick used a 5 L carbureted V8 engine, which is not exactly the pinnacle of efficiency even by 1970s standards. But [ThunderHead289] figured out that with some clever modifications to the carburetor, he could squeeze out some more efficiency. By using a much smaller carburetor, specifically one from a lawn mower, and 3D printing an adapter for it, he was able to increase the fuel efficiency to over 40 mpg (which is higher than even the modern Mavericks) while still achieving a top speed of 75 mph.

While it’s not the fastest car on the block with this modification, it’s still drives well enough to get around. One thing to watch out for if you try this on your own classic car is that some engines use fuel as a sort of coolant for certain engine parts, which can result in certain problems like burned valves. And, if you don’t have a lawnmower around from which to borrow a carb, take a look at this build which 3D prints one from scratch instead.

Thanks to [Jack] for the tip!

Continue reading “Lawn Mower Carburetor Improves Mileage On Old Sedan”

MiniDisc Player Supports Full Data Transfer

Between the era of the CD and the eventual rise and domination of streaming music platforms, there was a limbo period of random MP3 players mixed in with the ubiquitous (and now officially discontinued) iPod. In certain areas, though, the digital music player of choice was the MiniDisc, a miniature re-writable CD player with some extra digital features. Among them was the ability to transfer music to the discs over USB, but they did not feature the ability to transfer the songs back to a computer. At least until now, thanks to this impressive hack from [asivery].

Although it sounds straightforward, this trick has a lot of moving parts that needed to come together just right. The MiniDisc player uses a proprietary encoding format called ATRAC, so a codec is needed for that. The MiniDisc player stores data from the disc in a 40-second buffer when playing, so the code reads the data directly from DRAM in 40-second chunks, moves the read head, repeats the process as needed, then stitches the 40-second parts back together. It can work on any Sony NetMD portable, if you are lucky enough to still have one around.

The project is a tremendous asset to the MiniDisc community, especially since the only way to recover data from a MiniDisc player prior to this was to use a specific version known as the RH-1. As [asivery] reports, used RH-1 players are going for incredibly high prices partially because of this feature. Since this new method demonstrates that it’s possible to do with other devices, perhaps its reign in the MiniDisc world will come to a close. For those still outside the loop on this esoteric piece of technology, take a look at this MiniDisc teardown.

Thanks to [Maarten] for the tip!

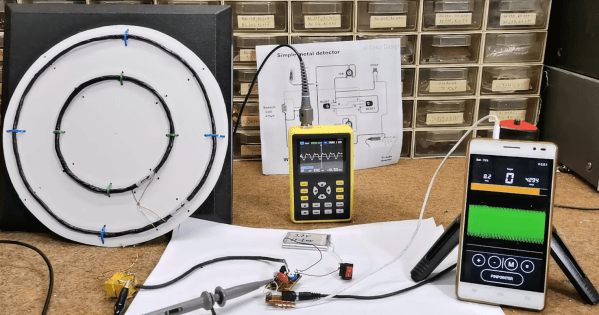
DIY Metal Detector Gives You The Mettle To Find Some Medals

Hurricane season is rapidly approaching those of us who live in the northern hemisphere. While that does come with a good deal of stress for any homeowners who live in the potential paths of storms it also comes with some opportunities for treasure hunting. Storms tend to wash up all kinds of things from the sea, and if you are equipped with this DIY metal detector you could be unearthing all kinds of interesting tchotchkes from the depths this year.

The metal detector comes to us from [mircemk] who is known for building simple yet effective metal detectors. Unlike his previous builds, this one uses only a single integrated circuit, the TL804 operational amplifier. It also works on the principle of beat-balance which is an amalgamation of two unique methods of detecting metal.  When the wire coils detect a piece of metal in the ground, the information is fed to an earpiece through an audio jack which rounds out this straightforward build.

[mircemk] reports that this metal detector can detect small objects like coins up to 15 cm deep, and larger metal objects up to 50 cm. Of course, to build this you will also need the support components, wire, and time to tune the circuit. All things considered, though it’s a great entryway into the hobby.

Want to learn more about metal detecting? Check out this similar-looking build which works on the induction balance principle.

Continue reading “DIY Metal Detector Gives You The Mettle To Find Some Medals”

All-In-One Automated Plant Care

Caring for a few plants, or even an entire farm, can be quite a rewarding experience. Watching something grow under and then (optionally) produce food is a great hobby or career, but it can end up being complicated. Thanks to modern technology we can get a considerable amount of help growing plants, even if it’s just one plant in a single pot.

Plant Bot from [YJ] takes what would normally be a wide array of sensors and controllers and combines them all into a single device. To start, there is a moisture sensor integrated into the housing so that when the entire device is placed in soil it’s instantly ready to gather moisture data. Plant Bot also has the capability to control LED lighting if the plant is indoors.  It can control the water supply to the plant, and it can also communicate information over WiFi or Bluetooth.

The entire build is based around an ESP32 which is integrated into the PCB along with all of the other sensors and components needed to monitor a single plant. Plant Bot is an excellent all-in-one solution for caring for a plant automatically. If you need to take care of more than one at a time take a look at this fully automated hydroponic mini-farm.