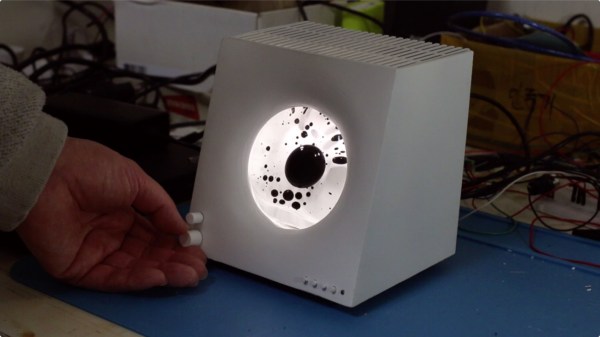
Battery Of The Future, Now Buildable Yourself

In theory, batteries and capacitors are fairly simple. One stores energy chemically and the other stores energy in an electric field. In practice though, building an energy storage device that has a practical amount of energy density is delicate, complex work. But if you have access to a few chemical compounds it’s actually not too difficult to produce useful batteries and electrolytic capacitors with the use of ionic liquids.

Ionic liquids are conductive liquids with a few other important qualities. Almost all of the ones shown can be built with relatively common compounds, and most of the products have advantageous physical qualities, making them stable and relatively safe for use. With some equipment found in a chemistry lab it’s possible to produce a wide variety of these liquids without too much hassle (although one method outlined uses an inert gas chamber), and from there batteries and capacitors can be built by allowing the ionic liquids to be absorbed into the device.

The video below shows the production of several of these devices and then illustrates their effects by running a small LED light. While they’re probably not going to be used to create DIY electric cars anytime soon, the production and improvement of atypical energy storage devices will be the key to a large part of the energy needs of society now and into the future, especially aluminum batteries like these.

Continue reading “Battery Of The Future, Now Buildable Yourself”

DIY Telescope Courtesy Of IKEA

Some of the most expensive hobbies have some of the more ingenious hacks on display, generally to lower the cost of entry to various parts the hobby itself. Amateur astronomy has expensive, necessary equipment such as telescopes and other optics, but also has a large group of people willing to build their own gear out of some surprising materials rather than buy pre-built equipment.

One of the latest telescopes from [The Amateur Engineer] uses several bowls from IKEA to build the mirror mount. It’s a variation of a Portaball telescope, which is similar to a Dobsonian telescope except that it is much easier to adjust and point in any direction. This “Portabowl” telescope uses two bowls epoxied together and weighted at the bottom as the core of the build. The mirror mounts inside the ball, and some supports are attached to it to hold the eyepiece and mount. With some paint and some minor adjustments it’s ready to go stargazing.

There are a few improvements to this build planned for the future, such as the creation of a larger ball that will make operating the scope easier. All in all, though, it’s an excellent example of amateur astronomy even without needing to go as far as grinding one’s own mirrors.

Growing The World’s Largest Snowflake

Plenty of areas around the world don’t get any snowfall, so if you live in one of these places you’ll need to travel to experience the true joy of winter. If you’re not willing to travel, though, you could make some similar ice crystals yourself instead. While this build from [Brian] aka [AlphaPhoenix] doesn’t generate a flurry of small ice crystals, it does generate a single enormous one in a very specific way.

The ice that [Brian] is growing is created in a pressure chamber that has been set up specifically for this hexagonal crystal. Unlike common ice that is made up of randomly arranged and varying crystals frozen together, this enormous block of ice is actually one single crystal. When the air is pumped out of the pressure chamber, the only thing left in the vessel is the seed crystal and water vapor. A custom peltier cooler inside with an attached heat sink serves a double purpose, both to keep the ice crystal cold (and growing) and to heat up a small pool of water at the bottom of the vessel to increase the amount of water vapor in the chamber, which will eventually be deposited onto the crystal in the specific hexagonal shape.

The build is interesting to watch, and since the ice crystal growth had to be filmed inside of a freezer there’s perhaps a second hack here which involved getting the camera gear set up in that unusual environment. Either way, the giant snowball of an ice crystal eventually came out of the freezer after many tries, and isn’t the first time we’ve seen interesting applications for custom peltier coolers, either.

Continue reading “Growing The World’s Largest Snowflake”

Monitor SpaceX Rocket Launches With Software-Defined Radio

The amateur radio community has exploded with activity lately especially in the software-defined radio (SDR) area since it was found that a small inexpensive TV tuner could be wrangled to do what only expensive equipment was able to do before. One common build with these cards is monitoring air traffic, which send data about their flights out in packets over the radio and can easily be received and decoded now. It turns out another type of vehicle, SpaceX’s Falcon 9 spacecraft, reports data via radio as well and with some slightly upgraded hardware it’s possible to “listen in” to these flights in a similar way.

Reddit users [derekcz] and [Xerbot] used a HackRF module to listen in to the Falcon 9’s data transmissions during its latest launch. While the HackRF is a much more expensive piece of equipment compared to the RTL-SDR dongles used to listen in on aircraft, it is much more capable as well, with a range from 1 MHz to 6 GHz. Using this SDR peripheral as well as a 1.2 m repurposed satellite dish, the duo were able to intercept the radio transmissions from the in-flight rocket. From there, they were recorded with GNU Radio, converted into binary data, and then translated into text.

It seems as though the data feed included a number of different elements including time, location information, and other real-time data about the rocket’s flight. It’s a great build that demonstrates the wide appeal of software-defined radio, and if you want to get started it’s pretty easy to grab a much cheaper dongle and use it for all kinds of applications like this. Go check out [Tom Nardi]’s piece on the last seven years of RTL-SDR to get caught up to speed.

Thanks to [Adrian] for the tip!

Supersized Weather Station Uses Antique Analog Meters

For most of us, getting weather information is as trivial as unlocking a smartphone or turning on a computer and pointing an app or browser at one’s weather site of choice. This is all well and good, but it lacks a certain panache that old weather stations had with their analog dials and stained wood cases. The weather station that [BuildComics] created marries both this antique aesthetic with modern weather data availability, and then dials it up a notch for this enormous analog weather station build.

The weather station uses 16 discrete dials, each modified with a different label for the specific type of data displayed. Some of them needed new glass, and others also needed coils to be modified to be driven with a lower current than they were designed as well, since each would be driven by one of two Arduinos in this project. Each are tied to a microcontroller output via a potentiometer which controls the needle’s position for the wildly different designs of meter. The microcontrollers themselves get weather information from a combination of real-world sensors outside the home of [BuildComics] and from the internet, which allows for about as up-to-date information about the weather as one could gather first-hand.

The amount of customization of these old meters is impressive, and what’s even more impressive is the project’s final weight. [BuildComics] reports that it took two people just to lift it onto the wall mount, which is not surprising given the amount of iron in some of these old analog meters. And, although not as common in the real world anymore, these old antique meters have plenty of repurposed uses beyond weather stations as well.

Continue reading “Supersized Weather Station Uses Antique Analog Meters”

Liquid Lite Brite Robot

Liquid handling workstations are commonly used in drug development, and look like small CNC machines with droppers on the ends which can dispense liquid into any container in a grid array. They are also extraordinarily expensive, as is most specialty medical research equipment. This liquid handling workstation doesn’t create novel drugs, though, it creates art, and performs similar functions to its professional counterparts at a much lower cost in exchange for a lot of calibration and math.

The art is created by pumping a small amount of CMYK-colored liquids into a 24×16 grid, with each space in the grid able to hold a small amount of the colored liquid. The result looks similar to a Lite-Brite using liquids instead of small pieces of plastic. The creator [Zach Frew] created the robot essentially from scratch using an array of 3D printers, waterjets, and CNC machines. He was able to use less expensive parts, compared to medical-grade equipment, by using servo-controlled valves and peristaltic pumps, but makes up for their inaccuracies with some detailed math and calibration.

The results of the project are striking, especially when considering that a lot of hurdles needed to be cleared to get this kind of quality, including some physical limitations on the way that the liquids behave in the first place. It’s worth checking out not just for the art but for the amount of detail involved as well. And, for those still looking to scratch the 90s nostalgia itch, there are plenty of other projects using the Lite Brite as inspiration.

Thanks to [Thane Hunt] for the tip!

Free To Good Home: FPGA Supercharged Audio/Video Synthesizer

Audio and video synthesizers have been around for decades, and are pretty much only limited by one’s willingness to spend money on them.  That is, unless you can develop your own FPGA-supercharged synthesizer to really get a leg up on the consumer-grade components. Of course, as [Julian] found out in this four-year project, you tend to pay for it anyway in time spent working on your projects.

[Julian] has actually decided to stop working on the project and open-source it to anyone who wants to continue on. He has already finished the PCB layout on a gargantuan 8-layer print, done all of the routing and parts selection, and really only needed to finish testing it to complete the project. It’s powered by the Xilinx Zynq and is packed with features too: HDMI, DDR3 ram, USB, a handful of sensors, and an Arduino Uno-style header to make interfacing and programming a breeze.

While we’re sympathetic with setting aside a project that we’ve worked so hard on, with most of the work done on this one it should be pretty easy to pick up and adapt for anyone interested in carrying the torch. If you were hoping to wet your whistle with something with fewer PCB layers, though, we’ve seen some interesting (but slightly simpler) video synthesizers made out of other unique hardware as well.