Tearing Down A Darkroom Relic For Buried Treasure

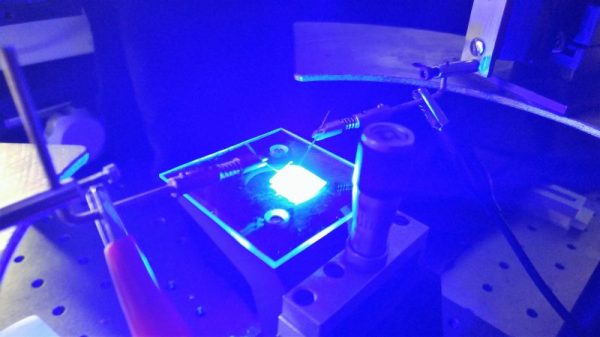
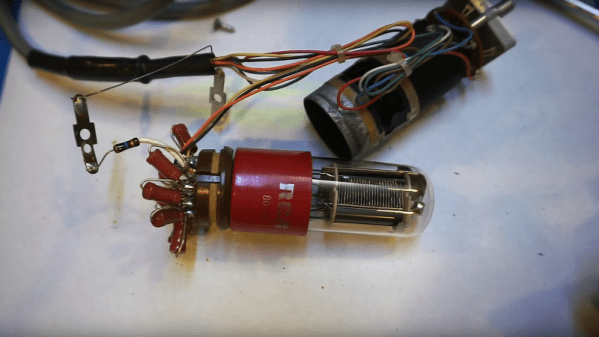
If your goal is to harvest unique parts from defunct devices, the further back in time you go, the better the pickings stand to be. At least that’s what [Kerry Wong] discovered during his tear-down of a darkroom color analyzer from the early 1980s.

For readers whose experience with photography has been solely digital, you need to understand that there once was a time when images were made with real cameras on real film, and serious amateurs and pros had darkrooms to process the film. Black and white processing was pretty straightforward in terms of chemistry — it was just developer, stop, and fixing. Color processes were much trickier, and when it came to enlarging your film onto color photo paper, things could get really complicated. [Kerry]’s eBay find, a Besler PM1A color analyzer, was intended to help out in the color lab by balancing the mix of cyan, blue, and yellow components in the enlarger.

The instrument, which no doubt demanded a princely sum back in the day, is actually really simple, with the object of [Kerry]’s desire, a PM1A photomultiplier tube and its driver, being the only real find.  Still, it’s an interesting teardown, and we’re eager to see what [Kerry] makes of the gem. A muon detector, perhaps? An X-ray backscatter machine? Or perhaps repeating his old speed of light experiments is on the docket.

Continue reading “Tearing Down A Darkroom Relic For Buried Treasure”

Fallen Radiosonde Reborn As Active L-band Antenna

If your hobby is chasing radiosondes across vast stretches of open country, and if you get good enough at it, you’ll eventually end up with a collection of the telemetry packages that once went up on weather balloons to record the conditions aloft. Once you’ve torn one or two down though, the novelty must wear off, which is where this radiosonde conversion to an active L-band antenna comes from.

As it happens, we recently discussed the details of radiosondes, so if you need a primer on these devices, check that out. But as Australian ham [Mark (VK5QI)] explains, radiosondes are a suite of weather instruments crammed into a lightweight package with a GPS receiver and a small transmitter. Lofted beneath a weather balloon into the stratosphere, a radiosonde transmits a wealth of data back to the ground before returning on a parachute after the balloon bursts. [Mark] had his eyes on the nice quadrifilar helical antenna used by the Vaisla R92 radiosonde’s GPS receiver, with the aim of repurposing them. He had a lot of components to remove while still retaining the low-noise amplifier (LNA), but in the end managed to get a working antenna with 40 dB gain in the L-band, and with the help of an RTL-SDR dongle he picked up solid signals from Iridium satellites.

Want to score your own radiosonde to play with? First, you have to know how to listen in so you can find them. Or, you know – there’s always eBay.

[via RTL-SDR.com]

Celebrate Display Diversity For A Circuit Circus Clock

There’s a lot to be said for nice, tidy projects where everything lines up and looks pretty. Seeing straight lines and pleasing proportions speaks to our obsessive-compulsive tendencies, and tends to soothe the mind and calm the spirit. But disorder is not without its charm, and mixing it up a little from time to time, such as with this mixed-media digital clock, can be a good idea.

Now, we know what you’re thinking — yet another Nixie clock. True, but that’s only half the story — or more accurately, one-sixth. There’s but a single Nixie in [Fuselage]’s circus-punk themed clock, used for the least significant digit in the hours part of the display. The other digits are displayed with four seven-segment devices — a Numitron, a vacuum fluorescent display, and an LED dot display — plus a real oddball, an old electromechanical display with individual slides for each character and a rear-screen projector. The RTC part of the project is standard Arduino fare, but as you can imagine the power supply needed for such a diversity of displays is pretty complex and has to provide everything from +5 to -270 volts. Each display needs its own driver, too, making this more of a zoo than a circus. The mixed up look just works with the circus theme, too. We’d really like more information on the projector display, though.

Looking for a real statement for your next clock build? Check out the rare as hens’ teeth NIMO tube.

Continue reading “Celebrate Display Diversity For A Circuit Circus Clock”

Spite, Thrift, And The Virtues Of An Affordable Logic Analyzer

[Larry Wall], the father of Perl, lists the three great virtues of all programmers: Laziness, Impatience, and Hubris. After seeing that Saleae jacked up the prices on their popular logic analyzers to ludicrous levels, [CNLohr] added a fourth virtue: Spite. And since his tests with a Cypress FX3 over the last few days may lead to a dirt-cheap DIY logic analyzer, we may soon be able to add another virtue: Thrift.

The story begins a year or two ago when [CNLohr] got a Cypress FX3 development board for $45. The board sat unused for want of a Windows machine, but after seeing our recent article on a minimalist logic analyzer based on an FX2, he started playing with the board to see if it could fan the flames of his Saleae hatred. The FX3 is a neat little chip that has a 100-MHz General Programmable Interface (GPIF) bus that basically lets it act like an easy to use FPGA.

Prepared to spend months on the project, he was surprised to make significant progress on his mission of spiteful thrift within a few days, reading 16 bits off the GPIF at over 200 megabytes per second and dumping it over the USB 3.0 port. [Charles]’ libraries for the FX3 lay the foundation for a lot of cool stuff, from logic analyzers to SDRs and beyond — now someone just has to build them.

The search for a cheap but capable logic analyzer is nothing new, of course. Last year, both [Jenny List] and [Bil Herd] looked at the $22 iCEstick as a potential Saleae beater.

Continue reading “Spite, Thrift, And The Virtues Of An Affordable Logic Analyzer”

Samy Kamkar: Reverse Engineering For A Secure Future

Show of hands: how many of you have parked your car in the driveway, walked up to your house, and pressed your car’s key fob button thinking it would open the front door? We’ve probably all done it and felt a little dopey as a result, but when you think about it, it would be tremendously convenient, especially with grocery bags dangling off each arm and the mail clenched between your teeth. After all, we’re living in the future —  shouldn’t your house be smart enough to know when you’re home?

Reverse engineer par excellence Samy Kamkar might think so, but given his recent experiences with cars smart enough to know when you’re standing outside them, he’d probably have some reservations. Samy dropped by the 2017 Hackaday Superconference in November to discuss the finer points of exploiting security flaws in passive car entry systems, and also sat down with our own Elliot Williams after his talk for a one-on-one interview. Samy has some interesting insights on vehicle cybersecurity, but the practical knowledge he’s gained while exploring the limits of these systems teach some powerful lessons about being a real-world reverse engineer.

Continue reading “Samy Kamkar: Reverse Engineering For A Secure Future”

LED Fabrication From Wafer To Light

Building a circuit to blink an LED is the hardware world’s version of the venerable “Hello, world!” program — it teaches you the basics in a friendly, approachable way. And the blinky light project remains a valuable teaching tool right up through the hardware wizard level, provided you build your own LEDs first.

For [emach1ne], the DIY LED was part of a Master’s degree course and began with a slice of epitaxial wafer that goes through cleaning, annealing, and acid etching steps in preparation for photolithography. While gingerly handling some expensive masks, [emach1ne] got to use some really cool tools and processes — mask aligners, plasma etchers, and electron beam vapor deposition. [emach1ne] details every step that led to a nursery of baby LEDs on the wafer, each of which was tested. Working arrays were cut from the wafer and mounted in a lead frame, bonded with gold wires, and fiat lux.

The whole thing must have been a great experience in modern fab methods, and [emach1ne] should feel lucky to have access to tools like these. But if you think you can’t build your own semiconductor fab, we beg to differ.

[via r/engineering]

Eat Some Pringles, Feed The Cat

You know the saying: “Dogs have people, cats have servants.” This is especially true when your feline overlord loses track of time and insists on being fed at oh-dark-thirty. You’re tempted to stay in bed feigning death, but that’s a tall order with the cat sitting on your chest and staring into your soul.

An automatic cat feeder would be nice at moments like these, but off-the-shelf units are pricey. [Mom Will Be Proud] decided to roll his own cat feeder, and the results are pretty impressive for what amounts to a trash can build. Two old food cans form the body — a Pringles can on top to hold the food and a nut can below for the servo. The metal ends of the cans nest together nicely, and with a large section removed from each, an aperture opens every time the hopper rotates, dropping food down a chute. A BeagleBone Black controls the servo, but anything with PWM outputs should do the trick. We’d lean toward the ESP8266 ecosystem for WiFi support for remotely controlling feedings, and we’d probably beef up the structure with PVC tube to prevent unauthorized access. But it’s a simple concept, and simple is a good place to start.

You shall not want for pet feeder builds around these parts. Take your pick — snazzy Steampunk, super cheap, or with an Archimedean twist.

Continue reading “Eat Some Pringles, Feed The Cat”