Swarm Of Servos Plays This Robotic Glockenspiel

It’s the happiest sounding instrument in the marching band, and it’s got the best name to boot. It’s the glockenspiel, and if this robotic glockenspiel has anything to say about it, the days of human glockenspielists are numbered.

In its present prototype form, [Averton Engineering]’s “Spielatron” looks a little like something from a carousel calliope or an animatronic pizza restaurant band. Using a cast-off glockenspiel from a school music room as a base, the Spielatron uses four mallets to play all the notes. Each key is struck by a mallet secured to a base made of two servos. For lack of more descriptive mallet terminology, these servos provide pan and tilt so the mallet can strike the proper keys. The video below shows the Spielatron’s first recital.

An Arduino runs the servos and a MIDI interface; unfortunately, this version can’t play chords and is a little limited on note length, but upgrades are on the way. We’ve seen a robotic glockenspiel before with a similar design that might have some ideas for increasing performance. But if you’re looking for a more sublime sound, check out this dry ice-powered wind chime.

Continue reading “Swarm Of Servos Plays This Robotic Glockenspiel”

Radio Apocalypse: The GWEN System

Recent developments on the world political stage have brought the destructive potential of electromagnetic pulses (EMP) to the fore, and people seem to have internalized the threat posed by a single thermonuclear weapon. It’s common knowledge that one bomb deployed at a high enough altitude can cause a rapid and powerful pulse of electrical and magnetic fields capable of destroying everything electrical on the ground below, sending civilization back to the 1800s in the blink of an eye.

Things are rarely as simple as the media portray, of course, and this is especially true when a phenomenon with complex physics is involved. But even in the early days of the Atomic Age, the destructive potential of EMP was understood, and allowances for it were made in designing strategic systems. Nowhere else was EMP more of a threat than to the complex web of communication systems linking far-flung strategic assets with central command and control apparatus. In the United States, one of the many hardened communications networks was dubbed the Groundwave Emergency Network, or GWEN, and the story of its fairly rapid rise and fall is an interesting case study in how nations mount technical responses to threats, both real and perceived. Continue reading “Radio Apocalypse: The GWEN System”

Fail Of The Week: Cheap Chips Cause Chaos

We all know the old saw: if it’s too good to be true, it probably is. But nowhere does this rule seem to break down as regularly as when we order parts. Banggood, AliExpress, and eBay are flooded with parts ready to be magically transported across the globe to our doorsteps, all at prices that seem to defy the laws of economics.

Most of these transactions go off without a hitch and we get exactly what we need to complete our Next Cool Thing. But it’s not always so smooth, as [Kerry Wong] recently discovered with an eBay order that resulted in some suspicious chips. [Kerry] ordered the AD633 analog multiplier chips as a follow-up to his recent Lorenz Attractor X-Y recorder project, where he used an Arduino to generate the chaotic butterfly’s data set as a demo for the vintage instrument. Challenged in the comments to do it again in analog, [Kerry] did his homework and found a circuit to make it happen. The needed multipliers were $10 a pop on DigiKey, so he sourced cheaper chips from eBay. The $2 chips seemed legit, with the Analog Devices logo and everything, but the circuit didn’t work. [Kerry]’s diagnosis in the video below is interesting, and it’s clear that the chips are fakes. Caveat emptor.

Here’s hoping that [Kerry] sources good chips soon and regales us with a successful build. Until then, what are your experiences with cheap chips? Have you been burned by overseas or domestic suppliers before? Does any single supplier seem like a better bet to you, or is it all hit or miss? Sound off in the comments below.

Continue reading “Fail Of The Week: Cheap Chips Cause Chaos”

Bolt-Together Belt Grinder For The No-Weld Shop

Belt grinding offers a lot of advantages for the metalworker, and since belt grinders are pretty simple machines, shop-built tools are not an uncommon project. A bolt-together belt grinder makes this tool even more accessible to the home gamer.

With no access to a welder but with a basic milling machine and an ample scrap bin at his disposal,  [IJustLikeMakingThings] had to get creative and modify some of the welding-required belt grinder designs he found online to be bolt-up builds.  The key to a cool running belt grinder is for the belt to be as long as possible, and the 2″x72″ belt seems to be the sweet spot, at least here in the States. Machined drive and idler wheels with the crown needed for proper belt tracking were sourced online, as was the D-bracket for holding the two guide wheels. But the rest of the parts were fabricated with simple tools and bolted together. [IJustLikeMakingThings] provides a lot of detail in his write-up, and it shouldn’t be too hard to build a belt grinder just like this one.

Looking for other belt grinder plans to compare notes? Here’s a grinder with an even simpler design, but with welding required.

Flip-Dot Display Brought Out Of Retirement By New Drivers

LED matrix displays and flat-screen monitors have largely supplanted old-school electromechanical models for public signage. We think that’s a shame, but it’s also a boon for the tinkerer, as old displays can be had for a song these days in the online markets.

Such was the case for [John Whittington] and his flip-dot display salvaged from an old bus. He wanted to put the old sign back to work, but without a decent driver, he did what one does in these situations — he tore it down and reverse engineered the thing. Like most such displays, his Hannover Display 7 x 56-pixel flip-dot sign is electromechanically interesting; each pixel is a card straddling the poles of a small electromagnet. Pulse the magnet and the card flips over, changing the pixel from black to fluorescent green. [John] used an existing driver for the sign and a logic analyzer to determine the protocol used by the internal electronics to drive the pixels, and came up with a much-improved method of sending characters and graphics. With a Raspberry Pi and power supply now resident inside the case, a web-based GUI lets him display messages easily. The video below has lots of details, and the code is freely available.

You may recall [John] from a recent edge-lit Nixie-like display. Looks like he’s got a thing for eye-catching displays, and we’re fine with that.

Continue reading “Flip-Dot Display Brought Out Of Retirement By New Drivers”

Simple Jig Gives Plastic Homes To Orphaned Projects

Look around your bench and chances are pretty good that there’s a PCB or scrap of perfboard or even a breadboard sitting there, wires and LEDs sprouting off it, doing something useful and interesting. Taking it to the next level with a snazzy enclosure just seems too hard sometimes, especially if you don’t have access to a 3D printer or laser cutter. But whipping up plastic enclosures can be quick and easy with this simple acrylic bending outfit.

At its heart [Derek]’s bending rig is not much different from any of the many hot-wire foam cutters we’ve featured. A nichrome wire with a tensioning spring is stretched across a slot in a flat work surface. The slot contains an aluminum channel to reflect the heat from the wire upward and to protect the MDF bed; we wonder if perhaps an angle section set in a V-groove might not be more effective, and whether more vertical adjustment range would provide the wider heating area needed for wider radius bends. It works great as is, though, and [Derek] took the time to build a simple timer to control the heating element, for which of course he promptly built a nice looking enclosure.

We can imagine the possibilities here are endless, especially if you use colored acrylic or Lexan and add in some solvent welding. We’ve covered acrylic enclosure techniques before; here’s a post that covers the basics.

Continue reading “Simple Jig Gives Plastic Homes To Orphaned Projects”

Drill The Wet Side Wet And The Dry Side Dry

Working mostly in metal as he does, [Tuomas Soikkeli] has invested in some nice tools. So when his sweet magnetic-base drill was in need of a new home, he built this two-in-one drilling station to maximize shop space and add some versatility to boot.

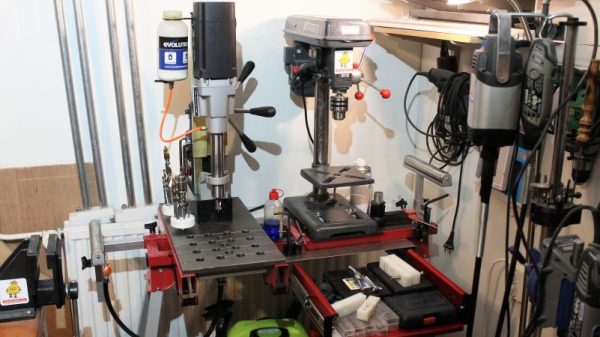
For the non-metalworkers out there, a mag-base drill is basically a portable drill press where the base is replaced with a strong electromagnet like the one shown here. They’re often used in the construction trades to drill holes in steel beams or columns, and often include nice features like a built-in coolant system.

[Tuomas] effectively turned his mag-base drill into a very beefy drill press by mounting it to a disused miter saw stand. A thick piece of plate steel forms the base, and with holes and drain channels machined into it, used coolant can be captured in a drain pan below for reuse. A second base for a benchtop drill press means he’s got a dry drilling station too, and the original support arms on the miter stand are ready for drilling long stock. The drawer below the dry side is a nice touch too.

There’s a lot to learn about fabrication from [Tuomas]’ video and the others on his channel, which is well worth checking out. And if you want to convert your drill press into a mag-base drill, why not check out this microwave oven transformer to electromagnetic crane project for inspiration?

Continue reading “Drill The Wet Side Wet And The Dry Side Dry”