Nissan Gives Up Root Shell Thanks To Hacked USB Drive

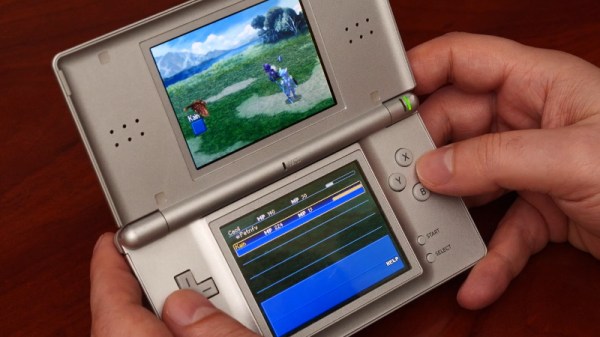
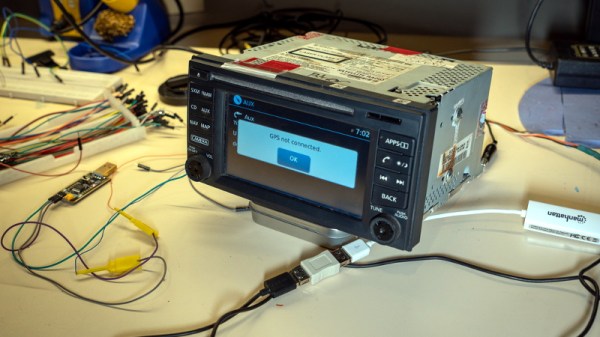
For the impatient Nissan owners who may be joining us from Google, a hacker by the name of [ea] has figured out how to get a root shell on the Bosch LCN2kai head unit of their 2015 Xterra, and it looks like the process should be the same for other vehicles in the Nissan family such as the Rogue, Sentra, Altima, and Frontier. If you want to play along at home, all you have to do is write the provided image to a USB flash drive and insert it.

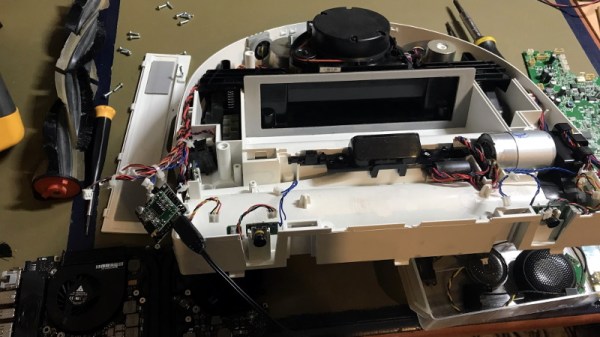
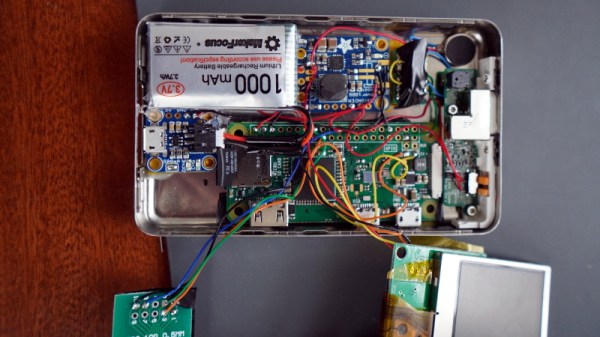
Now for those of us who are a more interested in how this whole process works, [ea] was kind of enough to provide a very detailed account of how the exploit was discovered. Starting with getting a spare Linux-powered head unit out of a crashed Xterra to experiment with, the write-up takes the reader through each discovery and privilege escalation that ultimately leads to the development of a non-invasive hack that doesn’t require the user to pull their whole dashboard apart to run.

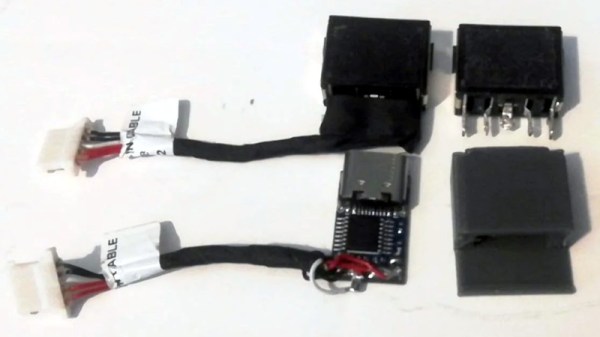
The early stages of the process will look familiar to anyone who’s messed with embedded Linux hacking. The first step was to locate the board’s serial port and connect it to the computer. From there, [ea] was able to change the kernel parameters in the bootloader to spawn an interactive shell. To make things a little easier, the boot scripts were then modified so the system would start up an SSH server accessible over a USB Ethernet adapter. With full access to the system, the search for exploits could begin.

A simple script on the flash drive enables the SSH server.

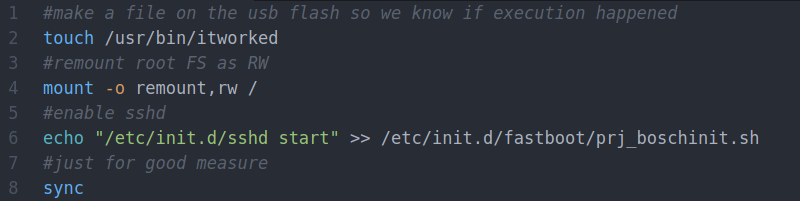
After some poking, [ea] discovered the script designed to mount USB storage devices had a potential flaw in it. The script was written in such a way that the filesystem label of the device would be used to create the mount point, but there were no checks in place to prevent a directory traversal attack. By crafting a label that read ../../usr/bin/ and placing a Bash script on the drive, it’s possible to run arbitrary commands on the head unit. The provided script permanently adds SSHd to the startup process, so when the system reboots, you’ll be able to log in and explore.

So what does [ea] want to do with this new-found exploit? It looks like the goal is to eventually come up with some custom programs that extend the functionality of the in-dash Linux system. As it seems like these “infotainment” systems are now an inescapable feature of modern automobiles, we’re certainly excited to see projects that aim to keep them under the consumer’s control.

USB-C Charging On Your ThinkPad, One Step At A Time

Hackers love their ThinkPads. They’re easy to work on, well documented, and offer plenty of potential for upgrades. For the more daring, there’s also a wide array of community-developed modifications available. For example, [Berry Berry Sneaky] has recently put together a step-by-step guide on swapping the common ThinkPad rectangular charging port (also used on ThinkBooks and other Lenovo machines) for USB-C Power Delivery.

Now to be clear, this is not a new concept. But between freely sharing the STL for the 3D printed adapter, providing a full parts list, and providing clear instructions on how to put it all together, [Berry Berry Sneaky] has done a fantastic job of making this particular modification as approachable as possible. For the cost of a common PDC004 Power Delivery “trigger” module and a bit of PETG filament, you can add yet another device to the list of things that work with your shiny new USB-C charger.

While not strictly necessary, [Berry Berry Sneaky] recommends getting yourself a replacement DC input cable for your particular machine before you crack open the case. That will let you assemble everything ahead of time, making the installation a lot quicker. It will also let you keep the original rectangular power jack intact so you can swap it back in if something goes wrong or you decide this whole unified charging thing isn’t quite what you hoped for.

Not a member of the ThinkPad Army? No worries. We’ve seen a lot of interest in using these configurable USB-C trigger modules to upgrade all manner of devices to the new Power Delivery standard or sometimes put together custom battery chargers for their older mobile gadgets.

A Physical Front Panel For Oscilloscope Software

For hackers on a tight budget or with limited bench space, a USB oscilloscope can be a compelling alternative to a dedicated piece of hardware. For plenty of hobbyists, it’s a perfectly valid option. But while the larger discussion about the pros and cons of these devices is better left for another day, there’s one thing you’ll definitely miss when the interface for your scope is a piece of software: the feel of physical buttons and knobs.

But what if it doesn’t have to be that way? The ScopeKeypad by [Paul Withers] looks to recreate the feel of a nice bench oscilloscope when using a virtual interface. Is such a device actually necessary? No, of course not. Although one could argue that there’s a certain advantage to the feedback you get when spinning through the detents on a rotary encoder versus dragging a slider on the screen. Think of it like a button box for a flight simulator: sure you can fly the plane with just the keyboard and mouse, but you’re going to have a better time with a more elaborate interface.

The comparison with a flight simulator panel actually goes a bit deeper, since that’s essentially what the ScopeKeypad is. With an STM32 “Blue Pill” microcontroller doing its best impression of a USB Human Interface Device, the panel bangs out the prescribed virtual key presses when the appropriate encoder is spun or button pressed. The project is designed with PicoScope in mind, and even includes a handy key map file you can load right into the program, but it can certainly be used with other software packages. Should you feel so inclined, it could even double as a controller for your virtual spaceship in Kerbal Space Program.

Affordable USB oscilloscopes have come a long way over the years, and these days, using one is hardly the mark of shame it once was. But the look and feel of the classic bench scope is about as timeless as it gets, so we can certainly see the appeal of a project that tries to combine the best of both worlds.

Continue reading “A Physical Front Panel For Oscilloscope Software”

Modded Robot Vacuum Can Whistle While It Works

While repairing his Neato Botvac D85, [elad] noticed the little fellow was packing a real speaker and not just a piezo buzzer. Thinking this was a bit overkill just for the occasional beep and bloop, he decided to round things out with a Bluetooth receiver and a second speaker so the bot can spin some stereo tunes while it gets down and dirty.

It wasn’t a very expensive modification. Between the VHM-314 Bluetooth receiver, the 3 watt PAM8403 amplifier, and a matching speaker, [elad] says he was only a few bucks out of pocket. Truly a small price to pay for a robotic vacuum that plays its own theme music as it travels around the house. A small demonstration of the Neato’s new musical talents can be heard in the video after the break.

Perhaps unsurprisingly, the audio hardware puts enough of a drain on the robot’s batteries at max volume that there’s a noticeable reduction in runtime. He’s not too worried about it right now, but [elad] mentions that if it ends up keeping the vacuum from being able to complete it’s whole cleaning cycle, that he might look into adding a dedicated power source to keep the music going.

Despite some early encouragement from iRobot, we haven’t seen quite as much robot vacuum hacking as you might think. It’s always interesting to get a glimpse inside of these automated housekeepers, especially when it’s a custom built machine.

Continue reading “Modded Robot Vacuum Can Whistle While It Works”

A Look At How Nintendo Mastered Dual Screens

When it was first announced, many people were skeptical of the Nintendo DS. Rather than pushing raw power, the unique dual screen handheld was designed to explore new styles of play. Compared to the more traditional handhelds like the Game Boy Advance (GBA) or even Sony’s PlayStation Portable (PSP), the DS seemed like huge gamble for the Japanese gaming giant.

But it paid off. The Nintendo DS ended up being one of the most successful gaming platforms of all time, and as [Modern Vintage Gamer] explains in a recent video, at least part of that was due to its surprising graphical prowess. While it was technically inferior to the PSP in almost every way, Nintendo’s decades of experience in pushing the limits of 2D graphics allowed them to squeeze more out of the hardware than many would have thought possible.

On one level, the Nintendo DS could be seen as a upgraded GBA. Developers who were already used to the 2D capabilities of that system would feel right at home when they made the switch to the DS. As with previous 2D consoles, the DS had several screen modes complete with hardware-accelerated support for moving, scaling, rotating, and reflecting up to four background layers. This made it easy and computationally efficient to pull off pseudo-3D effects such as having multiple backdrop images scrolling by at different speeds to convey a sense of depth.

On top of its GBA-inherited tile and sprite 2D engine, the DS also featured a rudimentary GPU responsible for handling 3D geometry and rendering. Hardware accelerated 3D could only used on one screen at a time, which meant most games would keep the closeup view of the action on one display, and used the second panel to show 2D imagery such as an overhead map. But developers did have the option of flipping between the displays on each frame to render 3D on both panels at a reduced frame rate. The hardware can also handle shadows and included integrated support for cell shading, which was a particularly popular graphical effect at the time.

By combining the 2D and 3D hardware capabilities of the Nintendo DS onto a single screen, developers could produce complex graphical effects. [Modern Vintage Gamer] uses the example of New Super Mario Bros, which places a detailed 3D model of Mario over several layers of moving 2D bitmaps. Ultimately the 3D capabilities of the DS were hindered by the limited resolution of its 256 x 192 LCD panels; but considering most people were still using flip phones when the DS came out, it was impressive for the time.

Compared to the Game Boy Advance, or even the original “brick” Game Boy, it doesn’t seem like hackers have had much luck coming up with ways to exploiting the capabilities of the Nintendo DS. But perhaps with more detailed retrospectives like this, the community will be inspired to take another look at this unique entry in gaming history.

Continue reading “A Look At How Nintendo Mastered Dual Screens”

Decoding NOAA Satellite Images In Python

You’d be forgiven for thinking that receiving data transmissions from orbiting satellites requires a complex array of hardware and software, because for a long time it did. These days we have the benefit of cheap software defined radios (SDRs) that let our computers easily tune into arbitrary frequencies. But what about the software side of things? As [Dmitrii Eliuseev] shows, decoding the data satellites are beaming down to Earth is probably a lot easier than you might think.

Well, at least in this case. The data [Dmitrii] is after happens to be broadcast from a relatively old fleet of satellites operated by the National Oceanic and Atmospheric Administration (NOAA). These birds (NOAA-15, NOAA-18 and NOAA-19) are somewhat unique in that they fly fairly low and utilize a simple analog signal transmitted at 137 MHz. This makes them especially good targets for hobbyists who are just dipping their toes into the world of satellite reception.

Continue reading “Decoding NOAA Satellite Images In Python”

Raspberry Pi Zero Powers Spotify Streaming IPod

Even those critical of Apple as a company have to admit that they were really onto something with the iPod. The click wheel was a brilliant input device, and the simplicity of the gadget’s user interface made it easy to get to the music you wanted with a minimum of hoop jumping. Unfortunately it was a harbinger of proprietary software and DRM, but eventually there were a few open source libraries that let you put songs on the thing without selling your soul to Cupertino.

Of course, modern users expect a bit more than what the old hardware can deliver. Which is why [Guy Dupont] swapped the internals of his iPod Classic with a Raspberry Pi Zero W. This new Linux-powered digital audio player is not only capable of playing essentially any audio format you throw at it, but can also tap into streaming services such as Spotify. But such greatness doesn’t come easy; to pull this off, he had to replace nearly every component inside the player with the notable exception of the click wheel itself. Good thing the Classics were pretty chunky to begin with.

In addition to the Pi Zero running the show, he also had to fit a 1000 mAh battery, its associated charging and boost modules, a vibration motor for force feedback, and a 2″ LCD from Adafruit. The display ended up being almost the perfect size to replace the iPod’s original screen, and since it uses composite video, only took two wires to drive from the Pi. To interface with the original click wheel, [Guy] credits the information he pulled from a decade-old Hackaday post.

Of course with a project like this, the hardware is only half the story. It’s one thing to cram all the necessary components inside the original iPod enclosure, but by creating such an accurate clone of its iconic UI in Python, [Guy] really took things to the next level. Especially since he was able to so seamlessly integrate support for Spotify, a feature the Apple devs could scarcely have imagined back at the turn of the millennium. We’re very interested in seeing the source code when he pushes it to the currently empty GitHub repository, and wouldn’t be surprised if it set off a resurgence of DIY iPod clones.

We’ve seen modern hardware grafted onto the original iPod mainboard, and over the years a few hackers have tried to spin up their own Pi-based portable music players. But this project that so skillfully combines both concepts really raises the bar.

Continue reading “Raspberry Pi Zero Powers Spotify Streaming IPod”