Pulse Oximetry Sensor Judges Your Coffee Roast

Breakout board for the MAX30101, which [Zach] used as the basis of his roast gauge. The sensor is at the top edge of the board.
Parts designed and marketed for a specific application can nevertheless still be useful in other ways, and whenever that happens, it’s probably the start of a pretty good hack. Using a sensor for something other than its intended purpose is exactly what [Zach Halvorson] did to make the Roast Vision device, which uses the MAX30101, a sealed optical sensor intended mainly for pulse oximetry and heart-rate monitoring.

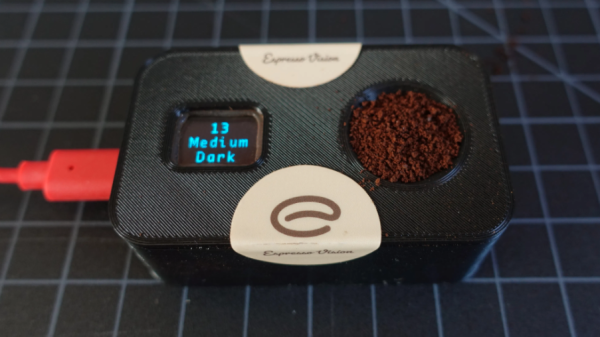
[Zach] is instead using that sensor to measure the roast level of coffee beans, and assign a consistent number from 0 to 35 to represent everything from Very Dark to Very Light. Measuring a bean’s roast level is important to any roaster seeking accuracy and consistency, but when [Zach] found that commercial roast gauges could easily cost over a thousand dollars, he was sure he could do better.

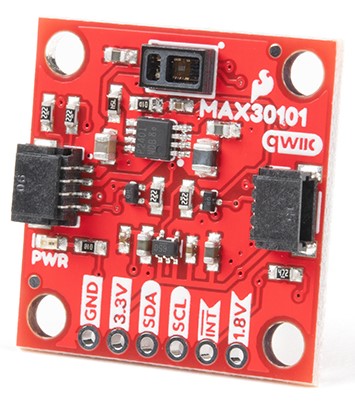
[Zach] settled on using a Sparkfun MAX30101 breakout board to develop his device, and Sparkfun shared an informative blog post that demonstrates how making hardware and tools more accessible can help innovative ideas flourish. The Roast Vision device has a 3D printed enclosure, and a simple top-loading design with an integrated sample cup makes it easy to use. One simply puts about a teaspoon of finely-ground coffee into the sample cup, and the unit provides a measurement in a couple of seconds. Fortunately the sensor works just fine though an acrylic window which means the device can be sealed; a handy feature for a tool that will spend a lot of time around ground coffee.

The joys of fresh roasted coffee is something that is perfectly accessible to those making small batches at home. There are commercial options for small roasters of course, but should you wish to go the DIY route, check out our own Elliot Williams’ guide on making a low-cost DIY roaster.

Clacker Hacker: Popping A Cap In A Brother EP43 Thermal Typewriter

A few months ago, I fell down the internet rabbit hole known as Ted Munk’s typewriter site. I don’t remember if I just saw this Brother EP43 typewriter for sale and searched for information about them, or went looking for one after reading about them. Either way, the result is the same — I gained a typewriter.

Now I’m not really a typewriter collector or anything, and this is my first word processor typewriter. When it arrived from Goodwill, I anxiously popped four ‘C’ cells in and hoped for the best. It made a print head noise, so that was a good sign. But almost immediately after that, there was a BANG! and then a puff of smoke wafted out from the innards. My tiny typewriter was toast. Continue reading “Clacker Hacker: Popping A Cap In A Brother EP43 Thermal Typewriter”

What If You Could Design Your Own Aluminum Hand?

[Ian Davis] has decided to start over on his hand. [Ian] is missing four fingers on his left hand and has for a year now been showcasing DIY prosthetics on his YouTube channel. Back in July, we covered [Ian]’s aluminum hand.

Why aluminum? [Ian] found himself reprinting previous versions’ 3D printed plastic parts multiple times due to damage in the hinged joints, or UV damage rendering them brittle. With an ingenious splaying mechanism and some sensors powered by an Arduino, [Ian] has been wearing the custom machined aluminum hand on a daily basis.

However, as with many makers, he had that itch to revisit and refine the project. Even though the last version was a big jump in quality of life, he still found room for improvement. One particular problem was that the sensors tended to shift around and made it hard to get an accurate reading. To overcome this, [Ian] turned to a molding process. However, adding a stabilizing silicon layer meant that the design of the prosthetic needed to change. With several improvements in mind, [Ian] started the process of creating the plaster positive of his palm, working to create a silicon negative. The next step from here was to create a fiberglass shell that can go over the silicone with sensor wires embedded into the fiberglass shell.

It has been amazing to see the explosion in 3D printed prosthetics over the past few years and hope the trend continues. We look forward to seeing the next steps in [Ian’s] journey towards their ideal prosthetic!

Continue reading “What If You Could Design Your Own Aluminum Hand?”

STM32 Clones: The Good, The Bad And The Ugly

Whenever a product becomes popular, it’s only a matter of time before other companies start feeling the urge to hitch a ride on this popularity. This phenomenon is the primary reason why so many terrible toys and video games have been produced over the years. Yet it also drives the world of electronics. Hence it should come as no surprise that ST’s highly successful ARM-based series of microcontrollers (MCUs) has seen its share of imitations, clones and outright fakes.

The fakes are probably the most problematic, as those chips pretend to be genuine STM32 parts down to the markings on the IC package, while compatibility with the part they are pretending to be can differ wildly. For the imitations and clones that carry their own markings, things are a bit more fuzzy, as one could reasonably pretend that those companies just so happened to have designed MCUs that purely by coincidence happen to be fully pin- and register compatible with those highly popular competing MCU designs. That would be the sincerest form of flattery.

Let’s take a look at which fakes and imitations are around, and what it means if you end up with one. Continue reading “STM32 Clones: The Good, The Bad And The Ugly”

Cluster Deck Packs Four Pis Into One Portable Package

Parallel computing is a fair complex subject, and something many of us only have limited hands-on experience with. But breaking up tasks into smaller chunks and shuffling them around between different processors, or even entirely different computers, is arguably the future of software development. Looking to get ahead of the game, many people put together their own affordable home clusters to help them learn the ropes.

As part of his work with decentralized cryptocurrency, [Jay Doscher] recently found himself in need of a small research cluster. He determined that the Raspberry Pi 4 would give him the best bang for his buck, so he started work on a small self-contained cluster that could handle four of the single board computers. As we’ve come to expect given his existing body of work, the final result is compact, elegant, and well documented for anyone wishing to follow in his footsteps.

The core unit would make a great desktop cluster.

Outwardly the cluster looks quite a bit like the Mil-Plastic that he developed a few months back, complete with the same ten inch Pimoroni IPS LCD. But the internal design of the 3D printed case has been adjusted to fit four Pis with a unique staggered mounting arrangement that makes a unit considerably more compact than others we’ve seen in the past. In fact, even if you didn’t want to build the whole Cluster Deck as [Jay] calls it, just printing out the “core” itself would be a great way to put together a tidy Pi cluster for your own experimentation.

Thanks to the Power over Ethernet HAT, [Jay] only needed to run a short Ethernet cable between each Pi and the TP-Link five port switch. This largely eliminates the tangle of wires we usually associate with these little Pi clusters, which not only looks a lot cleaner, but makes it easier for the dual Noctua 80 mm to get cool air circulated inside the enclosure. Ultimately, the final product doesn’t really look like a cluster of Raspberry Pis at all. But then, we imagine that was sort of the point.

Of course, a couple of Pis and a network switch is all you really need to play around with parallel computing on everyone’s favorite Linux board. How far you take the concept after that is entirely up to you.

Affordable Ground-Penetrating Radar

While you might think of radar pointing toward the skies, applications for radar have found their way underground as well. Ground-penetrating radar (GPR) is a tool that sends signals into the earth and measures their return to make determinations about what’s buried underground in much the same way that distant aircraft can be located or identified by looking for radar reflections. This technology can also be built with a few common items now for a relatively small cost.

This is a project from [Mirel] who built the system around a Arduino Mega 2560 and antipodal Vivaldi antennas, a type of directional antenna. Everything is mounted into a small cart that can be rolled along the ground. A switch attached to the wheels triggers the radar at regular intervals as it rolls, and the radar emits a signal and listens to reflections at each point. It operates at a frequency range from 323 MHz to 910 MHz, and a small graph of what it “sees” is displayed on an LCD screen that is paired to the Arduino.

Using this tool allows you to see different densities of materials located underground, as well as their depths. This can be very handy when starting a large excavation project, detecting rock layers or underground utilities before digging. [Mirel] made all of the hardware and software open-source for this project, and if you’d like to see another take on GPR then head over to this project which involves a lot of technical discussion on how it works.

Do Your Part To Stop The Robot Uprising

One of the pleasures of consuming old science fiction movies and novels is that they capture the mood of the time in which they are written. Captain Kirk was a 1960s guy and Picard was a 1990s guy, after all. Cold war science fiction often dealt with invasion. In the 1960s and 70s, you were afraid of losing your job to a computer, so science fiction often had morality tales of robots running amok, reminding us what a bad idea it was to give robots too much power. As it turns out, robots might be dangerous, but not for the reasons we thought. The robots won’t turn on us by themselves. But they could be hacked. To that end, there’s a growing interest in robot cybersecurity and Alias Robotics is releasing Alurity, a toolbox for robot cybersecurity.

Currently, the toolbox is available for Linux and MacOS with some support for Windows. It targets 25 base robots including the usual suspects. There’s a white paper from when the product entered testing available if you want more technical details.

Continue reading “Do Your Part To Stop The Robot Uprising”