Illuminating The Inner Workings Of A Venus Flytrap

As a carnivorous plant, Venus flytraps have always been a fascinating subject of study. One of their many mysteries is how they differentiate an insect visit from less nutritious stimulants such as a windblown pebble. Now scientists are one step closer to deciphering the underlying mechanism, assisted by a new ability to visualize calcium changes in real time.

Calcium has long been suspected to play an important part in a Venus flytrap’s close/no-close decision process, but scientists couldn’t verify their hypothesis before. Standard chemical tests for calcium would require cutting the plant apart, which would only result in a static snapshot. The software analogy would be killing the process for a memory dump but unable to debug the process at runtime. There were tantalizing hints of a biological calcium-based analog computer at work, but mother nature had no reason to evolve JTAG test points on it.

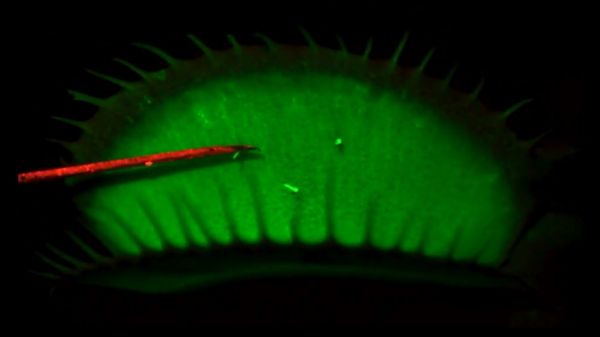
Lacking in-circuit debug headers, scientists turned to the next best thing: add diagnostic indicator lights. But instead of blinking LEDs, genes were added to produce a protein that glows in the presence of calcium. Once successful, they could work with the engineered plants and get visual feedback. Immediately see calcium levels change and propagate in response to various stimuli over different time periods. Confirming that the trap snaps shut only in response to patterns of stimuli that push calcium levels beyond a threshold.

With these glowing proteins in place, researchers found that calcium explained some of the behavior but was not the whole picture. There’s something else, suspected to be a fast electrical network, that senses prey movement and trigger calcium release. That’ll be something to dig into, but at least we have more experience working with electrical impulses and not just for plants, either.

Continue reading “Illuminating The Inner Workings Of A Venus Flytrap”

Linux Fu: Send In The (Cloud) Clones

Storing data “in the cloud” — even if it is your own server — is all the rage. But many cloud solutions require you to access your files in a clumsy way using a web browser. One day, operating systems will incorporate generic cloud storage just like any other file system. But by using two tools, rclone and sshfs, you can nearly accomplish this today with a little one-time setup. There are a few limitations, but, generally, it works quite well.

It is a story as old as computing. There’s something new. Using it is exotic and requires special techniques. Then it becomes just another part of the operating system. If you go back far enough, programmers had to pull specific records from mass storage like tapes, drums, or disks and deblock data. Now you just open a file or a database. Cameras, printers, audio, and even networking once were special devices that are now commonplace. If you use Windows, for example, OneDrive is well-supported. But if you use another service, you may or may not have an easy option to just access your files as a first-class file system.

The rclone program is the Swiss Army knife of cloud storage services. Despite its name, it doesn’t have to synchronize a local file store to a remote service, although it can do that. The program works with a dizzying array of cloud storage providers and it can do simple operations like listing and copying files. It can also synchronize, as you’d expect. However, it also has an experimental FUSE filesystem that lets you mount a remote service — with varying degrees of success.

What’s Supported?

If you don’t like using someone like Google or Amazon, you can host your own cloud. In that case, you can probably use sshfs to mount a file using ssh, although rclone can also do that. There are also cloud services you can self-host like OwnCloud and NextCloud. A Raspberry Pi running Docker can easily stand up one of these in a few minutes and rclone can handle these, too.

Continue reading “Linux Fu: Send In The (Cloud) Clones”

New Contest: Say Goodbye To 2020

Every year you find yourself wanting to build an awesome hack to show off on New Year’s Eve, but like all hackers, you procrastinate and it’s a rush job, if it happens at all. But considering the hot mess of a year 2020 has been, let’s all plan ahead and give 2020 the boot by building the things that make us happy.

The Goodbye 2020! contest kicked off this morning: build something that ushers in the new year in a fun and creative way. Maybe it’s a robot that tears off the pages of a daily desk calendar of 2020, shredding one for each of the last 365 minutes of the year. Build a video countdown device that works with any HDMI screen, or a dedicated LED display — perhaps in hat, glasses, or sweater form factor? There’s unlimited room for creativity here, so don’t forget to show us video of it to get the full effect.

Top three finishers will win a $500, $250, or $100 shopping spree from Digi-Key electronics who are sponsoring the Goodbye 2020! contest. Start your project page on Hackaday.io right now and use the “Submit project to…” drop-down box on the left sidebar to enter it into the contest. We’ll be keeping an eye out for awesome entries from now until the end of December.

Mini IMac G4 Made With NUC And 3D Printer

Apple’s computers have been well regarded over the years for their sharp design features. Of course, something that’s great can only be cuter and cooler if it’s made even smaller. In just that vein, [Gary Olson] whipped up a 54% scale iMac G4.

The iMac G4 was the futuristic-looking flatscreen model, and the direct successor to the original CRT-based iMac. Unlike other projects that run Raspberry Pis or simply fit iPads inside, [Gary] elected to go for a Hackintosh-based build. The system runs Mac OS X on a Intel NUC kitted out with a Core i3 CPU. While it’s not a genuine PowerPC, using OS X fits the proper G4 aesthetic. The build relies on 3D printed components, with the scale size largely chosen to suit the size of [Gary’s] printer and the Intel NUC motherboard. [Gary] goes into detail explaining what was required to get the paint finish right and how to make the hinges stiff but movable.

We’re always fans of a mini retro builds, even if the fact that iMacs are now retro means we’re showing our age. If you’ve got your own cute micro PC coming together in the ‘shop, be sure to drop us a line!

Sending 3D Printed Parts To Mars: A Look Inside JPL’s Additive Manufacturing Center

With the Mars 2020 mission now past the halfway point between Earth and its destination, NASA’s Jet Propulsion Lab recently released a couple of stories about the 3D-printed parts that made it aboard the Perseverance rover. Tucked into its aeroshell and ready for its high-stakes ride to the Martian surface, Perseverance sports eleven separate parts that we created with additive manufacturing. It’s not the first time a spacecraft has flown with parts made with additive manufacturing technique, but it is the first time JPL has created a vehicle with so many printed parts.

To take a closer look at what 3D-printing for spaceflight-qualified components looks like, and to probe a little into the rationale for additive versus traditional subtractive manufacturing techniques, I reached out to JPL and was put in touch with Andre Pate, Additive Manufacturing Group Lead, and Michael Schein, lead engineer on one of the mission’s main scientific instruments. They both graciously gave me time to ask questions and geek out on all the cool stuff going on at JPL in terms of additive manufacturing, and to find out what the future holds for 3D-printing and spaceflight.

Continue reading “Sending 3D Printed Parts To Mars: A Look Inside JPL’s Additive Manufacturing Center”

Binary Calculator For All 0b10 Types

You know the old joke: There are 10 types of people in the world — those who understand binary, and those who don’t. Most of us on Hackaday are firmly in the former camp, which is why projects like this circuit sculpture binary calculator really tickle our fancies.

Inspired by the brass framework and floating component builds of [Mohit Bhoite], [dennis1a4] decided to take the plunge into circuit sculpture in an appropriately nerdy way. He wisely decided on a starter build, which was a simple 555 timer circuit, before diving into the calculator. Based on an ATMega328P in a 28-pin DIP, the calculator is built on an interesting hybrid platform of brass wire and CNC-routed wood. The combination of materials looks great, and we especially love the wooden keycaps on the six switches that make up the keyboard. There’s also some nice work involved in adapting the TLC5928 driver to the display of 16 discrete LEDs; suspended as it is by fine magnet wires, the SSOP chip looks a bit like a bug trapped in a spider web.

Hats off to [dennis1a4] for a great entry into our soon-to-conclude Circuit Sculpture Contest. The entry deadline is (today!) November 10, so it might be a bit too late for this year. But rest assured we’ll be doing this again, so take a look at all this year’s entries and start thinking about your next circuit sculpture build.

Continue reading “Binary Calculator For All 0b10 Types”

Proper Cassettes For Your FPGA Retrocomputer

You can tell the age of someone in our community with a simple question: what were the first removable data storage media you used? Punched cards for the venerable, cassettes for the middle-aged, floppies for the thirtysomethings, Flash cards for the twentysomethings, and maybe even “What’s a removable storage medium?” for the kids brought up on cloud services.  Even with refreshed interest in retrocomputing the cassette hasn’t made a comeback, but maybe that owes something to the hardware. Createing a cassette interface for an FPGA is a task that’s often overlooked, and that’s a project [zpekic] has tackled.

Cassette data recordings are frequency shift keyed, with the 0 and 1 of the binary information represented by different tones. An expected solution to detect these might be to use a Fourier transform, but instead he opts for a simpler solution of counting zero crossings and timing their interval. The resulting stream of data is fed into a UART from which the data itself can be reconstructed. All this is implemented on a Mercury FPGA board which contains a Xilinx Spartan 3A FPGA, but it’s a technique that could be used on other devices too.

So your FPGA retrocomputer deserves an authentic cassette interface, and now it can have one. We’d be especially impressed if all this 2020s wizardry could produce a more stable chuntey field, but we guess that might take a bit more work.

As a final aside, the project is dedicated to the memory of the pioneering Yugoslavian broadcaster [Zoran Modli], whose innovative 1980s radio show featured broadcasts of tape software for the computers of the time including our Hackaday colleague [Voja Antonić]’s Galaksija. Broadcasting software over the radio? That’s a cool hack.