I’m sure you’ve heard of Spectre, which was the first of many speculative execution vulnerabilities found in modern processors. A new one just popped up this week. At Blackhat on Tuesday, CVE-2019-1125 was announced by Bitdefender as SWAPGS.
SWAPGS is an x86_64 instruction that is intended for use in context switching, that is when execution is transferred from a user-space program back into the kernel. Specifically, SWAPGS swaps the value of the GS register so that it refers to either a memory location in the running application, or a location in the kernel’s space. An unprivileged program can attempt to call this instruction and leak kernel memory contents as a result of the processor speculatively executing the instruction (this is similar to Spectre). Even though the instruction will ultimately not be executed, because a userspace program doesn’t have sufficient privilege to do so, the contents of the system cache have already been sufficiently altered, and an attack could feasibly leverage this to read arbitrary kernel memory.
While the initial reports have mentioned both AMD and Intel products, AMD has released a statement:
AMD is aware of new research claiming new speculative execution attacks that may allow access to privileged kernel data. Based on external and internal analysis, AMD believes it is not vulnerable to the SWAPGS variant attacks because AMD products are designed not to speculate on the new GS value following a speculative SWAPGS. For the attack that is not a SWAPGS variant, the mitigation is to implement our existing recommendations for Spectre variant 1.
Patches for Windows and Linux have been released, and Red Hat has an informative write-up on the vulnerability. I would have reviewed Bitdefender’s whitepaper on the vulnerability, but rather than make it freely available, they have opted to require a name and email address. While I would like to see their work, I refuse to sell my contact information in exchange for access.
A Malicious Shader?
This is the first time I can remember hearing of a malicious pixel shader. Cisco Talos announced a set of vulnerabilities targeting VMware and NVIDIA graphics drivers.
Shaders are specialized programs that run on a video card, and are generally used to apply effects like blur, lighting, bump mapping, and more. Most of the graphical improvements in the last few years of gaming is a result of shaders.
Talos researchers were specifically looking at how to compromise a VM Hyper-visor from inside a guest OS, and they discovered that when a host provides 3d acceleration to the guest, shaders are passed directly through to the system drivers without verification. Because the NVIDIA drivers are also vulnerable, this could allow a malicious program on the host to run arbitrary code on the hypervisor.
While this is troubling enough, the topper is that a malicious shader could potentially be run via WebGL. Taken together, this represents a real danger where simply loading a malicious WebGL enabled page could compromise not only a conventional machine, but could also compromise the bare-metal OS even when run on a guest instance.
Both NVIDIA and VMware have already released driver updates that fixes the flaw, so go update!
iOS Problems
Natalie Silvanovich of Google’s Project Zero released a set of 5 iOS vulnerabilities on Wednesday the 7th. These are not garden variety bugs, but so-called “zero click” problems where no user interaction is required for exploit.
The first exploit, for example, is a spoofed visual voicemail message. Visual voicemail notifications are sent as specially formatted text messages and contain information about the message and the address of an IMAP server to connect to and download the message. That information can be spoofed, leading a device to try to download a message from an IMAP server in the control of an attacker. From that point, finding a bug in the iOS IMAP handling code was relatively easy.
5 vulnerabilities have been fixed in iOS updates. There is a 6th vulnerability, CVE-2019-8641, that has yet to be fixed. While a few hints about this problem are given, the details have been withheld until an update has been released to fully fix the problem. One could be a bit cynical and point out that it’s the Google research team announcing these flaws. While there is certainly a self-serving angle to consider, it’s much better for iOS and consumers if flaws are fixed and publicized, rather than kept secret and sold to an offensive security vendor.
One more iOS story is Apple Bleee. Bluetooth Low Energy is an extremely useful communication protocol, allowing Apple devices to perform many of their seemingly magic functionality. The downside is that to make the magic happen, iOS devices are constantly sending BLE signals, probing for other devices. The researchers at Hexway realized that these signals leak lots of data about your device, potentially including your phone number.
iOS uses a SHA256 hash of the device’s phone number as an identifier when using AirDrop. A SHA256 is still a reasonably secure one-way hash, so there’s no problem, right? The clever realization is that while the hash is secure, and the output space is too large to attack, the input space is small enough to be manageable. An attacker could target the most common area codes in their area, limiting the target space further. From there, the SHA256 hashes for all valid numbers can be pre-calculated and stored in a lookup table.
More WPA3 Problems
We’ve discussed Dragonblood, a WPA3 analysis project. A new problem has been identified, a timing analysis attack that leaks information about the internal state of the encryption algorithm.
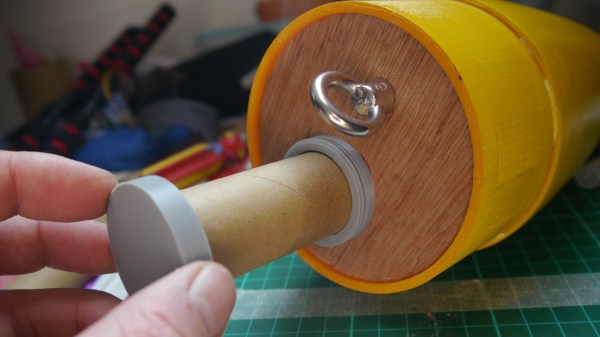
 The payload container is a hollow tube with a 3D printed threaded adaptor attached to one end. Payload goes into the tube, and the tube inserts into a hole in the bulkhead, screwing down securely. The result is an easy way to send up something like a GPS tracker, possibly with a LoRa module attached to it. That combination is a popular one with high-altitude balloons, which, like rockets, also require people to retrieve them after not-entirely-predictable landings. LoRa wireless communications have very long range, but that doesn’t help if there’s an obstruction like a hill between you and the transmitter. In those cases, a simple LoRa repeater attached to a kite, long pole, or drone can save the day.


 The tray rides on short drawer glides and, thanks to a small pneumatic spring, pops up when the door is unlatched. There was a little trouble with some slop in the glides causing the tray to jam, but that was taken care of with a simple roller bearing. The video below shows its construction and how it stays entirely out of the way until needed.


