Gorgeous Omnidirectional 3D Printed Speaker

With all due respect to the hackers and makers out there that provide us with all these awesome projects to salivate over, a good deal of them tend to prioritize functionality over aesthetics. Which isn’t a bad thing necessarily, and arguably better than the alternative. But for many people there’s a certain connotation around DIY, an impression that the final product is often a little rough around the edges. It’s usually cheaper, maybe even objectively better, but rarely more attractive.

Which makes builds like this absolutely beautiful 3D printed Bluetooth speaker by [Ahmsville] especially impressive. Not only did he engineer a fantastic sounding speaker that projects stereo sound no matter where you are in the room, he clearly gave a lot of thought into making the final product look as good as it sounds.

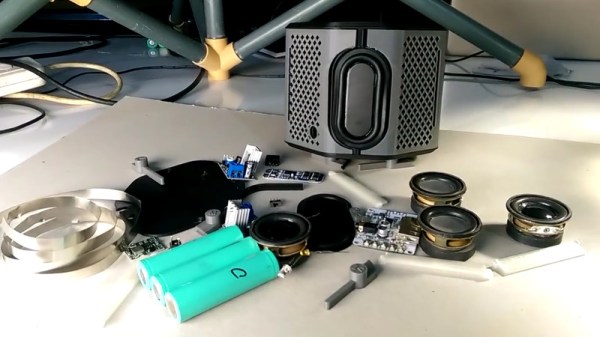
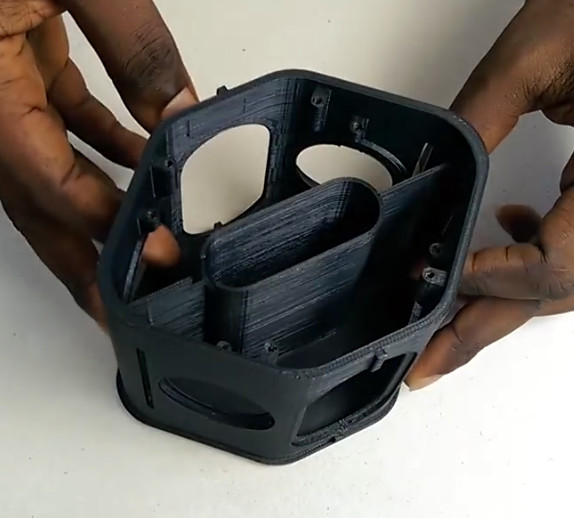
The 3D-printed enclosure provides separation for the four internal speakers and two passive radiators, as well as holding the electronics. A custom made 3S battery powers the Bluetooth module though an isolated step-down module, and the twin 18 W TDA2030 amplifiers feed their respective pair of drivers.

The device is surrounded by an impressively detailed 3D-printed mesh, which is then wrapped with some speaker grill fabric to give it a very professional look. In the video after the break, [Ahmsville] shows a time-lapse of building the speaker, as well as a demonstration of how it sounds on his desk.

If you’re more about function than what the finished product looks like, we’ve covered speaker enclosures made out of various types of actual trash which you can take a look at.

Continue reading “Gorgeous Omnidirectional 3D Printed Speaker”

PLA: The Plastic That Grows

If you’ve ever taken a coast-to-coast car trip across the United States, the one thing that’s sure to impress you is the mind-bogglingly immense amount of corn that we grow here. If you take the northern route — I’ve done it seven times, so I know it by heart — you’ll see almost nothing but corn from Ohio to Montana. The size of the fields is simply staggering, and you’re left wondering, “Do we really eat all this corn?”

The simple answer is no, we don’t. We grow way more corn than we can eat or, once turned into alcohol, drink. We do feed a lot to animals, many of which subsequently end up as burgers or pork chops. But even after all that, and after accounting for exports, we still have a heck of a lot of corn to put to work. There are lots of industrial uses for this surplus corn, though, and chances are pretty good you’ve got an ear or two worth coiled up next to your 3D-printer, in the form of polylactic acid, or PLA.

Continue reading “PLA: The Plastic That Grows”

Turning A Cheap Engraver Into A Decent PCB Mill

We know, we know. Getting PCBs professionally fabricated anymore is so cheap and easy that making them in-house is increasingly becoming something of a lost art. Like developing your own film. Or even using a camera that has film, for that matter. But when you’re in Brazil and it takes months for shipments to arrive like [Robson Couto] is, sometimes you’re better off sticking with the old ways.

[Robson] writes in to tell us how he decided to buy a ~$150 CNC “engraver” kit from an import site, in hopes that it would allow him to prototype his designs without having to use breadboards all the time. The kit turned out to be decent, but with a series of modifications and a bit of trial and error, he’s improved the performance significantly and is now putting out some very nice looking boards.

The primary hardware issues [Robson] ran into were in the Z axis, as some poor component selections made the stock configuration wobble a bit too much. He replaced some flimsy standoffs as well as swapping in some bushings he salvaged from dead inkjet printers, and the movement got a lot tighter.

Despite the fact that the version of Grbl flashed onto the engraver’s cloned Arduino Uno supports Z leveling, it’s not actually enabled out of the box. [Robson] just needed to add some extra wiring to use the spindle’s bit as a probe on the copper clad board. He also went ahead and updated to the latest version of Grbl, as the one which ships with the machine is fairly old.

He wraps up the post by going through his software workflow on GNU/Linux, which is useful information even if you’ve taken the completely DIY route for your PCB mill. If you’d like to know more about the ins and outs of milling your own boards, check out this excellent primer by [Adil Malik].

Continue reading “Turning A Cheap Engraver Into A Decent PCB Mill”

Less Is More: A Micromatrix Display In A Square Inch

In your living room, the big display is what you want. But in an embedded project, often less is more. We think [bobricius] will agree since he submitted a tiny 4×5 LED display into our square inch challenge. The board features an ATtiny CPU and twenty SMD LEDs in a nice grid. You can see them in action, scrolling to some disco music in the video below.

There is plenty of room left in the CPU for bigger text strings — the flash memory is just over 10% full. A little side-mounted header makes it easy to program the chip if you want to change anything.

Continue reading “Less Is More: A Micromatrix Display In A Square Inch”

Repairing A Desktop Jukebox

Although vinyl records have had a bit of resurgence, they are far away from their heyday. There was a time when 45 RPM singles were not just how you listened to music at home, but they also populated the jukeboxes you’d find in your local malt shop or anywhere else in public. [Fran] has an old 45 RPM “desktop jukebox” from RCA. It really isn’t a jukebox, but an automatic record changer dating from the 1950s. The problem is, the cartridge was toast. Replacing it wasn’t a big problem, even though replacing it with an exact duplicate wasn’t possible. But, of course, that was just the start.

You can see in the video below, that there were some weight problems with the cartridge, but the changer part would not work. She tears it down and makes some modifications. She even pulled out the schematic which had three tubes — one of which was just a rectifier.

Continue reading “Repairing A Desktop Jukebox”

Shop-Made Pneumatic Cylinders From PVC And Plywood

You see a lot of pneumatic actuators in industrial automation, and for good reason. They’re simple, powerful, reliable, and above all, cheap. Online sources and fluid-power suppliers carry a bewildering range of actuators, so why would anyone bother to make their own pneumatic cylinders? Because while the commercial stuff is cheap, it’s not PVC and plywood cheap.

Granted, that’s not the only reason [Izzy Swan] gives for his DIY single-acting cylinder. For him it’s more about having the flexibility to make exactly what he needs in terms of size and shape. And given how ridiculously easy these cylinders are, you can make a ton of them for pennies. The cylinder itself is common Schedule 40 PVC pipe with plywood endcaps, all held together with threaded rod. [Izzy] cut the endcaps with a CNC router, but a band saw or jig saw would do as well. The piston is a plywood plug mounted to a long bolt; [Izzy] gambled a little by cutting the groove for the O-ring with a table saw, but no fingers were lost. The cylinder uses a cheap bungee as a return spring, but an internal compression spring would work too,. Adding a second air inlet to make the cylinder double-acting would be possible as well. The video below shows the cylinder in action as a jig clamp.

True, the valves are the most expensive part of a pneumatic system, but if nothing else, being able to say you made your own cylinders is a win. And maybe you’ll get the fluid-power bug and want to work up to DIY hydraulics.

Continue reading “Shop-Made Pneumatic Cylinders From PVC And Plywood”

Adding Upgrades To A Stock Motorcycle

In today’s world of over-the-air firmware upgrades in everything from cars to phones to refrigerators, it’s common for manufacturers of various things to lock out features in software and force you to pay for the upgrades. Even if the hardware is the same across all the models, you can still be on the hook if you want to unlock anything extra. And, it seems as though Suzuki might be following this trend as well, as [Sebastian] found out when he opened up his 2011 Vstrom motorcycle.

The main feature that was lacking on this bike was a gear indicator. Even though all the hardware was available in the gearbox, and the ECU was able to know the current gear in use, there was no indicator on the gauge cluster. By using an Arduino paired with an OBD reading tool (even motorcycles make use of OBD these days), [Sebastian] was able to wire an LED ring into the gauge cluster to show the current gear while he’s riding.

The build is very professionally done and is so well blended into the gauge cluster that even we had a hard time spotting it at first. While this feature might require some additional lighting on the gauge cluster for Suzuki to be able to offer this feature, we have seen other “missing” features in devices that could be unlocked with a laughably small amount of effort.

Continue reading “Adding Upgrades To A Stock Motorcycle”