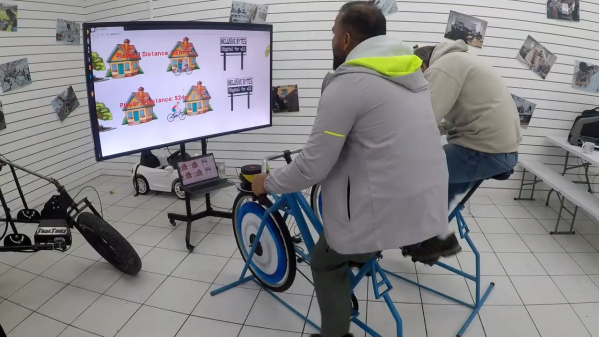
Retro Inspired Cyberdeck Scrolls Around Cyberspace

It’s difficult to nail down exactly what counts as a “real” cyberdeck in this brave new era of bespoke computing. But at the minimum, most in the community would agree that a proper deck should have a non-traditional form factor, and be designed to meet the unique needs of the builder. If you’re looking for a fantastic example of both concepts, check out the Cyberdore 2064 from [Tommi L].

At first glance the 3D printed enclosure of the Cyberdore looks a bit like a Speak & Spell, but it’s really more of an amalgamation of everything that made 1980s computers so unique. You’ve got the vents, the chunky switches, the undersized display, and of course, the handle. The case might have been extruded in 2024, but it’s doing a fantastic impression of a piece of tech from 40 years ago.

One of the key external features of the Cyberdore 2064 is the side-mounted rotary encoder that allows for smoothly scrolling through online feeds (such as your favorite hardware hacking site) or long documents. The cheap and easy to work with KY-040 encoder has been converted to a USB input device by way of a Pi Pico, and has been paired with an over-sized 3D printed knob that really makes this build stand out — not only visually, but in terms of usability. These cyberdeck builds often rely on touch screens for input, but we always appreciate a physical interface.

Under the hood you’ve got a Raspberry Pi Zero and an 18650 cell to keep the whole thing running while on the go. Though the Zero is certainly showing its age compared to the more modern variants of the Pi, for a device like this, raw computing power isn’t really the driving concern. A mechanical keyboard usually rounds out these cyberdeck builds, but in this case, [Tommi] went with a fairly common Rii 518BT portable board that’s been skillfully integrated into the front of the Cyberdore.

All of the STL files necessary to print out your own Cyberdore 2064 are available on Printables, and while [Tommi] didn’t exactly provide build instructions, the write-up provides plenty of information to get you started.

So is it just us, or does looking at Cyberdore 2064 make you think it’s time for another Hackaday Cyberdeck Challenge?

A person putting a screw into a CNC spoil board on the left of the image. Their drill is chartreuse and black. Clamps hold a rectangular board down at all four corners. The spindle of the CNC is just visible on the right hand side of the image.

Workholding Options For The Beginner CNC Operator

Designing a file to cut on a CNC is only part of the process. You also have to keep it in place while the machine does its work. [Garrett Fromme] walks us through five different work holding techniques.

Since every project is different and stock material can vary from thin veneer to much larger pieces, there’s no one right work holding method for every project, and not all methods are applicable to all materials. A vise is great for small projects that need to be held very securely and won’t be damaged, vacuum tables can make switching pieces quick in a production environment, fasteners will hold a piece securely at the expense of your spoil board, clamps are fairly versatile but fiddly to setup, and tape and CA glue are quick but require more consumables.

[Fromme] does a quick demonstration of setups with these different methods and their limitations, which is a great place to start for the beginner CNC operator. Just like 3D printers, CNCs are a far cry from the replicators in Star Trek that can automagically create what you ask it to, but proper workholding lets you waste less material and operate the machine more safely.

Our own [Elliot Williams] had a look at how CNCs aren’t as automated as you think. If you do need some CNC clamps, you might try these printable parametric clamps, or if you want something more beautiful, give these metal toe clamps a go.

Continue reading “Workholding Options For The Beginner CNC Operator”

Exploring Cheap Tantalum Caps Of Mysterious Provenance

We’ve all heard about the perils of counterfeit chips, and more than a few of us have probably been bitten by those scruple-free types who run random chips through a laser marker and foist them off as something they’re not. Honestly, we’ve never understood the business model here — it seems like the counterfeiters spend almost as much time and effort faking chips as they would just getting the real ones. But we digress.

Unfortunately, integrated circuits aren’t the only parts that can be profitably faked, as [Amateur Hardware Repair] shows us with this look at questionable tantalum capacitors. In the market for some tantalums for a repair project, the offerings at AliExpress proved too tempting to resist, despite being advertised alongside 1,000 gram gold bars for $121 each. Wisely, he also ordered samples from more reputable dealers like LCSC, DigiKey, and Mouser, although not at the same improbably low unit price.

It was pretty much clear where this would be going just from the shipping. While the parts houses all shipped their tantalums in Mylar bags with humidity indicators, with all but LCSC including a desiccant pack, the AliExpress package came carefully enrobed in — plastic cling wrap? The Ali tantalums were also physically different from the other parts: they were considerably smaller, the leads seemed a little chowdered up, and the package markings were quite messy and somewhat illegible. But the proof is in the testing, and while all the more expensive parts tested fine in terms of capacitance and equivalent series resistance, the caps of unknown provenance had ESRs in the 30 milliohm range, three to five times what the reputable caps measured.

None of this is to say that there aren’t some screaming deals on marketplaces like AliExpress, Amazon, and eBay, of course. It’s not even necessarily proof that these parts were in fact counterfeit, it could be that they were just surplus parts that hadn’t been stored under controlled conditions. But you get what you pay for, and as noted in the comments below the video, a lot of what you’re paying for at the parts houses is lot tracebility.

Continue reading “Exploring Cheap Tantalum Caps Of Mysterious Provenance”

Reviewing Nuclear Accidents: Separating Fact From Fiction

Few types of accidents speak as much to the imagination as those involving nuclear fission. From the unimaginable horrors of the nuclear bombs on Nagasaki and Hiroshima, to the fever-pitch reporting about the accidents at Three Mile Island, Chernobyl and Fukushima, all of these have resulted in many descriptions and visualizations which are merely imaginative flights of fancy, with no connection to physical reality. Due to radiation being invisible with the naked eye and the interpretation of radiation measurements in popular media generally restricted to the harrowing noise from a Geiger counter, the reality of nuclear power accidents in said media has become diluted and often replaced with half-truths and outright lies that feed strongly into fear, uncertainty, and doubt.

Why is it that people are drawn more to nuclear accidents than a disaster like that at Bhopal? What is it that makes the one nuclear bomb on Hiroshima so much more interesting than the firebombing of Tokyo or the flattening of Dresden? Why do we fear nuclear power more than dam failures and the heavy toll of air pollution? If we honestly look at nuclear accidents, it’s clear that invariably the panic afterwards did more damage than the event itself. One might postulate that this is partially due to the sensationalist vibe created around these events, and largely due to a poorly informed public when it comes to topics like nuclear fission and radiation. A situation which is worsened by harmful government policies pertaining to things like disaster response, often inspired by scientifically discredited theories like the Linear No-Threshold (LNT) model which killed so many in the USSR and Japan.

In light of a likely restart of Unit 1 of the Three Mile Island nuclear plant in the near future, it might behoove us to wonder what we might learn from the world’s worst commercial nuclear power disasters. All from the difficult perspective of a world where ideology and hidden agendas do not play a role, as we ask ourselves whether we really should fear the atom.

Continue reading “Reviewing Nuclear Accidents: Separating Fact From Fiction”

Watch This RC Jet Thrust System Dance

An EDF (electric duct fan) is a motor that basically functions as a jet engine for RC aircraft. They’re built for speed, but to improve maneuverability (and because it’s super cool) [johnbecker31] designed a 3D-printable method of adjusting the EDF’s thrust on demand.

Before 3D printers were common, making something like this would have been much more work.

The folks at Flite Test released a video in which they built [john]’s design into a squat tester jet that adjusts thrust in sync with the aircraft’s control surfaces, as you can see in the header image above. Speaking of control surfaces, you may notice that test aircraft lacks a rudder. That function is taken over by changing the EDF’s thrust, although it still has ailerons that move in sync with the thrust system.

EDF-powered aircraft weren’t really feasible in the RC scene until modern brushless electric motors combined with the power density of lithium-ion cells changed all that. And with electronics driving so much, and technology like 3D printers making one-off hardware accessible to all, the RC scene continues to be fertile ground for all sorts of fascinating experimentation. Whether it’s slapping an afterburner on an EDF or putting an actual micro jet engine on an RC car.

Continue reading “Watch This RC Jet Thrust System Dance”

Hacker Tactic: Single-PCB Panels

Ordering a PCB? Two of them? Three? Five? For about eight years now, I’ve been regularly ordering large numbers of different PCBs, and, naturally, have developed a toolkit to make things smoother. One trick is PCB panelization, and you should really know about it.

You might’ve encountered PCB panels already. Perhaps, if you order PCBA at a fab, you will get your board returned in a whole new form-factor, with rails on the sides that you have to snap off before your PCB is usable. Those rails are used so that your PCBs are easier to handle during assembly, but that’s far from the only reason why you would make a panel.

If you need multiple pieces of a PCB, your fab may say that building 50 pcs is classified as “large batch” and that takes longer than 30 days, which delays your entire PCB order. I’ve been there, five years ago, running out of time right before Chinese New Year. The fix was simple – I made a 2×2 panel and ordered that in quantity of 10-15. Panelization might be a little more expensive, or maybe even cheaper, but, most importantly, it will be faster.

In a few hours’ time, I sat down, figured out that KiCad has built-in features for panelization, and ordered panels instead of separate PCBs. Thanks to that, I made the Chinese New Year deadline that year and could successfully restock my store, letting me earn a fair bit of money instead of keeping a popular product out-of-stock – ultimately, helping my family stay up on rent that month.

Panelization lets you hack around many PCB ordering and assembly limitations, and I’ve only gotten started – there’s way way more! For now, let’s sort out panelizing multiples of the same PCB. As long as your boards are using KiCad (or KiCad-converted from Eagle/EasyEDA/Altium/gerbers), there’s no better software than KiKit.

Continue reading “Hacker Tactic: Single-PCB Panels”

Playing Rock, Paper Scissors With A Time Of Flight Sensor

You can do all kinds of wonderful things with cameras and image recognition. However, sometimes spatial data is useful, too. As [madmcu] demonstrates, you can use depth data from a time-of-flight sensor for gesture recognition, as seen in this rock-paper-scissors demo.

If you’re unfamiliar with time-of-flight sensors, they’re easy enough to understand. They measure distance by determining the time it takes photons to travel from one place to another. For example, by shooting out light from the sensor and measuring how long it takes to bounce back, the sensor can determine how far away an object is. Take an array of time-of-flight measurements, and you can get simple spatial data for further analysis.

The build uses an Arduino Uno R4 Minima, paired with a demo board for the VL53L5CX time-of-flight sensor. The software is developed using NanoEdge AI Studio. In a basic sense, the system uses a machine learning model to classify data captured by the time-of-flight sensor into gestures matching rock, paper, or scissors—or nothing, if no hand is present. If you don’t find [madmcu]’s tutorial enough, you can take a look at the original version from STMicroelectronics, too.

It takes some training, and it only works in the right lighting conditions, but this is a functional system that can determine real hand sign and play the game. We’ve seen similar techniques help more advanced robots cheat at this game before, too! What a time to be alive.