Retro Gaming With Retro Joysticks

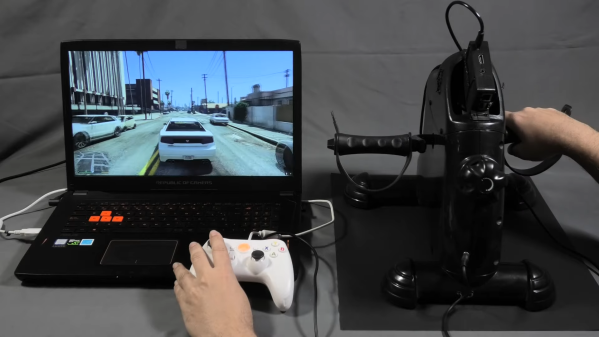
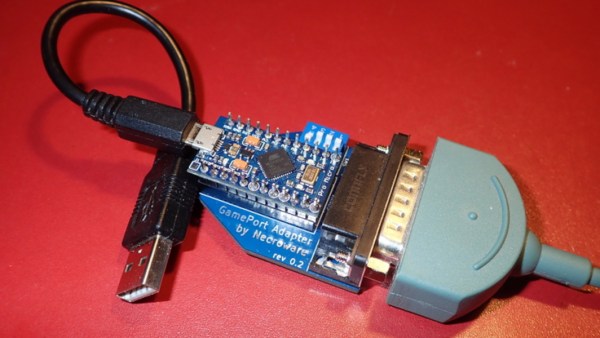
One of the biggest reasons for playing older video games on original hardware is that emulators and modern controllers can’t replicate the exact feel of how those games would have been originally experienced. This is true of old PC games as well, so if you want to use your original Sidewinder steering wheel or antique Logitech joystick, you’ll need something like [Necroware]’s GamePort adapter to get them to communicate with modern hardware.

In a time before USB was the standard, the way to connect controllers to PCs was through the GamePort, typically found on the sound card. This has long since disappeared from modern controllers, so the USB interface [Necroware] built relies on an Arduino to do the translating. Specifically, the adapter is designed as a generic adapter for several different analog joysticks, and a series of DIP switches on the adapter select the appropriate mode. Check it out in the video after the break. The adapter is also capable of automatically calibrating the joysticks, which is necessary as the passive components in the controllers often don’t behave the same way now as they did when they were new.

Plenty of us have joysticks and steering wheels from this era stored away somewhere, so if you want to experience Flight Simulator 5.0 like it would have been experienced in 1993, all it takes is an Arduino. And, if you want to run these programs on bare metal rather than in an emulator, it is actually possible to build a new Intel 486 gaming PC, which operates almost exactly like a PC from the 90s would have.

Continue reading “Retro Gaming With Retro Joysticks”

ESP32 And Raspberry Pi Take Over Game Boy LCD

The Nintendo Game Boy and its many permutations represent one of the most well-known and successful gaming platforms ever produced. There was a decades-long stretch of time where the most popular kid in the lunch room was the one who brought in their Game Boy so the rest of the class could huddle around and check out the latest Pokemon title.

But those days are long gone, and now these once-coveted handhelds can be had for a song on the second-hand market. Which makes it the perfect time to check out this project [kgsws] released recently that allows you to interface the Game Boy LCD with the ESP32 or the Raspberry Pi. In the most basic of applications, it lets you push video from your Linux computer out to the Game Boy LCD over WiFi. But as the video below illustrates, that’s just the tip of the iceberg.

With the ESP32 wired between the handheld’s LCD and main PCB, the microcontroller can also act as a capture device using I2S camera mode. Compared to what ends up showing on the handheld’s LCD, the recorded gameplay [kgsws] shows off looks fantastic. Visuals are crisp and fluid, and naturally devoid of the Game Boy’s iconic (if slightly nauseating) greenish tint.

The project also includes the capability to control an array of Game Boy LCDs, which allows for some interesting possibilities. The image can be stretched to cover multiple displays, which [kgsws] demonstrates by playing a game on 3 x 3 grid of salvaged panels, but each LCD also can be controlled individually as is the case with the large digital clock seen above.

Whether you’re looking for a way to capture gameplay on the real hardware, or want to run RetroPie on a real Game Boy screen, we’re excited to see what folks come up with using this project.

Continue reading “ESP32 And Raspberry Pi Take Over Game Boy LCD”

Pocket-Sized DOOM Is Actually Playable

It used to be that you needed a well-equipped expensive new beige-box PC if you wanted to play DOOM at all. Now, you can do so in a form factor with a footprint smaller than a credit card, as demonstrated by this nifty little build from Adafruit.

The build relies on the Retro-Go firmware for ESP32 devices, which can emulate a range of machines, from the Nintendo NES and Game Boy to the NEC PC Engine, Atari Lynx, and, yes, DOOM itself. It can even run DOOM, via the WAD architecture used by the game.

It was a simple matter of porting Retro-Go to run on the tiny QT Py ESP32 Pico board, and everything fell into place. With six tactile buttons, it’s capable of not just running DOOM, but running it at full playable speeds including that classic soundtrack. The 1.3″ 240×240 screen looks surprisingly crisp and does a great job of displaying the game while keeping everything readable.

It’s one of the smaller DOOM-capable portables we’ve seen; we reckon you could stuff this in the change pocket in your jeans if you tried hard enough. We’ll never quite get over seeing the world’s most loved FPS running on commercial kitchen hardware, though.

Continue reading “Pocket-Sized DOOM Is Actually Playable”

Exercise Bike Hacked As Input For Xbox 360

If you like playing Grand Theft Auto, you’re pretty familiar with squeezing the triggers for accelerating and braking while driving around. [David Programa] decided this was too easy, and instead developed a system to allow him to pedal his way around the virtual world.

The device relies on a flywheel-based exercise bike, with six magnets placed on the flywheel that triggers a reed switch six times per rotation. The extra magnets give the system better resolution at slow speeds. A Hall Effect sensor would be a more reliable way to build this to survive in the long term, but the reed switch does work. It’s paired with a debounce circuit to keep the output clean. A Raspberry Pi is pressed into service, running a Python program to read a GPIO pin activated by the reed switch, counting pulses to determine the speed of pedalling.

The trigger control used in the Xbox 360 controller is a potentiometer that creates varying voltages depending on its position, allowing it to act as an analog accelerator input. 0 volts corresponds to no input, while the trigger reads 3.3 volts when fully depressed. The Raspberry Pi emulates this with its PWM output, paired with a low-pass filter to create the relevant voltage to inject into the trigger input on a generic Xbox 360 controller.

While it’s a lot less practical than simply using a regular controller, the pedal controls do allow you to get a great workout while playing Grand Theft Auto. Some of the more intense chase missions should be a great way to get your heart rate up, and that’s got to be a good thing.

Ironically, though, the system only works for cars and motorbikes in game. The bicycles in Grand Theft Auto are controlled by mashing the A button instead. Alternatively, you might consider a similar system for playing Mario Kart on the Nintendo Switch. Video after the break.

Continue reading “Exercise Bike Hacked As Input For Xbox 360”

Reverse Engineering The SEGA Mega Drive

With the widespread adoption of emulators, almost anyone can start playing video games from bygone eras. Some systems are even capable of supporting homebrew games, with several having active communities that are still creating new games even decades later. This ease of programming for non-PC platforms wasn’t always so easy, though. If you wanted to develop games on a now-antique console when it was still relatively new, you had to jump through a lot of hoops. [Tore] shows us how it would have been done with his Sega Mega Drive development kit that he built from scratch.

While [Tore] had an Atari ST, he wanted to do something a little more cutting edge and at the time there was nothing better than the Mega Drive (or the Genesis as it was known in North America). It had a number of features that lent the platform to development, namely the Motorola 68000 chip that was very common for the time and as a result had plenty of documentation available. He still needed to do quite a bit of reverse engineering of the system to get a proper dev board running, though, starting with figuring out how the cartridge system worked. He was able to build a memory bank that functioned as a re-writable game cartridge.

With the hard parts out of the way [Tore] set about building the glue logic, the startup firmware which interfaced with his Atari ST, and then of course wiring it all together. He was eventually able to get far enough along to send programs to the Mega Drive that would allow him to control sprites on a screen with the controller, but unfortunately he was interrupted before he could develop any complete games. The amount of research and work to get this far is incredible, though, and there may be some helpful nuggets for anyone in the homebrew Mega Drive community today. If you don’t want to get this deep into the Mega Drive hardware, though, you can build a cartridge that allows for development on native Sega hardware instead.

Acid-Damaged Game Boy Restored

The original Game Boy was the greatest selling handheld video game system of all time, only to be surpassed by one of its successors. It still retains the #2 position by a wide margin, but even so, they’re getting along in years now and finding one in perfect working condition might be harder than you think. What’s more likely is you find one that’s missing components, has a malfunctioning screen, or has had its electronics corroded by the battery acid from a decades-old set of AAs.

That latter situation is where [Taylor] found himself and decided on performing a full restoration on this classic. To get started, he removed all of the components from the damaged area so he could see the paths of the traces. After doing some cleaning of the damage and removing the solder mask, he used 30 gauge wire to bridge the damaged parts of the PCB before repopulating all of the parts back to their rightful locations. A few needed to be replaced, but in the end the Game Boy was restored to its former 90s glory.

This build is an excellent example of what can be done with a finely tipped soldering iron while also being a reminder not to leave AA batteries in any devices for extended periods of time. The AA battery was always a weak point for the original Game Boys, so if you decide you want to get rid of batteries of any kind you can build one that does just that.

Continue reading “Acid-Damaged Game Boy Restored”

Miniature Space Invaders game

Arduino And An OLED Make This Space Invaders Cabinet Tiny

For as simple as it appears now, Space Invaders was one machine from the Golden Age of video games that always seemed to have a long line waiting for a chance to lose a couple of quarters. And by way of celebrating the seminal game’s influence, [Nick Cranch] has executed what might just be the world’s smallest Space Invaders replica.

It appears that this started mainly as an exercise in what’s possible with what’s on hand, which included a couple of quite small OLED displays. For the build photos it looks like there’s an Arduino Nano running the show; [Nick] relates that the chosen hardware proved challenging, and that he had to hack the driver library to make it work. Once he got a working game, [Nick] didn’t rest on his laurels. Rather, he went the extra mile and built a miniature cabinet to house everything in.

The video quality below may be poor, but it’s more than enough to see how much work he put into detailing the cabinet. The graphics of the original US release of the game cabinet are accurately represented, right down to the art on the front glass. The cabinet itself is made from 1.5 mm plywood which he cut by hand. It even looks like he recreated the original scheme of cellophane overlays on the monochrome screen to add a little color to the game. Nice touch!

We really appreciate the attention to detail here, with our only quibble being no schematics or code being posted. Hopefully, we’ll see those later, but for now, this looks like a fun project and a nice trip down memory lane. But if you think it’s too small, no worries — we’ve got a much, much bigger version of the game too.

Continue reading “Arduino And An OLED Make This Space Invaders Cabinet Tiny”