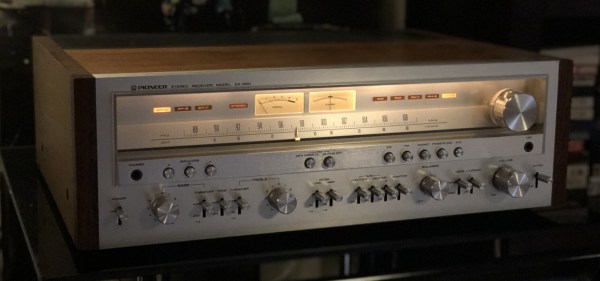
Solar Satellite Glows At Night

They say that imitation is the sincerest form of flattery. If we were going to imitate one of master circuit sculptor Mohite Bhoite’s creations, we’d probably pick the little blinky solar satellite as a jumping off point just like [richardsappia] did. It’s cute, it’s functional, and it involves solar power and supercapacitors. What more could you want?

SATtiny is a pummer, which is BEAM robotics speak for a bot that soaks up the sun all day and blinks (or ‘pumms’, we suppose) for as long as it can throughout the night on the juice it collected. This one uses four mini solar panels to charge up a 4 F supercapacitor.

At the controls is an ATtiny25V, which checks every eight seconds to see if the supercapacitor is charging or not as long as there is enough light. Once night has fallen, the two red LEDs will pumm like a pair of chums until the power runs out. Check out the brief demo after the break.

Would you rather have something more nightstand-friendly? Here’s a mini night light sculpture with a friendly glow. If you haven’t started your entry into our Circuit Sculpture Challenge, there’s still plenty of time — the contest runs until November 10th.

Continue reading “Solar Satellite Glows At Night”

Driving A PAL TV Over RF Thanks To PWM Harmonics

While most analog televisions come with composite video inputs on a yellow RCA jack, the feature is not universal. This problem was even more prevalent in the 1980s, and most home consoles got around the problem by instead feeding video to the television’s tuner with an RF modulator. [Manzel Seet] had just such a television which used the PAL standard. Wanting to display images from a microcontroller, he put together PAL-Streamer.

The aim of the project was to display images on an analog television with minimal investment in hardware over and above what [Manzel] already had on hand. To this end, the project was built using a STM32F411 Nucleo development board. Capable of running at clock speeds up to 100 MHz, there’s plenty of grunt to handle demanding tasks like outputting video signals to a TV.

To achieve the target frequency of VHF Channel 3 (61.25 MHz), [Manzel] elected to rely on the onboard PWM hardware, after being inspired by [CNLohr]’s ATTiny NTSC project. The project takes advantage of the odd harmonics of square waves. Setting the PWM output to operate at 6.86 MHz, the ninth harmonic ends up at around 61.71 MHz, close enough to be tuned in on the TV set. With the hard part done, [Manzel] then implemented a virtual COM port allowing an attached PC to send PNG images or GIF animations to the display.

It’s a fun project that shows it’s possible to drive all kinds of analog displays if you’re willing to be creative about how you do it. Files are available on GitHub for those eager to recreate the work. [Manzel] points out that this method does put out a lot of RF energy in the surrounding bands, but for direct hookup to an antenna input, it works just fine. We love to see creative video projects on microcontrollers, so if you’ve figured out how to get an Arduino Uno to do 1080P over HDMI, be sure to let us know. Video after the break.

Continue reading “Driving A PAL TV Over RF Thanks To PWM Harmonics”

Hacking D-Link Firmware

When [0xRickSanchez] found some D-Link firmware he couldn’t unpack, he was curious to find out why. The firmware had a new encryption method which was doing its job of preventing tampering and static analysis. Of course, he had to figure out how to get around it and is documenting his work in a series of blog posts.

Looking at the entropy analysis showed the data to be totally random,  a good sign it was either encrypted or compressed. The target router cost about $200, but a similar cheaper router used the same encryption and thus this model became the hardware of choice for testing.

Continue reading “Hacking D-Link Firmware”

ESP32 Altair Emulator Gets Split Personality

If you wanted me to demo CP/M running on an emulated Altair 8800, I’d pull out a tiny board from my pocket. You might wonder how I wound up with an Altair 8800 that runs CP/M (even WordStar), that fits in your pocket and cost less than $10. Turns out it’s a story that goes back to 1975.

When the Altair 8800 arrived back in 1975, I wanted one. Badly. I’d been reading about computers but had no hands-on experience. But back then, as far as I was concerned, the $400 price tag might as well have been a million bucks. I was working for no real pay in my family’s store, though in all fairness, adjusted into today’s money that was about $2,000.

I’d love to buy one now, but a real Altair costs even more today than it did back then. They also take up a lot of desk space. Sure, there are replicas and I’ve had a few. I even helped work the kinks out of Vince Briel’s clone which I’ve enjoyed. However, the Briel computer has two problems. First, it takes a little work to drive a serial port (it uses a VGA and a PS/2 keyboard). Second, while it’s smaller than a real Altair, it is still pretty large — a byproduct of its beautiful front panel.

So to quickly show off CP/M to someone, you need to haul out a big box and find a VGA monitor and PS/2 keyboard — both of which are becoming vanishing commodities. I made some modifications to get the serial port working, but it is still a lot to cart around. You could go the software route with a simulator like SIMH or Z80pack, but now instead of finding a VGA monitor and a PS/2 keyboard, you need to find a computer where you can install the software. What I really wanted was a simple and portable device that could boot CP/M.

Continue reading “ESP32 Altair Emulator Gets Split Personality”

Palm-Sized Sixteen Segments Light The Way To Our Hearts

It’s no secret that we here at the Hackaday are suckers for cool display. LEDs, OLEDs, incandescent, nixie or neon, you name it and we want to see it flash. So it fills us with joy to discover a new way to build large, daisy-chainable 16-segment digits, and even more excited to learn how easy they are to fab and assemble.

A cousin of the familiar 7 segment display, the 16 segment gives so many more possibilities (128% more possibilities to be exact) for digit display. To be specific, those extra segments unlock the ability to display upper and lowercase latin characters as well as scads of punctuation.

But where the character set is complex, the assembly is anything but thanks to a great design from [Kolibri] called klais-16. They’re available fully assembled if you want to jump straight to code, but thanks to thorough documentation (seriously, check this out) assembly is a snap.

Each module is composed a very boring PCBA base layer which should be inexpensive from the usual sources, even when ordering one fully assembled. A stackup of three more PCBs are used for spacing and diffusion with plans for die-cut or injection mold layers if a larger production run ends up happening. Board dimensions for each character are 100 mm x 66.66 mm (about 4″ x 2.5″). Put together, each module can stand on its own or be easily daisy-chained together to make a longer single display.

Addressing all those bits with an elaborate, ugly control scheme would be a drag but fortunately the firmware for the onboard STM8 microcontroller exposes a nice boring serial interface which can be used without configuration to display strings. There’s even an example Windows Batch script!

E-Ink Moon Phase Viewer Keeps Interest From Waning

It’s a shame that so many cool things happen in the night sky, but we can’t see them because of clouds or light pollution. If you missed seeing the comet NEOWISE or this summer’s Perseid meteor showers, there’s not a lot to be done but look at other people’s pictures. But if it’s the Moon and its phases you keep missing out on, that information can be acquired and visualized fairly easily.

This project includes a bunch of firsts for [Jacob Tarr], like designing a custom PCB and utilizing a three-color E-ink screen to show the Moon in its current phase along with the date and time.

[Jacob]’s moon phase viewer runs on an ItsyBitsy M4 Express, which holds data pulled from NASA ahead of time to save battery. Every morning, the board dishes out the daily info on a schedule kept by a real-time clock module.

We particularly like the minimalist case design, especially the little shelf that holds the lithium-ion cell. This is just the beginning, and [Jacob] plans to add more detail for anyone who wants one for themselves.

If you want something more Moon-shaped, here’s a printed version that gets brighter in time with the real thing. Or you could just make a giant light-up full moon like Hackaday super alumnus [Caleb Kraft].

PIC32 DMA Is A Weird Machine

Direct memory access (DMA) systems in computers are more powerful than you might think, and [Bruce Land] and [Joseph Primmer] have done some clever hacking to take full advantage of this on the PIC32 microcontrollers. This is a cool proof-of-concept hack — you can do general computing in the DMA subsystem without using the CPU at all if you don’t mind taking your time — but they also include two useful examples: a direct digital synthesis machine and a random number generator. Both of these run using exactly 0% CPU time.

How do they do it? DMA is a mechanism for shuttling data around in memory or between hardware peripherals without involving the CPU. Say you want to take a large block of memory containing music, and spit it out slowly to an I2S audio converter. A DMA subsystem could be configured to take an interrupt from the sound chip, pass it a chunk of data, increment the data pointer, and wait for the next interrupt.

The gimmick, which goes back at least to [Rushanan] and [Checkoway]’s “Run DMA” paper, is that you can modify the memory source and destination addresses of one DMA service from another DMA service, and that some registers automatically perform mathematical operations on whatever data is put into them. Combine these together, and you’ve got transport-triggered programming.

(An awesome side-note: our own [Al Williams] developed a one-instruction transport-triggered CPU way back in the day: the One Instruction Wonder.)

What is this good for? Writing simple helper applications that run independent of the CPU on a PIC32 microcontroller. [Land] and [Primmer]’s direct-digital synthesis example is a great one. But there are a lot of cases where you simply want to take in some new data and pre-process it a little bit before it enters the main program flow. While creating weird machines in the DMA engine might be a slower way to get it done, it keeps the CPU free for doing other stuff. We’re sure you’ll come up with something.