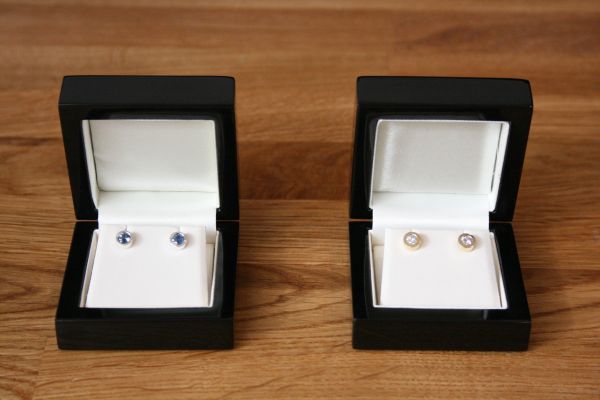
A Freeze Dryer You Can Build In Your Garage

What do trail mix, astronaut ice-cream, and cryogel have in common? This may sound like the introduction to a corny riddle, but they are all things you can make in your garage with a homemade freeze dryer. [The Thought Emporium] built his own freeze dryer with minimum fuss and only a few exotic components like a vacuum pump and a high-quality pressure gauge. The video is also posted after the break which contains a list for the parts and where they can be purchased.

Freeze drying uses a process called cryodesiccation or lyophilization. Below a certain pressure, water skips the liquid phase and goes directly to a gas, so frozen items can transition from ice to dry without a soggy step. When you jump the liquid phase, objects hold their shape when they were frozen, and since no heat is used, you don’t carmelize your sugars.

A freeze-dryer like this has three parts. The first is the pump which doesn’t need any explanation. Next to the pump there must be a water trap. This chilly compartment recondenses the water vapor, so it doesn’t get inside the pump or saturate the things you’re trying to dry. Lastly, there is the drying chamber where your items are placed to have their moisture taken out.

Astronaut ice cream has been made on Hackaday before. [The Thought Emporium] has also been seen including a piece on making your own graphene.

Continue reading “A Freeze Dryer You Can Build In Your Garage”

3D Printering: Printing Sticks For A PLA Hot Glue Gun

When is a hot glue stick not a hot glue stick? When it’s PLA, of course! A glue gun that dispenses molten PLA instead of hot glue turned out to be a handy tool for joining 3D-printed objects together, once I had figured out how to print my own “glue” sticks out of PLA. The result is a bit like a plus-sized 3D-printing pen, but much simpler and capable of much heavier extrusion. But it wasn’t quite as simple as shoving scrap PLA into a hot glue gun and mashing the trigger; a few glitches needed to be ironed out.

Why Use a Glue Gun for PLA?

Some solutions come from no more than looking at two dissimilar things while in the right mindset, and realizing they can be mashed together. In this case I had recently segmented a large, hollow, 3D model into smaller 3D-printer-sized pieces and printed them all out, but found myself with a problem. I now had a large number of curved, thin-walled pieces that needed to be connected flush with one another. These were essentially butt joints on all sides — the weakest kind of joint — offering very little surface for gluing. On top of it all, the curved surfaces meant clamping was impractical, and any movement of the pieces while gluing would result in other pieces not lining up.

An advantage was that only the outside of my hollow model was a presentation surface; the inside could be ugly. A hot glue gun is worth considering for a job like this. The idea would be to hold two pieces with the presentation sides lined up properly with each other, then anchor the seams together by applying melted glue on the inside (non-presentation) side of the joint. Let the hot glue cool and harden, and repeat. It’s a workable process, but I felt that hot glue just wasn’t the right thing to use in this case. Hot glue can be slow to cool completely, and will always have a bit of flexibility to it. I wanted to work fast, and I wanted the joints to be hard and stiff. What I really wanted was melted PLA instead of glue, but I had no way to do it. Friction welding the 3D-printed pieces was a possibility but I doubted how maneuverable my rotary tool would be in awkward orientations. I was considering ordering a 3D-printing pen to use as a small PLA spot welder when I laid eyes on my cheap desktop glue gun.

Continue reading “3D Printering: Printing Sticks For A PLA Hot Glue Gun”

Benchtop Fume Extractor Cuts The Cord, Clears The Air

What good is safety gear that isn’t used because it’s annoying and gets in the way of getting the job at hand completed? None, really, and the solder fume extractor is one item that never seems to live in harmony with your workspace. They’re often noisy, they obstruct your vision, and a power cord draped across your bench is a sure way to ruin your soldering zen.

To fix those problems, [Nate] has built a nice battery powered solder fume extractor that’s so low profile and so quiet, you won’t mind sharing a bench with it. Based on a standard 80-mm case fan, the extractor has a built-in 18650 battery for power and a USB charging port. There are nice little features, like a speed control and a low-battery indicator. The fan mounts to a pair of custom PCBs, which form the feet for the fan. [Nate] claims to have run the fan for 12 hours straight on battery before needing a charge, and that it’s so quiet he needs to add a power indicator to the next version. Also making an appearance in rev 2 will be a carbon filter to catch the fumes, but as [Nate] notes, better to spread them around for now than let them go directly up his nose.

Are you in the hacking arts for the long haul? Let’s hope so. If you are, make sure you’re up on the basics of mitigating inhalation hazards.

Repairs You Can Print: 3D Printing Is For (Solder) Suckers

[Joey] was about to desolder something when the unthinkable happened: his iconic blue anodized aluminium desoldering pump was nowhere to be found. Months before, having burned himself on copper braid, he’d sworn off the stuff and sold it all for scrap. He scratched uselessly at a solder joint with a fingernail and thought to himself: if only I’d used the scrap proceeds to buy a backup desoldering pump.

Determined to desolder by any means necessary, [Joey] dove into his junk bin and emerged carrying an old pump with a broken button. He’d heard all about our Repairs You Can Print contest and got to work designing a replacement in two parts. The new button goes all the way through the pump and is held in check with a rubber band, which sits in a groove on the back side. The second piece is a collar with a pair of ears that fits around the tube and anchors the button and the rubber band. It’s working well so far, and you can see it suck in real-time after the break.

We’re not sure what will happen when the rubber band fails. If [Joey] doesn’t have another, maybe he can print a new one out of Ninjaflex, or build his own desoldering station. Or maybe he’ll turn to the fire and tweezers method.

Continue reading “Repairs You Can Print: 3D Printing Is For (Solder) Suckers”

Repairs You Can Print: Broken Glue Gun Triggers Replacement

Picture this: you need to buy a simple tool like a glue gun. There’s usually not a whole lot going on in that particular piece of technology, so you base your decision on the power rating and whether it looks like it will last. And it does last, at least for a few years—just long enough to grow attached to it and get upset when it breaks. Sound familiar?

[pixelk] bought a glue gun a few years ago for its power rating and its claims of strength. Lo and behold, the trigger mechanism has proven to be weak around the screws. The part that pushes the glue stick into the hot end snapped in two.

It didn’t take much to create a replacement. [pixelk] got most of the measurements with calipers and then got to work in OpenSCAD. After printing a few iterations, it fit well enough, but [pixelk] saw a chance to improve on the original design and added a few teeth where the part touches the glue stick. The new part has been going strong for three months.

We think this entry into our Repairs You Can Print contest is a perfect example of the everyday utility of 3D printers. Small reproducible plastic parts are all around us, just waiting to fail. The ability to not only replace them but to improve on them is one of the brightest sides of our increasingly disposable culture.

Still haven’t found a glue gun you can stick to? Try building your own.

Repairs You Can Print: Take A Deep Breath Thanks To A 3D Printed Fume Extractor

If you are a maker, chances are that you will be exposed to unhealthy fumes at some point during your ventures. Whether they involve soldering, treating wood, laser cutting, or 3D printing, it is in your best interest to do so in a well ventilated environment. What seems like sound advice in theory though is unfortunately not always a given in practice — in many cases, the workspace simply lacks the possibility, especially for hobbyists tinkering in their homes. In other cases, the air circulation is adequate, but the extraction itself could be more efficient by drawing out the fumes right where they occur. The latter was the case for [Zander] when he decided to build his own flexible hose fume extractor that he intends to use for anything from soldering to chemistry experiments.

Built around not much more than an AC fan, flex duct, and activated carbon, [Zander] designed and 3D printed all other required parts that turns it into an extractor. Equipped with a pre-filter to hold back all bigger particles before they hit the fan, the air flow is guided either through the active carbon filter, or attached to another flex duct for further venting. You can see more details of his build and how it works in the video after the break.

Workspace safety is often still overlooked by hobbyists, but improved air circulation doesn’t even need to be that complex for starters. There’s also more to read about fumes and other hazardous particles in a maker environment, and how to handle them.

Continue reading “Repairs You Can Print: Take A Deep Breath Thanks To A 3D Printed Fume Extractor”

3D Printed Battery Pack Keeps Old Drill Spinning

The greatest enemy of proprietary hardware and components is time. Eventually, that little adapter cable or oddball battery pack isn’t going to be available anymore, and you’re stuck with a device that you can’t use. That’s precisely what happened to [Larry G] when the now antiquated 7.2V NiCd batteries used by his cordless drill became too hard to track down. The drill was still in great shape and worked fine, but he couldn’t power the thing. Rather than toss a working tool, he decided to 3D print his own battery pack.

The 3D modeling on the battery pack is impeccable

He could have just swapped new cells into his old pack, but if you’re going to go through all that trouble, why not improve on things a little? Rather than the NiCd batteries used by the original pack, this new pack is designed around readily available AA NiMH batteries. For the light repairs and craft work he usually gets himself into, he figures these batteries should be fine. Plus he already had them on hand, and as we all know, that’s half the battle when putting a project together.

Interestingly, the original battery pack was wired in such a way that it provided two voltages. In older tools such as this one, this would be used for rudimentary speed control. Depending on which speed setting the drill is on, it would either connect to 4 or 6 cells in the original pack. [Larry] didn’t want to get involved with the extra wiring and never used the dual speeds anyway, so his pack only offers the maximum speed setting. Though he does mention that it may be possible to do PWM speed control in the battery itself via a 555 timer if he feels like revisiting the project.

[Larry] tells us the pack itself was rendered completely from scratch, using only the original battery pack and trial-and-error to get the fit perfect. He reused the side-mounted release buttons to save time, but otherwise everything is 3D printed in PETG for its strength and chemical resistance.


This is an entry in Hackaday’s

Repairs You Can Print contest

The twenty best projects will receive $100 in Tindie credit, and for the best projects by a Student or Organization, we’ve got two brand-new Prusa i3 MK3 printers. With a printer like that, you’ll be breaking stuff around the house just to have an excuse to make replacement parts.