Hub-powered bike computer

Battery-less Bike Computer Gets Power And Data From The Wheels

Bicycle generator technology has advanced far beyond the bottle dynamos of years past, which as often as not would introduce enough drag when engaged to stall the bike. Granted, it’s not as much of a current draw as a big old incandescent headlight, but this wheel-powered cyclocomputer is a great example of harvesting both power and data from the rotation of a bike’s wheel.

While there are plenty of cyclocomputers available commercially, [Lukas] was looking for some specific features. His main goal was something usable at night, which means a backlit display, ruling out the usually coin-cell power sources. His bike’s hub dynamo offered interesting possibilities — not only does it provide AC power, but its output frequency is proportional to the bike’s speed. This allows him to derive speed, distance, RPM, time-in-motion, and other parameters to display on the 1×8 character LCD display. There’s some clever circuitry needed to condition the output of the hub dynamo, and a 1.5 farad supercapacitor keeps the unit powered for about four days when the bike isn’t in motion.

As for measuring the frequency of the dynamo’s output, [Lukas] simply used a digital input on the MSP430 microcontroller, with a little signal conditioning of course. He also added a barometer chip for altitude data, plus an ambient light sensor to control the LCD backlight. Everything lives in a clever 3D-printed case with a minimalist but thoughtful design that docks and undocks from the bike easily; [Lukas] assures us that a waterproof version of the case is in the works.

We really appreciate the elegance of this design, and the way it uses the data that’s embedded in the power supply. While [Lukas] appears to have used a commercially available generator, we’ve seen other examples of home-brew hub dynamos before — even one that offers regenerative braking.

Hackaday Links Column Banner

Hackaday Links: October 31, 2021

Global supply chain issues are beginning to hit closer to home for the hacker community, as Raspberry Pi has announced their first-ever price increase on their flagship Pi 4. The move essentially undoes the price drop on the 2GB version of the Pi 4 that was announced in February, and sets the price back up from $35 to $45. Also rolled back is the discontinuation of the 1GB version, which will now be available at the $35 price point. The announcements come from Eben Upton himself, who insists the price increase is only temporary. We applaud his optimism, but take it with a grain of salt since he also said that 2021 production across the board will stay at the seven million-unit level, which is what they produced in 2020. That seems to speak to deeper issues within the supply chain, but more immediately, it’s likely that the supply of Pi products will be pinched enough that you’ll end up paying above sticker price just to get the boards you need. Hope everyone is stocked up.

On the topic of supply chain issues and their threat to Christmas gift-giving, here’s one product we hope is stranded in a container off Long Beach or better still, bobbing along in the Strait of Juan De Fuca: a toddler’s toy telephone that actually makes and receives calls. Anyone born in the last 60 years probably had one of the Fisher-Price Chatter telephone, a toy that in its original form looked like a desk telephone on wheels that was dragged behind the child, popping along and providing endless hours of clicky amusement as kids twisted the dial and lifted the receiver. Come to think of it, the Chatter telephone may be as close to a dial phone as anyone born since 1990 may have come. Anyway, some genius stuck a Bluetooth module into the classic phone to let it hook up to an app on an actual phone, allowing kids (or more likely their nostalgia-soaked parents) to make and receive calls. It’s actually priced at a reasonable $60, so there might be some hacking potential here.

Also tangential to supply chains, we stumbled across a video guide to buying steel that might interest readers. Anyone who has seen the displays of steel and other metals at the usual big-box retailers might wonder what the fuss is, but buying steel that way or ordering online is a great way to bust a project’s budget. Fabricator and artist Doug Boyd insists that finding a local steel supplier is the best bang for your buck, and has a bunch of helpful tips for not sounding like a casual when you’re ordering. It’s all good advice, and would have helped us from looking foolish a time or two at the metal yard; just knowing that pipe is measured by inside diameter while tubing is measured by outside dimensions is worth the price of admission alone.

With all the money you save on steel and by not buying Raspberry Pis, perhaps you’ll have a couple of hundred thousand Euros lying around to bid on this authentic 1957 Sputnik I satellite. The full-scale model of Earth’s first artificial satellite — manhole covers excluded — was a non-flown test article, but externally faithful to the flown hardware that kicked off the first Space Race. The prospectus says that it has a transmitter and a “modern power supply”; it’s not clear if the transmitter was originally part of the test article or added later. The opening bid is €85,000 and is expected to climb considerably.

And finally, there’s something fascinating about “spy radios,” especially those from the Cold War era and before, when being caught with one in your possession was probably going to turn out to be a very bad day. One such radio is the Radio Orange “Acorn” receiver, which is in the collection of the Crypto Museum. The radio was used by the Dutch government to transmit news and information into the occupied Netherlands from their exile in London. Built to pass for a jewelry box, the case for the radio was made from an old cigar box and is a marvel of 1940s miniaturization. The radio used three acorn-style vacuum tubes and was powered by mains current; another version of the Radio Orange receiver was powered by a bike dynamo or even a water-powered turbine, which could be run from a tap or garden hose. The video below shows the water-powered version in action, but the racket it made must have been problematic for its users, especially given the stakes.

Continue reading “Hackaday Links: October 31, 2021”

3D Printed Metro Charger Ready For The Wasteland

In the video game Metro 2033 and its subsequent sequels, players fight their way through a post-apocalyptic version of Russia using improvised weapons and tools cobbled together from the sort of bits and bobs the survivors of a nuclear war might be able to scavenge from the rubble. One of the most useful devices in the game is known as the “Universal Charger”: a hand-operated dynamo that the player must use periodically recharge their electrical devices.

The in-game Universal Charger

Being a fan of the series, [Nikola Petrov] wanted to build his own version of the Metro 2033 charger; but rather than going for an exact screen replica, he decided to explore the mechanism itself and see if he could 3D print a functional device.

As demonstrated in the video after the break, his charger manages to produce enough energy to light an LED on each squeeze of the trigger. Though if we were packing our gear to go fight mutated beasties in alternate-future Moscow, we might look for something with a bit more kick.

Beyond the 3D printed parts, the charger uses a couple short pieces of 8 mm rod, a NEMA 17 stepper motor, and a one-way bearing that’s usually used for pull starting small gasolene engines.

Interestingly, [Nikola Petrov] is no stranger to 3D printed electrical generation. If you’re interested in getting some real power out of a NEMA 17 stepper, his fantastic printed wind turbine is a must-see.

Continue reading “3D Printed Metro Charger Ready For The Wasteland”

Spin Me Right Round, Baby: Generator Building Experiments For Mere Mortals

How many of you plan to build a wind-powered generator in the next year? Okay, both of you can put your hands down. Even if you don’t want to wind your coils manually, learning about the principles in an electric generator might spark your interest. There is a lot of math to engineering a commercial model, but if we approach a simple version by looking at the components one at a time, it’s much easier to understand.

For this adventure, [K&J Magnetics] start by dissect a commercial generator. They picked a simple version that might serve a campsite well, so there is no transmission or blade angle apparatus to complicate things. It’s the parts you’d expect, a rotor and a stator, one with permanent magnets and the other with coils of wire.

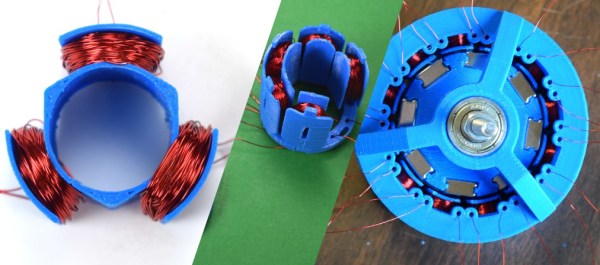
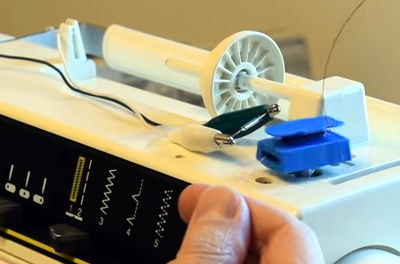
The fun of this project is copying the components found in the commercial hardware and varying the windings and coil count to see how it affects performance. If you have ever wound magnet wire around a nail to make an electromagnet, you know it is tedious work so check out their 3D printed coil holder with an embedded magnet to trigger a winding count and a socket to fit on a sewing machine bobbin winder. If you are going to make a bunch of coils, this is going to save headaches and wrist tendons.

They use an iterative process to demonstrate the effect of multiple coils on a generator. The first test run uses just three coils but doesn’t generate much power at all, even when spun by an electric drill. Six windings do better, but a dozen finally does the trick, even when turning the generator by hand. We don’t know about their use of cheap silicone diodes though, that seems like unintentional hobbling, but we digress.

Making turbine blades doesn’t have to be a sore chore either, and PVC may be the ticket there, you may also consider the vertical axis wind turbine which is safer at patio level. Now, you folks building generators, remember to tip us off!

Continue reading “Spin Me Right Round, Baby: Generator Building Experiments For Mere Mortals”

DIY 3D Slicer Is A Dynamo

We all know that hacker that won’t use a regular compiler. If he’s not using assembly language, he uses a compiler he wrote. If you don’t know him, maybe it is you! If you really don’t know one, then meet these two. [Nathan Fuller] and [Andy Baldwin] want to encourage you to write your own 3D slicer.

Their post is very detailed and uses Autodesk Dynamo as a graphical programming language. However, the details aren’t really specific to Dynamo. It is like a compiler. You sort of know what it must be doing, but until you’ve seen one taken apart, there are a lot of subtleties you probably wouldn’t think of right away if you were building one from scratch.

Continue reading “DIY 3D Slicer Is A Dynamo”

LEGO® My Single-Phase Induction Motor

[Diato556] made a really cool single-phase induction motor with parts mounted on Duplo blocks. He has posted an Instructable where he uses these modular parts to  demonstrate the motor and the principles of induction as described after the jump.


Continue reading “LEGO® My Single-Phase Induction Motor”

Hand Cranked Electric Toy Has No Batteries Or Power Supply

We think this hand cranked robot design is nothing short of absolute brilliance. The toy is remote-controlled through a short section of wire. It can drive forward and turn, but not at the same time. Still that’s impressive considering it uses no battery or power supply and, of the two servo motors, only one is actually in the robot itself.

The second servo, which is visible to the right, acts as a dynamo. When you crank it electricity is generated. The inputs of that servo are connected to the inputs of the one in the robot to power it. If you crank in one direction the colorful toy will drive forward. But there is a one-way catch on one of the side wheels so when the servo is cranked backward the little guy actually executes a reverse turn. The magic of building a project like this is perfect for a weekend activity with the kids. Don’t miss the demo embedded after the jump.

Continue reading “Hand Cranked Electric Toy Has No Batteries Or Power Supply”