Faceless Clock Makes You Think Twice About How It Works

We love projects that make you do a double-take when you first see them. It’s always fun to think you see one thing, but then slowly realize everything is not quite what you expected. And this faceless analog clock is very much one of those projects.

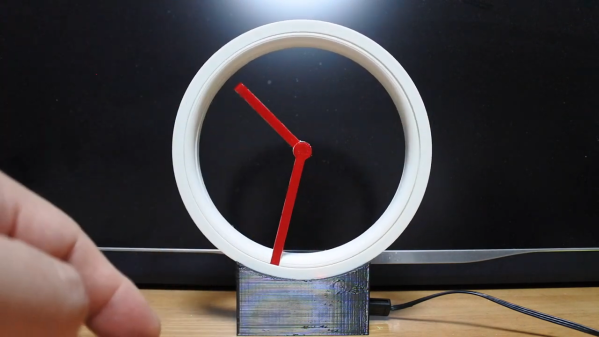
When we first saw [Shinsaku Hiura]’s “Hollow Clock 4,” we assumed the trick to making it look like the hands were floating in space would rely on the judicious use of clear acrylic. But no, this clock is truly faceless — you could easily stick a finger from front to back. The illusion is achieved by connecting the minute hand to the rim of the clock, and rotating the whole outer circumference through a compact 3D printed gear train. It’s a very clever mechanism, and it’s clear that it took a lot of work to optimize everything so that the whole look of the clock is sleek and modern.

But what about the hour hand? That’s just connected to the end of the minute hand at the center of the clock’s virtual face, so how does that work? As it is with most things that appear to be magical, the answer is magnets. The outer rim of the clock actually has another ring, this one containing a pair of neodymium magnets. They attract another magnet located in the very end of the hour hand, dragging it along as the hour ring rotates. The video below shows off the secrets, and it gives you some idea of how much work went into this clock.

We’re used to seeing unique and fun timepieces and other gadgets from [Shinsaku Hiura] — this up-flipping clock comes to mind, as does this custom RPN calculator — but this project is clearly a step beyond.

Continue reading “Faceless Clock Makes You Think Twice About How It Works” →
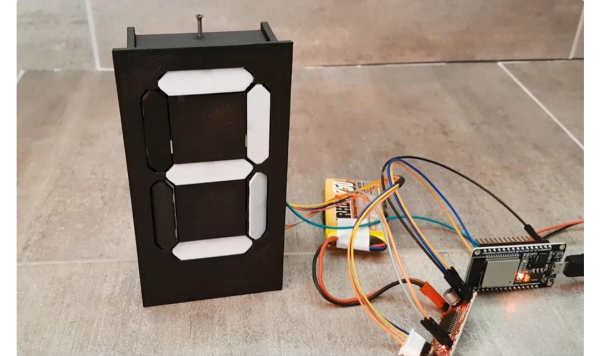
One Stepper Plus A Whole Bunch Of Magnets Equals A Unique Seven-Segment Display

Sometimes the cost of simplicity is extra complexity. It seems counterintuitive, but it seems to be true. And this single-motor mechanical seven-segment display seems to be a perfect example of this paradox.

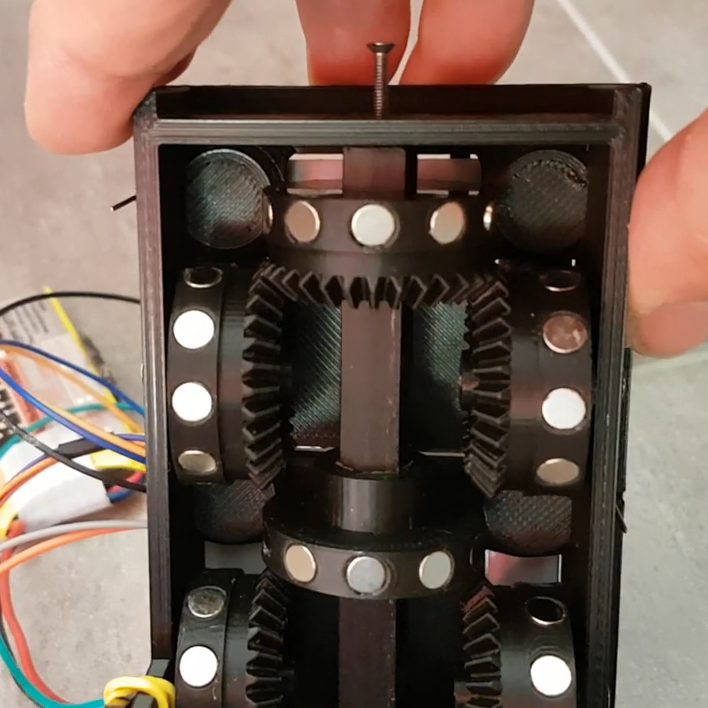
On second thought, [aeropic]’s mechanism isn’t really all that mechanically complicated, but there sure was a lot of planning and ingenuity that went into it. The front has a 3D-printed bezel with the familiar segment cutouts, each of which is fitted with a pivoting segment, black on one side and white on the other.

Behind the bezel is a vertical shaft with three wheels, one behind each horizontal segment, and a pair of horizontal shafts, each with two wheels behind each vertical segment. The three shafts are geared to turn together by a single stepper in the base. Each wheel has ten magnets embedded in the outer circumference, with the polarity oriented to flip the segment in front of it to the right orientation for the current digit. It’s probably something that’s most easily understood by watching the video below.

We’ve seen quite a few of these mechanical seven-segment displays lately — this cam-and-servo mechanism comes to mind. We love them all, of course, but the great thing about [aeropic]’s display is how quiet it is — the stepper is mostly silent, and the segments make only a gentle clunk when they flip. It’s very satisfying.

Continue reading “One Stepper Plus A Whole Bunch Of Magnets Equals A Unique Seven-Segment Display” →

Magnetic Experiments Shows Gradients

You’ve probably heard the term magnetic gradient before, but have you ever seen one? Now you can in [supermagnetman’s] video, below. The key is to use very fine (2 micron) iron filings and special silicone oil. The video is a good mix of whiteboard lectures and practical hands-on experimenting. Just watching him spin the iron filings in the bottle was entertaining. There’s sources in the video description for the oil and the filings if you want to replicate the demonstrations for a classroom or just for your own enjoyment.

It’s one thing to know the math behind magnetic fields. It’s another to be able to use them in practical applications. But a good understanding of the physical manifestation of the magnetic field coupled can help clarify the math and vice versa. There’s a lot of common sense explanations too. For example, the way the filings accelerate as they get closer to the magnet explains why the patterns form the way they do. Iron filings are a traditional way to “see” magnetic fields. Ask anyone who ever had a Wooly Willy.

Iron filings can be fun to play with, although we don’t think we’ve ever had any this fine. If you prefer your magnetic field visualizations to be higher-tech, we have the answer.

Continue reading “Magnetic Experiments Shows Gradients” →

A 3D Printer With An Electromagnetic Tool Changer

The versatility of 3D printers is simply amazing. Capable of producing a wide variety of prototypes, miscellaneous parts, artwork, and even other 3D printers, it’s an excellent addition to any shop or makerspace. The smaller, more inexpensive printers might do one type of printing well with a single tool, but if you really want to take a 3D printer’s versatility up to the next level you may want to try one with an automatic tool changing system like this one which uses magnets.

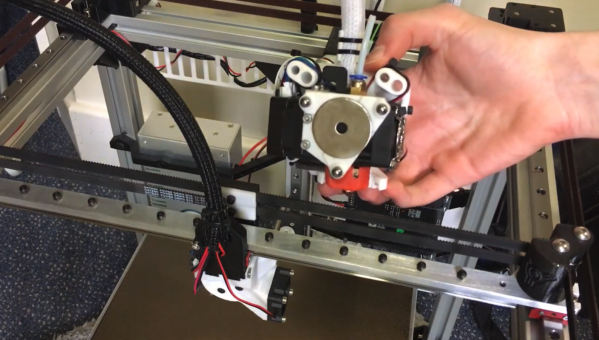
This 3D printer from [Will Hardy] uses an electromagnet to attach the tool to the printer. The arm is able to move to the tool storage area and quickly deposit and attach various tools as it runs through the prints. A failsafe mechanism keeps the tool from falling off of the head of the printer in case of a power outage, and several other design features were included to allow others to tweak this design to their own particular needs, such as enclosing the printer and increasing or decreasing the working area of the Core-XY printer as needed.

While the project looks like it works exceptionally well, [Will] notes that it is still in the prototyping phase and needs work on the software in order to refine its operation and make it suitable for more general-purpose uses. It’s an excellent design though and shows promise. It also reminds us of this other tool-changing system we featured a few months ago, albeit with a less electromagnetic twist.

Continue reading “A 3D Printer With An Electromagnetic Tool Changer” →

The Word Clock You Can Feel

By this point, pretty much everyone has come across a word clock project, if not built one themselves. There’s just an appeal to looking at a clock and seeing the time in a more human form than mere digits on a face. But there are senses beyond sight. Have you ever heard a word clock? Have you ever felt a word clock? These are questions to which Hackaday’s own [Moritz Sivers] can now answer yes, because he’s gone through the extreme learning process involved in designing and building a haptic word clock driven with the power of magnets.

Individual letters of the display are actuated by a matrix of magnetic coils on custom PCBs. These work in a vaguely similar fashion to LED matrices, except they generate magnetic fields that can push or pull on a magnet instead of generating light. As such, there are a variety of different challenges to be tackled: from coil design, to driving the increased power consumption, to even considering how coils interact with their neighbors. Inspired by research on other haptic displays, [Moritz] used ferrous foil to make the magnets latch into place. This way, each letter will stay in its forward or back position without powering the coil to hold it there. Plus the letter remains more stable while nearby coils are activated.

Part of the fun of “ubiquitous” projects like word clocks is seeing how creative hackers can get to make their own creations stand out. Whether it’s a miniaturized version of classic designs or something simple and clean, we  love to see them all. Unsurprisingly, [Moritz] himself has impressed us with his unique take on word clocks in the past. (Editor’s note: that’s nothing compared to his cloud chambers!)

Check out the video below to see this display’s actuation in action. We’re absolutely in love with the satisfying *click* the magnets make as they latch into place.

Continue reading “The Word Clock You Can Feel” →

Street-Legalize Your Ebike With A Magnet

Getting into e-biking is a great hobby. It can get people on bikes who might otherwise not be physically able to ride, it can speed up commute times, and it can even make hauling lots of stuff possible and easy, not to mention it’s also fun and rewarding. That being said, there are a wide array of conflicting laws around what your e-bike can and can’t do on the road and if you don’t want to run afoul of the rules you may need a programmable device that ensures your e-bike is restricted in the appropriate way.

This build is specifically for Bafang mid drives, which can be up to 1000 W and easily power a bike beyond the speed limit where [Tomblarom] lives. A small microcontroller is housed in a waterproof box on the bike and wired between the motor’s display and controller. A small hall effect sensor and magnet sit by this microcontroller, and if the magnet is removed then the microcontroller reprograms the bike’s controller to limit the speed and also to disable the throttle, another feature that is illegal in some jurisdictions but not others. As an added bonus, the microcontroller also handles brake lights, turn signals, and automatic headlights for the bike as well.

While the project page mentions removing the magnet while getting pulled over to avoid fines and other punishments, that’s on you. We imagine this could still be useful for someone who wants to comply with local laws when riding on the road, but still wants to remove the restrictions when riding on private property or off-road where the wattage and speed restrictions might not apply.

Tonewheels Warble In This Organ-Inspired Musical Instrument

Younger readers may not recall the days when every mall had a music store — not the kind where tapes and LPs were sold, but the kind where you could buy instruments. These places inevitably had an employee belting out mall-music to all and sundry on an electric organ. And more often than not, the organist was playing a Hammond organ, with the distinct sound of these instruments generated by something similar to this tonewheel organ robot.

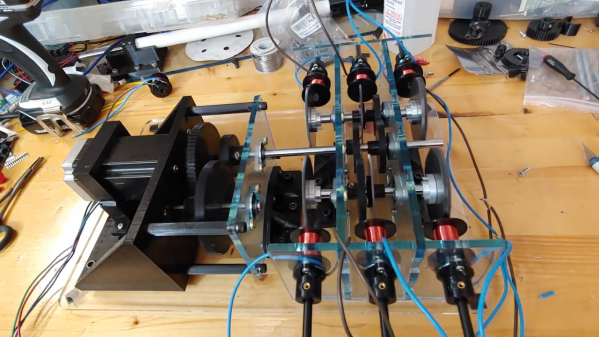
Tonewheels are toothed ferromagnetic wheels that are rotated near a pickup coil. This induces a current that can be amplified; alter the tooth profile or change the speed of rotation, and you’ve got control over the sounds produced. While a Hammond organ uses this technique to produce a wide range of sounds, [The Mixed Signal]’s effort is considerably more modest but nonetheless interesting. A stepper motor and a 1:8 ratio 3D-printed gearbox power a pair of shafts which each carry three different tonewheels. The tonewheels themselves are laser-cut from mild steel and range from what look like spur gears to wheels with but a few large lobes. This is a step up from the previous version of this instrument, which used tonewheels 3D-printed from magnetic filament.

Each tonewheel has its own pickup, wound using a coil winder that [TheMixed Signal] previously built. Each coil has a soft iron core, allowing for the addition of one or more neodymium bias magnets, which dramatically alters the tone. The video below shows the build and a demo; skip ahead to 16:10 or so if you just want to hear the instrument play. It’s — interesting. But it’s clearly a work in progress, and we’re eager to see where it goes. Continue reading “Tonewheels Warble In This Organ-Inspired Musical Instrument” →