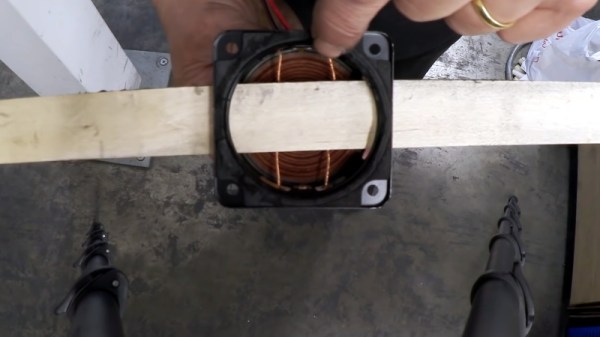
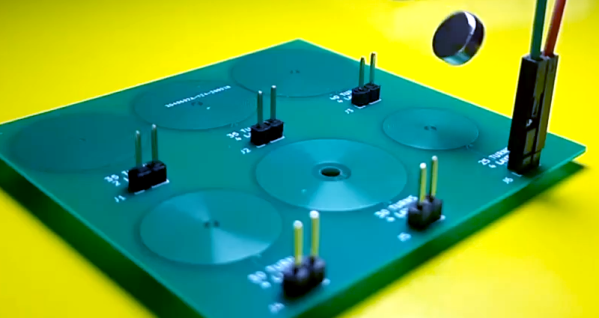
Sequence Your Beats With The Magic Of Magnets

Typically, when we think of a music sequencer, we envisage LEDs and boards covered in buttons. Of course, there are naturally other ways to build such a device. MesoTune takes a different tack entirely, relying on magnets and rotating mechanisms to get the job done.

MesoTune acts as a MIDI controller, and is designed to be hooked up to a computer or other MIDI synthesizer device. The heart of MesoTune is a set of eight magnet wheels, rotating together on a common shaft. The rotational speed of the shaft, dictated by the requested tempo in beats per minute, is controlled by an Arduino. Each magnet wheel has 16 slots into which the user can place a spherical magnet. Every time a magnet on the wheel passes a hall sensor, it sends a MIDI message to the attached computer which is then responsible for using this to synthesize the relevant sound.

There are other useful features, too. Each of the eight magnet wheels, or channels, gets its own fader, which can be used to control volume or other parameters. There’s also a handy tempo display, and a 16-button touchpad for triggering other events. These additions make it more practical to use in a compositional context, where it’s nice to have extra controls to make changes on the fly.

Made out of 3D printed parts and readily available off the shelf components, it’s a fun alternative sequencer design that we’re sure many makers could whip up in just a weekend. We’d love to see other remixes of the design – if you’ve got one, hit us up at the tipline. We’ve seen other great sequencer builds before, too. Video after the break.

A Nifty Tool For Separating Magnets

Neodymium magnets are fun to play with, largely thanks to their incredibly strong magnetic field. This also gives them plenty of applications where other magnets won’t cut the mustard. This very strength is also a drawback, making them difficult to work with and posing a danger to squishy human bodies. To help ease the task, [RandomCitizen4] developed a handy magnet separator tool.

The tool is similar in design to a pair of scissors, with two blades that are slid together when the handles are squeezed. The design is subtly different, however, with plastic blades that slide in between the gaps of a pair of magnets stuck together, pushing them apart. With just three parts to be 3D printed, a handful of fasteners and a rubber band, the tool is easy to build, too.

As someone who has spent significant time sliding magnets apart on the edge of a desk, wearing away the skin on my hands in the process, this tool would certainly come in handy. It might also be useful if you find yourself experimenting with magswitches or similar. Video after the break.

Continue reading “A Nifty Tool For Separating Magnets”

Emergency Torch Runs Without Batteries

It’s always good to have a torch on hand for emergencies. Unfortunately, sometimes these torches can be forgotten, and wind up with dead batteries when you need them most. For those cases, this build from [techrallyofficial] is just the ticket.

Instead of a battery, the torch relies on a 1.5 farad supercapacitor to store energy. The body of the torch is constructed out of PVC pipe and fittings, and packs strong neodymium magnets inside. A coil of wire wrapped is formed around an old solder spool, which, when shaken past the magnets, generates a current. This is rectified with a series of diodes and charges the supercapacitor, powering the light.

It’s a classic design that is available commercially, but it’s one easily replicated in the home shop, too. It would make a great educational project, particularly as students would be left with a useful device to take home at the end of the lesson. We’ve seen others resurrect commercial builds with upgrades, too. Video after the break.

Continue reading “Emergency Torch Runs Without Batteries”

Hackaday Links Column Banner

Hackaday Links: January 5, 2020

It looks like the third decade of the 21st century is off to a bit of a weird start, at least in the middle of the United States. There, for the past several weeks, mysterious squads of multicopters have taken to the night sky for reasons unknown. Witnesses on the ground report seeing both solo aircraft and packs of them, mostly just hovering in the night sky. In mid-December when the nightly airshow started, the drones seemed to be moving in a grid-search pattern, but that seems to have changed since then. These are not racing drones, nor are they DJI Mavics; witnesses report them to be 6′ (2 meters) in diameter and capable of staying aloft for 90 minutes. These are serious professional machines, not kiddies on a lark. So far, none of the usual government entities have taken responsibility for the flights, so speculation is all anyone has as to their nature. We’d like to imagine someone from our community will get out there with radio direction finding gear to locate the operators and get some answers.

We all know that water and electricity don’t mix terribly well, but thanks to the seminal work of White, Pinkman et al (2009), we also know that magnets and hard drives are a bad combination. But that didn’t stop Luigo Rizzo from using a magnet to recover data from a hard drive. He reports that the SATA drive had been in continuous use for more than 11 years when it failed to recover after a power outage. The spindle would turn but the heads wouldn’t move, despite several rounds of percussive maintenance. Reasoning that the moving coil head mechanism might need a magnetic jump-start, he probed the hard drive case with a magnetic parts holder until the head started moving again. He was then able to recover the data and retire the drive. Seems like a great tip to file away for a bad day.

It seems like we’re getting closer to a Star Trek future every day. No, we probably won’t get warp drives or transporters anytime soon, and if we’re lucky velour tunics and Spandex unitards won’t be making a fashion statement either. But we may get something like Dr. McCoy’s medical scanner thanks to work out of MIT using lasers to conduct a non-contact medical ultrasound study. Ultrasound exams usually require a transducer to send sound waves into the body and pick up the echoes from different structures, with the sound coupled to the body through an impedance-matching gel. The non-contact method uses pulsed IR lasers to penetrate the skin and interact with blood vessels. The pulses rapidly heat and expand the blood vessels, effectively turning them into ultrasonic transducers. The sound waves bounce off of other structures and head back to the surface, where they cause vibrations that can be detected by a second laser that’s essentially a sophisticated motion sensor. There’s still plenty of work to do to refine the technique, but it’s an exciting development in medical imaging.

And finally, it may actually be that the future is less Star Trek more WALL-E in the unlikely event that Segway’s new S-Pod personal vehicle becomes popular. The two-wheel self-balancing personal mobility device is somewhat like a sitting Segway, except that instead of leaning to steer it, the operator uses a joystick. Said to be inspired by the decidedly not Tyrannosaurus rex-proof “Gyrosphere” from Jurassic World, the vehicle tops out at 24 miles per hour (39 km/h). We’re not sure what potential market for these things would need performance like that – it seems a bit fast for the getting around the supermarket and a bit slow for keeping up with city traffic. So it’s a little puzzling, although it’s clearly easier to fully automate than a stand-up Segway.

Tracking Wasted Time With A Ferrofluid Clock

We know this project is supposed to be about developing a fine-looking ferrofluid clock, and not about the value of procrastination. But after watching the video below, see if you don’t think that procrastination has taken these two students further than expected.

We first ran into [Simen] and [Amund] several months ago when they launched their ferrofluid project in a fit of “There’s got to be more to life than studying.” It seemed then that building a good-looking, functional ferrofluid display would be a temporary distraction, but the problems posed proved to be far deeper and thornier than either of the electrical engineering students expected. The idea is simple: contain a magnetic fluid between two transparent panels and create pixels using an array of electromagnets to move dots of the fluid around. The implementation, however, was another matter, with the ferrofluid itself proved to be the biggest obstacle. All the formulas they tried seemed to coagulate or degrade over time and tended to stain the glass. While the degradation was never fully sorted, they managed to work around the staining by careful cleaning of the glass and using a saturated brine solution to fill the container.

Backed by 252 electromagnets and drivers on ten custom PCBs, the video below shows the (mostly) finished panel in action as a clock. We’re impressed by the smoothness of the movements of each pixel, even if there’s a bit of drooping at the bottom thanks to gravity. As for the future of the project, that’s unclear since [Simen] is headed off for a NASA internship. We’re not sure if that was despite or because of this procrastination-driven project, but we congratulate him either way and look forward to hearing more from both of them in the future.

Continue reading “Tracking Wasted Time With A Ferrofluid Clock”

Spin Me Right Round, Baby: Generator Building Experiments For Mere Mortals

How many of you plan to build a wind-powered generator in the next year? Okay, both of you can put your hands down. Even if you don’t want to wind your coils manually, learning about the principles in an electric generator might spark your interest. There is a lot of math to engineering a commercial model, but if we approach a simple version by looking at the components one at a time, it’s much easier to understand.

For this adventure, [K&J Magnetics] start by dissect a commercial generator. They picked a simple version that might serve a campsite well, so there is no transmission or blade angle apparatus to complicate things. It’s the parts you’d expect, a rotor and a stator, one with permanent magnets and the other with coils of wire.

The fun of this project is copying the components found in the commercial hardware and varying the windings and coil count to see how it affects performance. If you have ever wound magnet wire around a nail to make an electromagnet, you know it is tedious work so check out their 3D printed coil holder with an embedded magnet to trigger a winding count and a socket to fit on a sewing machine bobbin winder. If you are going to make a bunch of coils, this is going to save headaches and wrist tendons.

They use an iterative process to demonstrate the effect of multiple coils on a generator. The first test run uses just three coils but doesn’t generate much power at all, even when spun by an electric drill. Six windings do better, but a dozen finally does the trick, even when turning the generator by hand. We don’t know about their use of cheap silicone diodes though, that seems like unintentional hobbling, but we digress.

Making turbine blades doesn’t have to be a sore chore either, and PVC may be the ticket there, you may also consider the vertical axis wind turbine which is safer at patio level. Now, you folks building generators, remember to tip us off!

Continue reading “Spin Me Right Round, Baby: Generator Building Experiments For Mere Mortals”

Jigsaw Motor Uses PCB Coils For Radial Flux

Electric motors are easy to make; remember those experiments with wire-wrapped nails? But what’s easy to make is often hard to engineer, and making a motor that’s small, light, and powerful can be difficult. [Carl Bugeja] however is not one to back down from a challenge, and his tiny “jigsaw” PCB motor is the latest result of his motor-building experiments.

We’re used to seeing brushless PCB motors from [Carl], but mainly of the axial-flux variety, wherein the stator coils are arranged so their magnetic lines of force are parallel to the motor’s shaft – his tiny PCB motors are a great example of this geometry. While those can be completely printed, they’re far from optimal. So, [Carl] started looking at ways to make a radial-flux PCB motor. His design has six six-layer PCB coils soldered perpendicular to a hexagonal end plate. The end plate has traces to connect the coils in a star configuration, and together with a matching top plate, they provide support for tiny bearings. The rotor meanwhile is a 3D-printed cube with press-fit neodymium magnets. Check out the build in the video below.

Connected to an ESC, the motor works decently, but not spectacularly. [Carl] admits that more tweaking is in order, and we have little doubt he’ll keep optimizing the design. We like the look of this, and we’re keen to see it improved.

Continue reading “Jigsaw Motor Uses PCB Coils For Radial Flux”