Classic Toy Helicopter Flies Again As DIY Version

For many of us who grew up in the 1970s, “VertiBird”, the fly-it-yourself indoor helicopter, was a toy that was begged for often enough that it eventually appeared under the Christmas tree. And more than a few of the fascinating but delicate toys were defunct by Christmas afternoon, victims of the fatal combination of exuberant play and price-point engineering. But now a DIY version of the classic toy flies again, this time with a more robust design.

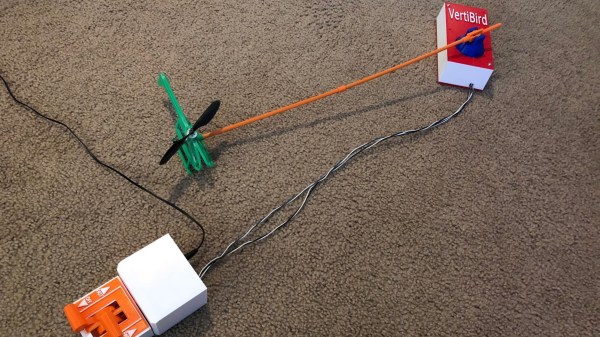
To be fair to the designers at Mattel, the toy company that marketed VertiBird, the toy was pretty amazing. The plastic helicopter was powered by a motor located in the central base, which rotated a drive rod that ran through a stiff tether. Small springs in the base and at the copter acted as universal joints to transmit power to the rotor. These springs were the weak point in the design, especially the one in the base, often snapping in two.

[Luke J. Barker]’s redesign puts a tiny gear motor in the aircraft rather than in the base, something that wouldn’t have been feasible in the original. To address the problem of getting electrical power from the base to the aircraft, [Luke] eschewed an expensive slip ring and instead used a standard 3.5-mm audio jack and plug. The plug serves as an axle for the main gear in the base that powers the copter’s rotation; sadly, this version doesn’t tilt the aircraft mechanically to control backward and forward flight like the original. A pair of pots with 3D-printed levers control throttle and flight direction through an Arduino; see it in action in the video below.

These pages abound with rotorcraft builds, both helicopters and multirotor. We appreciate all manner of flying machines, but this one really takes us back.

Continue reading “Classic Toy Helicopter Flies Again As DIY Version”

Jigsaw Motor Uses PCB Coils For Radial Flux

Electric motors are easy to make; remember those experiments with wire-wrapped nails? But what’s easy to make is often hard to engineer, and making a motor that’s small, light, and powerful can be difficult. [Carl Bugeja] however is not one to back down from a challenge, and his tiny “jigsaw” PCB motor is the latest result of his motor-building experiments.

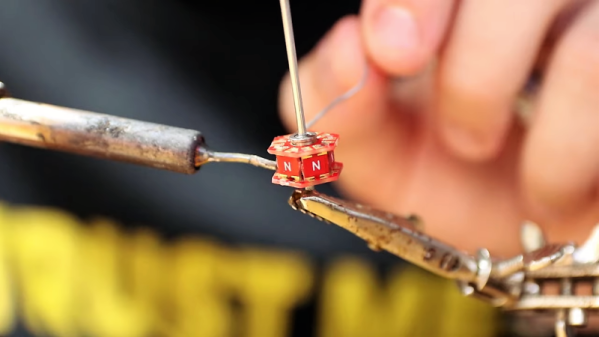
We’re used to seeing brushless PCB motors from [Carl], but mainly of the axial-flux variety, wherein the stator coils are arranged so their magnetic lines of force are parallel to the motor’s shaft – his tiny PCB motors are a great example of this geometry. While those can be completely printed, they’re far from optimal. So, [Carl] started looking at ways to make a radial-flux PCB motor. His design has six six-layer PCB coils soldered perpendicular to a hexagonal end plate. The end plate has traces to connect the coils in a star configuration, and together with a matching top plate, they provide support for tiny bearings. The rotor meanwhile is a 3D-printed cube with press-fit neodymium magnets. Check out the build in the video below.

Connected to an ESC, the motor works decently, but not spectacularly. [Carl] admits that more tweaking is in order, and we have little doubt he’ll keep optimizing the design. We like the look of this, and we’re keen to see it improved.

Continue reading “Jigsaw Motor Uses PCB Coils For Radial Flux”

Magnetic Bearings Might Keep This Motor Spinning For Millennia

We see our share of pitches for perpetual motion machines in the Hackaday tips line, and we generally ignore them and move along. And while this magnetic levitation motor does not break the laws of thermodynamics, it can be considered a perpetual motion machine, at least for certain values of perpetuity.

The motor that [lasersaber] presents in the video below is unconventional, to say the least. It’s not a motor that can do any useful work, spinning at a stately pace beneath its bell-jar enclosure as it does. The design is an extension of [lasersaber]’s “EZ-Spin” motor, which we’ve featured before, and has the same basic layout – a ring of coils wired in series forms the stator, while a disc bearing permanent magnets forms the rotor. The coils, scavenged from those dancing flowerpot solar ornaments, are briefly energized by the rotor passing over a reed switch, giving the rotor a little boost.

The difference here is that rather than low-friction sapphire bearings, this motor uses zero-friction magnetic levitation using pyrolyzed graphite discs. The diamagnetic material hovers above a rare-earth ring magnet, supporting a slender vertical shaft that holds the rotor and another magnetic bearing at the top. It’s fussy to adjust, but once it’s stable, the only friction in the system should be the drag caused by air in the bell jar. [lasersaber]’s current measurements of the motor running at slow speed are hard to believe – 150 nanoamps – leading to an equally jaw-dropping calculated run-time on a single AA battery of 89 millennia.

[lasersaber] is the first to admit that he’s not confident with his measurements, but it seems clear that his motor will likely outlive any chemical battery used to power it. Whatever the numbers are, we like the styling of the thing, and the magnetic bearings are cool too.

Continue reading “Magnetic Bearings Might Keep This Motor Spinning For Millennia”

Vacuum-Powered Rotary Tool Redux, This Time Machined

We love to see projects revisited, especially when new materials or methods make it worth giving the first design another go around. This twin-turbine vacuum-powered Dremel tool is a perfect example of what better tools can do for a build.

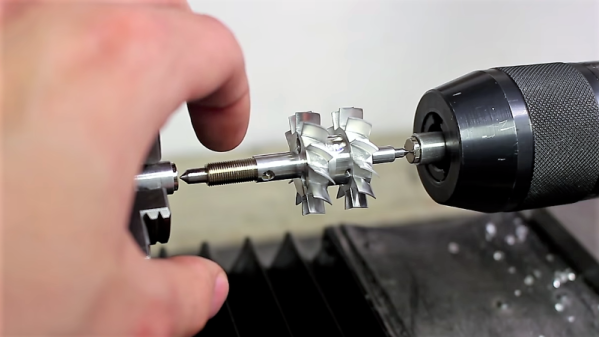
You may recall [JohnnyQ90]’s first attempt at a vacuum powered rotary tool. That incarnation, very similar in design to the current work, was entirely 3D-printed, and caused no little controversy in the comments about the wisdom of spinning anything made on an FDM printer at 43,000 RPM. Despite the naysaying, [Johnny] appears to have survived his own creation. But the turbo-tool did have its limitations, including somewhat anemic torque. This version, machined rather than printed and made almost completely from aluminum, seems to have solved that problem, perhaps thanks to the increased mass of the rotating parts. The twin rotors and the stator were milled with a 5-axis CNC machine, which has been a great addition to [JohnnyQ90]’s shop. The turbine shaft, looking like something from a miniature jet engine, was meticulously balanced using magnets mounted in the headstock and tailstock of a lathe. The video below shows the build and a few tests; we’re not big fans of the ergonomics of holding the tool on the end of that bulky hose, but it sure seems to work well. And that sound!

We first noticed [JohnnyQ90] when he machined aluminum from soda cans to make a mini Tesla turbine. His builds have come a long way since then, and we look forward to what he’ll come up with next.

Continue reading “Vacuum-Powered Rotary Tool Redux, This Time Machined”

Teardown Shows Why Innovative Designs Sometimes Fail

Some ideas are real head-scratchers from a design standpoint: Why in the world would you do it that way? For many of us, answering that question often requires a teardown, which is what [Ben Katz] did when this PCB motor-powered weed whacker came across his bench. The results are instructive on what it takes to succeed in the marketplace, or in this case, how to fail.

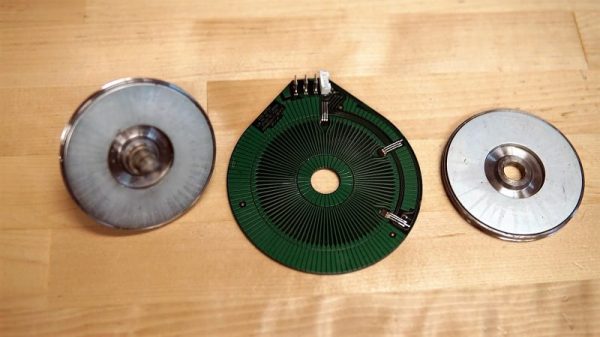
The unit in question comes from an outfit called CORE Outdoor Power. The line trimmer was powered by a big lithium-ion battery pack, but [Ben] concentrated on the unique motor for his teardown. After a problematic entry into the very sturdy case at the far end of the trimmer’s shaft, he found what looks like a souped-up version of [Carl Bugeja]’s PCB brushless motors. The rotors, each with eight large magnets embedded, are sandwiched on either side of a very thick four-layer PCB with intricately etched heavy copper traces. The PCB forms the stator, with four flat coils. The designer pulled a neat trick with the Hall-effect sensors needed for feedback; rather than go with surface-mount sensors, which would add to the thickness of the board, they used through-hole packages soldered to surface pads, with the body of the sensor nestled in a hole in the board. The whole design is very innovative, but sadly, [Ben]’s analysis shows that it has poor performance for its size and weight.

Google around a bit and you’ll see that CORE was purchased some years back by MTD, a big player in the internal combustion engine outdoor power market. They don’t appear to be a going concern anymore, and it looks as though [Ben] has discovered why.

[Jozef] tipped us off to this one. Thanks!

Can You 3D-Print A Stator For A Brushless DC Motor?

Betteridge’s Law holds that any headline that ends in a question mark can be answered with a “No.” We’re not sure that [Mr. Betteridge] was exactly correct, though, since 3D-printed stators can work successfully for BLDC motors, for certain values of success.

It’s not that [GreatScott!] isn’t aware that 3D-printed motors are a thing; after all, the video below mentions the giant Halbach array motor we featured some time ago. But part of advancing the state of the art is to replicate someone else’s results, so that’s essentially what [Scott!] attempted to do here. It also builds on his recent experiments with rewinding commercial BLDCs to turn them into generators. His first step is to recreate the stator of his motor as a printable part. It’s easy enough to recreate the stator’s shape, and even to print it using Proto-pasta iron-infused PLA filament. But that doesn’t come close to replicating the magnetic properties of a proper stator laminated from stamped iron pieces. Motors using the printed stators worked, but they were very low torque, refusing to turn with even minimal loading. There were thermal issues, too, which might have been mitigated by a fan.

So not a stunning success, but still an interesting experiment. And seeing the layers in the printed stators gives us an idea: perhaps a dual-extruder printer could alternate between plain PLA and the magnetic stuff, in an attempt to replicate the laminations of a standard stator. This might help limit eddy currents and manage heating a bit better. Continue reading “Can You 3D-Print A Stator For A Brushless DC Motor?”

Stepper Motor Mods Improve CNC Flat Coil Winder

Finding just the right off-the-shelf part to complete a project is a satisfying experience – buy it, bolt it on, get on with business. Things don’t always work out so easily, though, which often requires the even more satisfying experience of modifying an existing part to do the job. Modifying a stepper motor by drilling a hole down its shaft probably qualifies for the satisfying mod of the year award.

That’s what [Russ] did to make needed improvements to his CNC flat-coil winder, which uses a modified delta-style 3D-printer to roll fine magnet wire out onto adhesive paper to form beautiful coils of various sizes and shapes. [Russ] has been tweaking his design since we featured it and coming up with better and better coils. While experimenting, the passive roller at the business end proved to be a liability. The problem was that the contact point lagged behind the center axis of the delta, leading to problems with the G-code. [Russ] figured that a new tool with the contact point at the dead center would help. The downside would be having to actively swivel the tool in concert with the X- and Y-axis movements. The video below shows his mods, which include disassembling the NEMA-17 stepper and drilling out the shaft to pass the coil wire. [Russ] also spent some time reversing the rotor in the frame and provided a small preload spring to keep the coil roller in contact with the paper.

A real-time coil winding session starts at the 21:18 mark, and we’ve got to admit it’s oddly soothing to watch. We’re not sure exactly what [Russ] intends to do with these coils, and by his own admission, neither is he. But it’s still pretty cool to see, and the stepper motor mods are a neat trick to keep in mind.

Continue reading “Stepper Motor Mods Improve CNC Flat Coil Winder”