Decoding The PS/2 Keyboard Protocol Using Good Old Fashioned Hardware

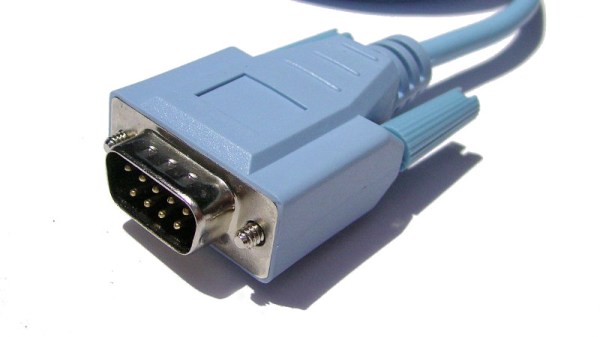
1987 was a glorious year.  It brought us the PS/2 keyboard standard that’s still present on many a motherboard back panel to this day. (It also marked the North America/Europe release of The Legend of Zelda but that’s another article.) Up until this point, peripherals were using DIN-5 and DE-9 (often mistakenly called DB9 and common for mice at the time) connectors or — gasp — non-standard proprietary connectors. So what was this new hotness all about? [Ben Eater] walks us through the PS/2 hall of fame by reverse-engineering the protocol.

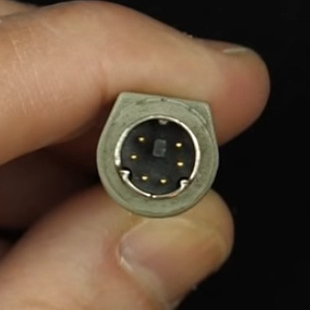
The PS/2 connector in all its glory

This is a clocked data protocol, so a waveform is generated on the data pin for each key pressed that can be compared to the clock pin to establish the timing of each pulse. Every key sends a unique set of encoded pulses and voila, the whims of the user can quickly and easily be decoded by the machine.

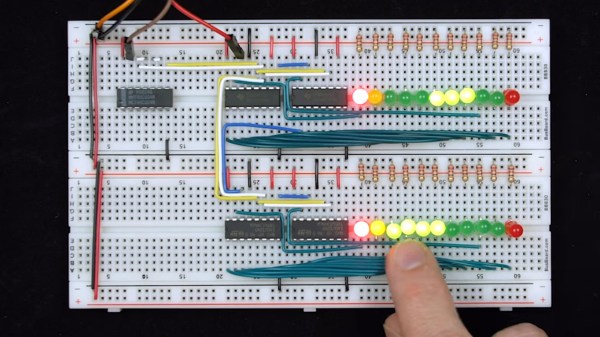
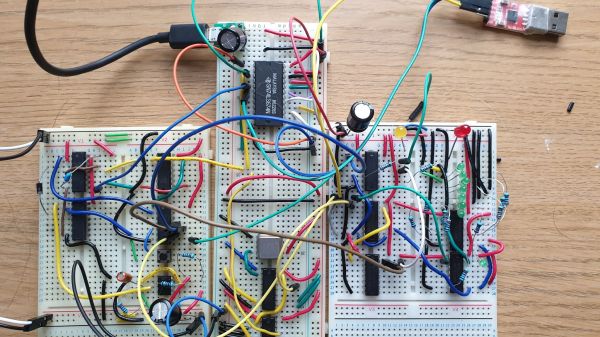
This is where [Ben’s] dive really shines, we know he’s a breadboarding ninja so he reaches for some DIP chips. A shift register is an easy way to build up a parallel PS/2 interface for breaking out each data packet. There are a few quirks along the way, like the need to invert the clock signal so the shift register triggers on the correct edge. He also uses the propagation delay of a couple inverter gates to fire the 595 shift register’s latch pin slightly late, avoiding a race condition. A second 595 stores the output for display by a set of LEDs.

Beyond simply decoding the signal, [Ben] goes into how the packets are formatted. You don’t just get the key code, but you get normal serial interface error detection; start/stop bits and a parity bit as well. He even drills down into extended keys that send more than one packet, and a key-up action packet that’s sent by this particular keyboard.

This is the perfect low-level demo of how the protocol functions. On the practicality side, it feels a bit strange to be breaking out the serial to parallel when it would be very easy to monitor the two signal lines and decode them with a microcontroller. You might want to switch it up a bit, stick with the clock and data pins, but connect them to a Raspberry Pi using just a few passive components.

Continue reading “Decoding The PS/2 Keyboard Protocol Using Good Old Fashioned Hardware”

Linux Fu: Serial Untethered

Serial ports used to be everywhere. In a way, they still are since many things that appear to plug in as a USB device actually look like a serial port. The problem is that today, the world runs on the network. Sure, you can buy a terminal server that converts a serial port to an Ethernet port, but what fun is that? In this article, I’m going to show you how to stream serial ports over the network using some available Linux tools. It isn’t perfect, and it won’t work for every case, but when it works it works well.

Everything is a File, Until it Isn’t

At some point in the past, Unix — the progenitor of Linux — treated virtually everything as a file, and all files were created more or less equal. Programs didn’t care if a file was local, on the network, from a tape drive, or arriving over a named pipe.

But things started to change. Even though a serial port is just a file under Linux, it has some special attributes that let you set, for example, baud rates. Worse, some programs “know” too much about files and insist on certain naming conventions. So, in theory, you should be able to create a network socket, connect one end to a serial port and the other end to a program, and be done with it. In theory.

Continue reading “Linux Fu: Serial Untethered”

Modified Yost Tames Pinout Plethora

Every hacker has an assortment of USB to TTL-serial adapters kicking around in their lab, and we have all been annoyed that each one has a different pinout. You layout a PCB or breadboard for the Sparkfun flavor (GND, CTS, VCC, TXD, RXD, DTR), but when you begin troubleshooting all you can find is a CH340 board (GND, +5V, TXD, RXD, DTR, +3.3V). You have to jumper everything, and it becomes a mess. It wasn’t much better back in the days of RS-232 level signaling, either. While the pinouts were consistent, there were other headaches. Did the connection need a NULL modem adaptor? And if you were unlucky, you might need a DB-25 to DE-9 adaptor, and the really unlucky might need one or more gender changers. Surely there’s a better way.

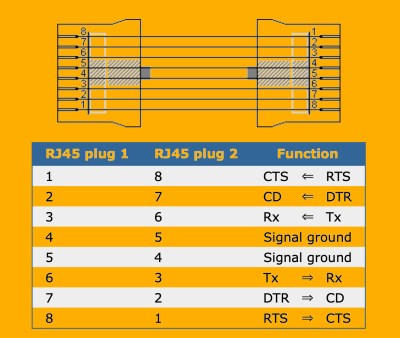
It turns out there was a better way, although it didn’t seem to have become as popular as one might expect. Back in 1987 [Dave Yost] formalized an interconnection scheme using RJ45 plugs and jacks while at Berkeley.  The signals were arranged in a mirrored fashion so that each cable is always a crossover — just plug two cables back-to-back if you really need a straight thru connection.

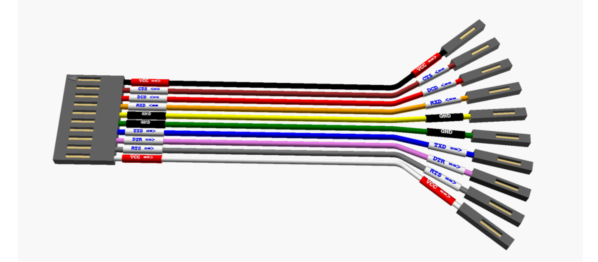
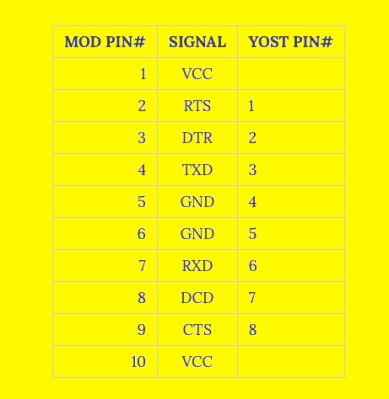
Even though he was dealing with RS-232 serial, nothing prevents us from using this scheme for logic level signaling. For example, consider the following 1×10 header pinout, where the original 8-pins are expanded to 10 to allow for power:

This is an extreme example, and can obviously be shrunk depending on how much handshaking, if any, or power is desired. Such a pinout lets you switch between DCE and DTE by simply flipping the connector around. And if a Dupont-style header slips off too easily in your applications, you could always use an RJ connector. This still doesn’t solve the Tower of Babel pinout problem with the USB-TTL adaptors. But standardizing on a serial pinout such as this for your projects and making cables or kludging your TTL adaptors will make serial debugging less painful.

Yost to Sparkfun Adaptor Cable

Back when he released this scheme in 1987, [Dave] pontificated:

“Maybe one day before the year 2,000, the world will have a new, simple, high-speed, flow-controlled, standard type of connection for point-to-point applications currently using RS-232, with an adaptor available to talk to old, RS-232 equipment.”

Let us know your thoughts in the comments below.

A Portable Serial Terminal That Should Be From The 1970s

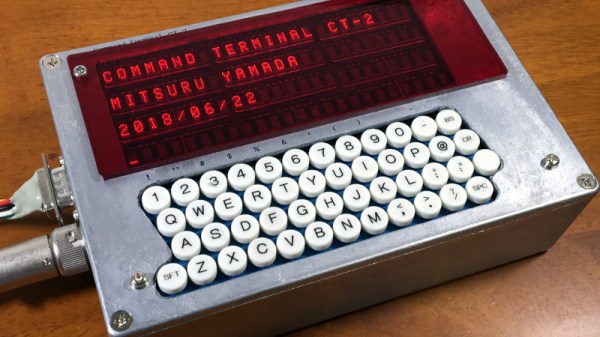
The humble standalone serial terminal might be long gone from the collective computing experience, but in the ghostly form of a software virtual terminal and a serial converter it remains the most basic fall-back and essential tool of the computer hardware hacker. [Mitsuru Yamada] has created the product that should have been made in the serial terminal’s heyday, a standalone handheld terminal using a 6809 microprocessor and vintage HP dot matrix LEDs. In a die-cast box with full push-button keyboard it’s entirely ready to roll up to a DB-25 wall socket and log into the PDP/11 in the basement.

Using today’s parts we might achieve the same feat with a single-chip microcontroller and a small LCD or OLED panel, but with an older microcomputer there is more system-building required. The 6809 is a wise choice from the 1970s arsenal because it has some on-board RAM, thus there’s no need for a RAM chip. Thus the whole thing is achieved with only a 2716 EPROM for the software, a 6850 UART with MAX232 driver  for the serial port, and a few 74 chips for glue logic, chip selects, and I/O ports to handle keyboard and display. There’s no battery in the case, but no doubt that could be easily accommodated. Also there’s not much information on the keyboard itself, but in the video below we catch a glimpse of its wiring as the box is opened.

The value in a terminal using vintage parts lies not only in because you can, but also in something that can’t easily be had with a modern microcontroller. These parts come from a time when a computer system had to be assembled as a series of peripherals round the microprocessor because it had few onboard, leading to a far more in-depth understanding of a computer system. It’s not that a 6809 is a sensible choice in 2020, more that it’s an interesting one.

By comparison, here’s a terminal using technology from today.

Continue reading “A Portable Serial Terminal That Should Be From The 1970s”

Discrete-Logic UART Keeps 8-Bit TTL Computer Connected

Pity the poor TTL computer aficionado. It’s an obsession, really — using discrete logic chips to scratch-build a computer that would probably compare unfavorably to an 80s era 8-bit machine in terms of performance. And yet they still forge ahead with their breadboards full of chips and tangles of wire. It’s really quite beautiful when you think about it.

[Duncan] at Shepherding Electrons has caught the TTL bug, and while building his 8-bit machine outfitted it with this discrete logic UART. The universal asynchronous receiver-transmitter is such a useful thing that single-chip versions of the device have been available since the early 1970s. [Duncan]’s version makes the magic of serial communications happen in just 12 chips, all from the 74LS logic family.

As if the feat of building a discrete logic UART weren’t enough, [Duncan] pulled this off without the aid of an oscilloscope. Debugging was a matter of substituting the 2.4576 MHz crystal oscillator clock with a simple 1 Hz 555 timer circuit; the reduced clock speed made it easier to check voltages and monitor the status of lines with LEDs. Once the circuit was working, the full-speed clock was substituted back in, allowing him to talk to his 8-bit computer at up to 38,400 bps. Color us impressed.

For more TTL computer goodness, and to see where [Duncan] got his inspiration, check out [Ben Eater]’s many discrete logic projects — his scratch-built 6502, a low-end video card, or even his take on serial communications.

The USB Null Modem Cable Is Now A Thing

The classic serial null-modem cable was, among other things, used to connect two computers together for communications and file transfer. Largely eliminated in daily use by the advent of home networking, there are still fringe applications where such a thing can come in handy. [Nick Sayer] needed just such a tool, but one that would work in a modern USB environment. Enter the isolated USB null-modem.

The device consists of two USB Communication Device Class, or CDC chips, creating a USB serial port for each attached computer. The TX and RX lines are cross-connected to allow communication between the two sides. Rather than directly connect the lines, however, they pass through an opto-isolator. This is important, as it allows two computers at different ground potentials to be safely connected to each other without damage.

[Nick] originally created the device to solve a specific problem at his day job, but community response was large enough that he was kind enough to share the project online. Expect to see devices available on Tindie in future for those that need a hookup. While it’s not something everyone will need, for those that do, it should come in handy. If you’re looking for other useful applications for USB-serial devices, there’s plenty – you can even try your hand at software-defined radio!

No More Floppy Drives For This Agilent Scope

When [kiwih] picked up an Agilent 54621A scope, he was amused that it had a floppy disk. At one time, it was high-tech to use a disk to transfer scope data to your computer. Today, not so much. However, on the back was a serial port. Surely it was possible to read data from there. It is, and what results is a nice walkthrough of finding the port’s info and interfacing with it using Python.

Normally, you’d use the included BenchLinkXL software to grab data from the port, but that software is so old it would not run under Windows 10 or Wine. Searching didn’t turn up much on the serial port, but it did locate a manual for a similar Agilent scope. That manual wasn’t too helpful since it assumed you were connecting via a LAN or USB. However, it did make reference to an older model that was also similar and that was the key to finding a manual that did explain the serial port protocol.

The command set looks suspiciously like SCPI — Standard Commands for Programmable Instruments — which is a layer on top of the GPIB protocol. Many scopes speak that language, so that’s not surprising. That also means if you are in the mood to communicate with an SCPI scope, you might find the code useful, even if you don’t use a serial port or have this exact Agilent model.

SCPI has a lot of uses. For example, try talking to your scope. The cheap Rigol and similar scopes usually have SCPI and you can control and read them using the same kind of techniques.