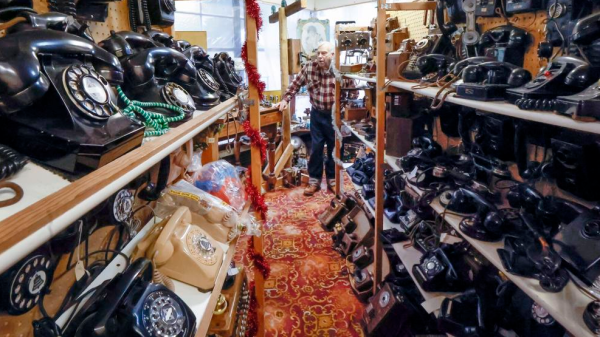
A ’70s TV With ’20s Parts

Keeping older technology working becomes exponentially difficult with age. Most of us have experienced capacitor plague, disintegrating wire insulation, planned obsolescence, or even the original company failing and not offering parts or service anymore. To keep an antique running often requires plenty of spare parts, or in the case of [Aaron]’s vintage ’70s Sony television set, plenty of modern technology made to look like it belongs in a machine from half a century ago.

The original flyback transformer on this TV was the original cause for the failure of this machine, and getting a new one would require essentially destroying a working set, so this was a perfect candidate for a resto-mod without upsetting any purists. To start, [Aaron] ordered a LCD with controls (and a remote) that would nearly fit the existing bezel, and then set about integrating the modern controls with the old analog dials on the TV. This meant using plenty of rotary encoders and programming a microcontroller to do the translating.

There are plenty of other fine details in this build, including audio integration, adding modern video and audio inputs like HDMI, and adding LEDs to backlight the original (and now working) UHF and VHF channel indicators. In his ’70s-themed display wall, this TV set looks perfectly natural. If your own display wall spotlights an even older era, take a look at some restorations of old radios instead.

Continue reading “A ’70s TV With ’20s Parts”

The Tools That Lovingly Tore Apart A Vintage Computer Game

The structure of computer game assets can be a bit of a mystery, even more so the older a game is, and some amount of reverse-engineering can be expected when pulling apart a game like 1995’s Night Light.

[voussoir] had fond memories of this game by GTE Entertainment, which had an interesting “flashlight” mechanic to serve the exploration theme. Spooky shapes in dark rooms would be revealed to be quite ordinary (and therefore not scary at all) once illuminated with a flashlight, which was directed by the mouse.

Extracting game assets was partly straightforward, thanks to many of them being laid out in a handy folder structure, with .bmp files for each level in a modest resolution. But there were also some unusual .mov files that were less than a second long, and those took a little more work to figure out.

It turns out that these unusual movie files were 80 frames in length, and each frame was a tile of a larger image. [voussoir] used ffmpeg to extract each frame, then wrote a Python script to stitch the tiles together. Behold! The results are high-resolution versions of each level’s artwork. Stitching the first 16 frames into a 4×4 grid yields a 1024×768 image, and the remaining 64 frames can be put into a 8×8 grid for a fantastic 2048×1376 version. The last piece was extracting audio, but sadly the ISO [voussoir] was using seems to have had errors, and not all the audio survived.

With intact assets in hand, [voussoir] was able to re-create the core of the game, which can be seen about halfway down into the writeup. Audio clues play simply while the flashlight effect is re-created in the browser with the game’s original level artwork, and it’s enough to ring those nostalgia bells. It’s a pretty successful project, even though not all of the assets have been tracked down, and not all of the audio was able to be extracted due to corruption. If you have any insights on that front, don’t keep them to yourself! Send [voussoir] an email, or chime in here in the comments.

Reverse engineering has a strong history when it comes to games, and has manifested itself in sometimes unusual ways, like the time Atari cracked the NES. Had the subsequent legal challenge gone differently, the game landscape might have looked very different today.

IBM PCjr Types Again, Thanks To KeybJr

Most of us think of keyboards — even vintage ones — as being fairly standardized and interchangeable, but that isn’t the case for the IBM PCjr. Its keyboard was quite unlike most others of its time, which means that a PCjr without an original keyboard is pretty much a dust collector. That’s what led [Jozef Bogin] to create the KeybJr, a piece of hardware that allows one to use any AT, XT, or PS/2 keyboard with the IBM PCjr.

The PCjr’s oddball keyboard can be a bit of a hassle for vintage computing enthusiasts.

What was strange about the PCjr’s keyboard? From the outside it looked pretty normal, but it definitely had its own thing going on. For one, the PCjr keyboard operated over a completely different protocol than the other keyboards of the time. In addition, its connection to the host was either by IR, or via its own wired cable adapter.

The KeybJr solves this by using an Arduino-based board to turn inputs from other keyboards of the time into something the PCjr expects. These signals are sent out and received either over infrared, or by the PCjr’s “K” port for a wired keyboard link.

Why bother with the IR functionality? Well, the connector and pins on the PCjr are not very rugged, and sometimes they are damaged. In those cases, it is nice to have the option of using a normal (for the time) keyboard over the IR link. Vintage hardware is not always in perfect shape, after all. That’s why things like ATX power supply adapters for the PCjr exist.

Want to give it a shot? There is a GitHub repository for the KeybJr, and you can see it in action in a brief video, embedded below.

Continue reading “IBM PCjr Types Again, Thanks To KeybJr”

NASA Hardware Techniques: Soldering Space Electronics Like It’s 1958

[PeriscopeFilms] on YouTube has many old TV adverts and US government reels archived on their channel, with some really interesting subjects to dive in to. This first one we’re highlighting here is a 1958 film about NASA Soldering Techniques (Video, embedded below), which has some fascinating details about how things were done during the Space Race, and presumably, continue to be done. The overall message about cleanliness couldn’t really be any clearer if they tried — it’s so critical it looks like those chaps in the film spend far more time brushing and cleaning than actually wielding those super clean soldering irons.

Of particular note are some of the details of wire stripping and jointing with components, such as the use of a hot-wire device to remove the insulation from wire, rather than use the kind of stripper we have lying around that cuts into the insulation and slightly distorts the wire in the process. That just won’t do. If they did have to use a cutting-type stripper, it must be precisely the right size for job, and calibrated daily.

The road to the Moon is paved with calibrated wire strippers.

When soldering a pre-tinned wire to a leaded component, a clamp is required to prevent movement of the wire, as is a thermal shunt on the component lead to protect the delicate component from excess heat. They even specify how much to wrap a wire around a terminal to be soldered, never bending the wire more than 180 degrees.

The bottom line in all this is, is that the work must be as perfect as is possible, as there is very little chance of sending someone up to fix a dodgy soldering job, once the assembly is hurtling around the planet. They call it too much of a science to be called an art and too much art to be called a science, and we can sure appreciate that.

As you would expect (and it’s not exactly a big secret) NASA has some very exacting standards for assembly of all hardware, like this great workmanship standard, which is well worth studying. Soldering is an important subject for many of us, we’ve covered the subject of solder metallurgy, as well as looking at how ancient hardware hackers soldered without the benefit of much modern knowledge.

Continue reading “NASA Hardware Techniques: Soldering Space Electronics Like It’s 1958”

Vintage Meter Repair? It’s Easier With X-Rays

Here’s an interesting and detailed teardown and repair of a Keithley 2001 7.5 Digit multimeter that is positively dripping with detail. It’s also not every day that we get to see someone using x-ray imaging to evaluate the extent of PCB damage caused by failed electrolytic capacitors.

Dark area is evidence of damage in the multi-layer PCB.

Sadly, this particular model is especially subject to that exact vintage electronics issue: electrolytic capacitor failure and leakage. These failures can lead to destroyed traces, and this particular unit had a number of them (in addition to a few destroyed diodes, just for good measure.) That’s where the x-ray machine comes in handy, because some of the damage is hidden inside the multi-layer PCBs.

[Shahriar], perhaps best known as [The Signal Path], narrates the entire process of fixing up the high-quality benchtop multimeter in a video, embedded below (or you can skip directly to the x-ray machine being broken out.) [Shahriar] was able to repair the device, thanks in part to it being in relatively good shape, and having the right tools available. Older electronics are not always so cooperative; the older a device is, the more likely one is to run into physical and logical standards that no longer exist.

Continue reading “Vintage Meter Repair? It’s Easier With X-Rays”

A screenshot of pinball schematics

Get A Grip On Troubleshooting Your Vintage Pinball Machine

Restoring vintage technology can be a tricky business, especially without the appropriate schematics and documentation. To this end [Mark] has spent the past twelve months building a comprehensive schematic editor and circuit simulator library for electromechanical pinball machines.

Rather than explore each and every table in excruciating detail, the emSim software aims to examine how specific circuits work, and how they are used as part of the gaming experience. The aim of the project is to aid in the diagnosis and repair of vintage electromechanical pinball machines, the types that rely on a dizzying array of switches, gears, motors and coils in their operation, operating like clockwork underneath the play field. While these older pinball machines typically use alternating current, the game logic (for the most part) is still binary, and can be effectively described with Boolean operators.

Like any machine with moving parts, these systems will eventually wear down and require servicing, a task which may not be in the wheelhouse for your casual pinball enthusiast. [Mark]’s hope is that his circuit simulations will allow just about anyone to repair these classic tables, and keep them around for future generations to explore and enjoy.

If tinkering with pinball innards isn’t for you, then make sure to check out our coverage of this awesome virtual pinball table.

Nixie clock from a frequency counter

A Nixie Clock, The Hard Way

Notice: no vintage Hewlett Packard test equipment was harmed in the making of this overly complicated Nixie clock. In fact, if anything, the HP 5245L electronic counter came out better off than it went into the project.

HP 5245 hand-wired backplane
Beautiful hand-wired backplane in the HP 5245 counter.

We mention the fate of this instrument mainly because we’ve seen our fair share of cool-looking-old-thing-gutted-and-filled-with-Arduinos projects before, and while they can be interesting, there’s something deeply disturbing about losing another bit of our shared electronic heritage. To gut this device, which hails from the early 1960s and features some of the most beautiful point-to-point backplane wiring we’ve ever seen, would have been a tragedy, one that [Shahriar] wisely avoided.

After a bit of recapping and some power supply troubleshooting, the video below treats us to a tour of the Nixie-based beauty. It’s a wonderful piece, and still quite accurate after all these decades, although it did need a bit of calibration. Turning it into a clock non-destructively required adding a little bit of gear, though. Internally, [Shahriar] added a divide-by-ten card to allow the counter to use an external 10-MHz reference. Externally, an ERASynth++ programmable signal generator was used to send a signal to the counter from 0 Hz to 23,595.9 kHz, ramping up by 100 Hz every second.

The end result is the world’s most complicated 24-hour clock, which honestly wasn’t even the point of the build at all. It was to show off the glorious insides of the counter, introduce us to some cool new RF tools, and as always with [Shahriar]’s videos, to educate and inform. We’ve always enjoyed his wizardry, from his look into automotive radars to a million-dollar scope teardown, and this was another great project.

Continue reading “A Nixie Clock, The Hard Way”