Roomba Gets Alexa Support With An ESP8266 Stowaway

The modern home is filled with plenty of “smart” devices, but unfortunately, they don’t always speak the same language. The coffee maker and the TV might both be able to talk to your phone through their respective apps, but that doesn’t necessarily mean the two appliances can work together to better coordinate your morning routine. Which is a shame, since if more of these devices could communicate with each other, we’d be a lot closer to living that Jetsons life we were promised.

Luckily, as hardware hackers we can help get our devices better acquainted with one another. A recent post by [MyHomeThings] shows how the ESP8266 can bridge the gap between a Roomba and Amazon’s Alexa assistant. This not only allows you to cheaply and easily add voice control to the robotic vacuum, but makes it compatible with the Amazon’s popular home automation framework. This makes it possible to chain devices together into complex conditional routines, such as turning off the lights and activating the vacuum at a certain time each night.

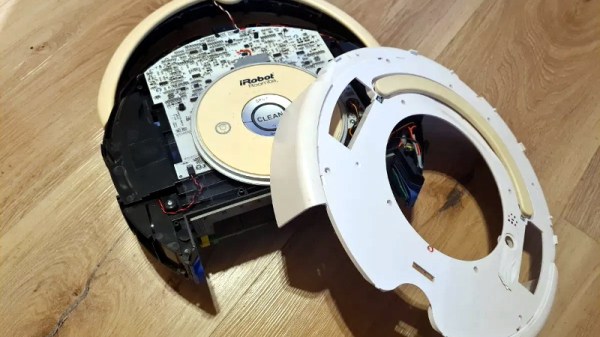
The hack depends on the so-called Roomba Open Interface, a seven pin Mini-DIN connector that can be accessed by partially disassembling the bot. This connector provides power from the Roomba’s onboard batteries as well as a two-way serial communications bus to the controller.

By connecting a MP1584EN DC-DC converter and ESP8266 to this connector, it’s possible to send commands directly to the hardware. Add a little glue code to combine this capability with a library that emulates a Belkin Wemo device, and now Alexa is able to stop and start the robot at will.

We’ve seen this sort of trick used a few times before to add backdoor Alexa support to various gadgets, and it’s always interesting to see what kind of unusual hardware folks are looking to make an integral part of their smart home.

Amazing STARGᐰTE With DHD And Infinity Mirror Wormhole

The Stargate Universe franchise has spawned numerous movies, serials, books, comics and games since 1994, and has been a favorite among science fiction fans. Prop makers and hackers often try building their own Stargate replica – the Einstein–Rosen bridge portal that allows almost instantaneous travel between two distant locations. Building an authentic looking prop requires a lot of attention to detail, and [Kristian]’s The Stargate Project is an amazingly well built rendition of the portal.

[Kristian]’s Stargate is mostly 3D printed and features a symbol ring, with chevrons that lock and light up when engaged. When the correct address has been dialled in, the wormhole is established, via an infinity mirror effect that uses 122 RGB LEDs. The Dial Home Device (DHD) is a replica of the original pedestal shaped computer, with two concentric sets of 19 buttons and a central activation button.

The Stargate ring is assembled from multiple 3D printed in sections, and measures 390 mm across. The seven Chevrons move along 3D printed rack-and-pinion gears, driven by geared micro-motors. The symbol ring is driven by a separate NEMA14 stepper motor. A Raspberry Pi with three piggy backed motor hats controls the various motors and LEDs. A USB sound card and a powered speaker provide audio effects while dialling. Once a worm hole is established, random audio snippets are played. The wormhole is maintained for 38 minutes, after which the Stargate powers down.

The Dial Home Device is built around a custom, circular PCB which holds the keypad buttons, LEDs and an ATmega 32u4 micro-controller which connects to the Raspberry Pi via USB. The 39 LEDs are APA102C’s so they only need two GPIO pins. For the keyboard, four banks of nine buttons and another bank of three are connected via a resistive ladder to the analog GPIO’s. This allows all 39 buttons to be connected via five analog inputs and was probably done to simplify PCB track layout. The back lit button key caps were printed in two parts. The translucent bases are covered with the opaque symbol caps.

Making a prop like this look like the real deal requires a lot of effort in painting the various parts, and this shows in [Kristian]’s final result, right down to the stone platform on which the Stargate sits. The one improvement we would like to see is a wireless DHD, just like it’s supposed to be. Doing so shouldn’t be too difficult, and losing the USB tether between the Stargate and its DHD would be a great upgrade to this amazing project. Check out the videos after the break, and there are many more on [Kristian]’s project page.

And if you are a fan of the franchise, then the amazingly Droolworthy Animatronic Stargate Horus Helmet is an excellent companion project to this Stargate.

Continue reading “Amazing STARGᐰTE With DHD And Infinity Mirror Wormhole”

Credit For Clever Corner Clamp

We love this design’s simplicity, but its mundane appearance is deceptive because a lot is going on here. [Bas van Hassel]’s clamp looks like a bench cookie or maybe a compressed hockey puck, but one pie piece-shaped quadrant extends on dovetails to form a right-angle channel, perfect for holding your ninety-degree joint while your glue dries. Opposing disc edges are flat, so your clamp won’t slip. Divots on the top and bumps on the bottom keep your stacks nice and neat when you put them away. All around, we have no trouble believing this designer has spent a lot of hours in the woodshop.

As long as your wood pieces are the same thickness, it seems like a practical use of printer filament, but if you have different sizes, you can always pull the dovetail out of its groove. Thanks to the scaling feature built into slicing programs, we expect some precision makers to utilize this in projects like dollhouses and model airplanes. If you have a high-resolution printer, you could make some miniature tools to construct a flea circus set. At that point, you may need to make some smaller clamps.

Print orientation for the puck is straightforward as it is a print-in-place design, but sometimes it isn’t always clear, so listen to those who know better and don’t be afraid of gears in your vises.


Teardown: Go Warmer USB Rechargeable Hand Heater

Under normal circumstances, if an electronic gadget in your pocket suddenly became hot to the touch, it would be cause for alarm. But not so with the Go Warmer. This lozenge shaped device is not only a USB power bank that can keep your mobile devices topped up, but is also doubles as a miniature heater that the manufacturer claims can bring its surface temperature up to 48 °C (120 °F) for several hours. You can hold in in your hand, put it in your pocket, maybe even sit on it if you’re particularly daring. The possibilities are endless, at least until the 4,000 mAh battery runs down.

For $14.99 USD, the Go Warmer certainly isn’t much of a deal when compared to other battery packs. Even if it does come with a swanky velveteen carrying pouch. But is it a good deal for one that can heat itself up without exploding? Let’s crack this metallic egg and find out.

Continue reading “Teardown: Go Warmer USB Rechargeable Hand Heater”

Peek Into This Synth’s Great Design (And Abandoned Features)

[Tommy]’s POLY555 is an analog, 20-note polyphonic synthesizer that makes heavy use of 3D printing and shows off some clever design. The POLY555, as well as [Tommy]’s earlier synth designs, are based around the 555 timer. But one 555 is one oscillator, which means only one note can be played at a time. To make the POLY555 polyphonic, [Tommy] took things to their logical extreme and simply added multiple 555s, expanding the capabilities while keeping the classic 555 synth heritage.

The real gem here is [Tommy]’s writeup. In it, he explains the various design choices and improvements that went into the POLY555, not just as an instrument, but as a kit intended to be produced and easy to assemble. Good DFM (Design For Manufacturability) takes time and effort, but pays off big time even for things made in relatively small quantities. Anything that reduces complexity, eliminates steps, or improves reliability is a change worth investigating.

For example, the volume wheel is not a thumbwheel pot. It is actually a 3D-printed piece attached to the same potentiometer that the 555s use for tuning; meaning one less part to keep track of in the bill of materials. It’s all a gold mine of tips for anyone looking at making more than just a handful of something, and a peek into the hard work that goes into designing something to be produced. [Tommy] even has a short section dedicated to abandoned or rejected ideas that didn’t make the cut, which is educational in itself. Want more? Good news! This isn’t the first time we’ve been delighted with [Tommy]’s prototyping and design discussions.

POLY555’s design files (OpenSCAD for enclosure and parts, and KiCad for schematic and PCB) as well as assembly guide are all available on GitHub, and STL files can be found on Thingiverse. [Tommy] sells partial and complete kits as well, so there’s something for everyone’s comfort level. Watch the POLY555 in action in the video, embedded below.

Continue reading “Peek Into This Synth’s Great Design (And Abandoned Features)”

Full DIY: A UNIX Clone On TTL

Making a CPU or indeed a whole computer system from scratch using discrete logic chips is by no means an unusual project, but it’s still one that requires quite a lot of technical ability and understanding of how computers work. Similarly, writing a UNIX-like operating system from scratch is something that’s been done more than once, but which definitely puts the author in an exclusive breed.  Creating a CPU and computer system from discrete logic and then writing a UNIX-like OS for it? That’s definitely something new, but here’s [RobotMan2412] with both CPU and operating system to prove it!

The GR8CPU as he calls it is an 8-bit design with a 16-bit address space, making it equivalent to a typical mid-to-late 1970s 8-bit chip. He’s on revision 3 of the processor, and even makes the bold suggestion that it might be the most complex breadboard CPU ever made. That’s impressive enough, but to add a UNIX-like operating system makes it special.

While he has a real GR8CPU, it appears he’s also written an emulator with access to a disk filesystem, and it’s on this that he shows us the OS running. Don’t expect an all-singing all-dancing desktop OS here, instead it’s a kernel and very basic command line that’s just about able to run a Hello World. The kernel is hand-coded in assembler and is about 5 kB in size.

We look forward to seeing more of this project, and hope maybe he’ll one day soon publish the source. As a reminder that this is a perfectly capable platform for the job, here’s the original UNIX running on a vintage DEC PDP7.

Arduino Micro Pushes Animal Crossing’s Buttons

Repetitive tasks in video games often find a way of pushing our buttons. [Facelesstech] got tired of mashing “A” while catching shooting stars in Animal Crossing, so he set out to automate his problem away. After briefly considering rigging up a servo to do the work for him, he recalled a previous effort that used an Arduino Teensy to automate a bowling mini-game in Zelda: Breath of the Wild and decided to use a microcontroller to catch stars for him.

[Facelesstech] programmed an Arduino Pro Micro to fake controller button presses. It starts with a couple of presses to identify itself to the Switch, before generating an endless stream of button presses that automatically catch every shooting star. Hooking it up is easy—an on-the-go adapter allows the Switch’s USB-C port to connect directly to the Arduino’s Micro-USB port, even supplying power!

[Facelesstech] also designed a compact 3D-printed case that packages up the Arduino Pro Micro along with an ISP header for easy updating. The case even lets the Arduino’s power LED shine through so you know that it’s working!

If you, too, need to automate video game button-pushing, [Facelesstech] has kindly uploaded the source code and 3D designs for you to try. If you’d prefer something a little more low-tech, perhaps you might try a mechanical button pusher.

Continue reading “Arduino Micro Pushes Animal Crossing’s Buttons”