Homebrew ECU Increases Mazda Zoom

A big problem with most modern cars is the sheer number of parts and systems that are not user serviceable. This is a big departure from cars of just decades ago that were designed to be easily worked on by the owner. To that end, [Anthony] aka [fuzzymonkey] has tackled what is normally the hardest thing to work on in modern cars: the Engine Control Unit. (Older posts on this project can be found at [Anthony]’s old project log.)

Every sensor in any modern car is monitored by a computer called the Engine Control Unit (ECU), and the computer is responsible for taking this data and making decisions on how the car should be running. In theory a custom ECU would be able to change any behavior of the car, but in practice this is extremely difficult due to the sheer number of operations required by the computer and the very specific tolerances of a modern engine.

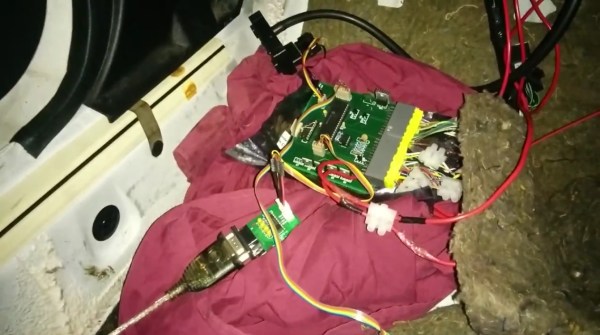
The custom ECU that Anthony has created for his Mazda MX-5 (a Miata for those in North America) is based on the PIC18F46K80 microcontroller, and there are actually two units involved. The first handles time-sensitive operations like monitoring the engine cam position and engine timing, and the other generates a clock signal for the main unit and also monitors things like cooling temperature and controlling idle speed. The two units communicate over SPI.

[Anthony]’s custom ECU is exceptional in that he’s gotten his car running pretty well. There are some kinks, but hopefully he’ll have a product that’s better than the factory ECU by allowing him to change anything from throttle response and engine timing to the air-fuel ratio. There have been a few other attempts to tame the ECU beast in the past, but so far there isn’t much out there.

Continue reading “Homebrew ECU Increases Mazda Zoom”

Busted Wah Pedal Becomes New Synth Tool

Sometimes we get lucky and find a part we need for a project in our parts drawer. [Scissorfeind] got even luckier and found a part for his project lying around in the street. It was a Crybaby Wah pedal, a classic effects pedal typically used for a guitar. Since it was somewhat damaged, [Scissorfeind] got to work creating a control voltage (CV) and volume circuit for his Korg synthesizer.

For those who aren’t synthesizer aficionados, CV is a method of controlling the pitch of a tone. A higher voltage creates a higher tone and vice-versa. The wah pedal has a rocker on it that allows one’s foot to control the effect, but this particular one has been modified for CV instead of the wah-wah sound these pedals normally make. [Scissorfeind] built in a switch that will allow it to control volume as well, which makes this pedal quite unique in the effects world.

[Scissorfeind] built the custom circuit out of other parts he had lying around (presumably not in the street) and put the entire thing together on perfboard, then fit it all back together in the pedal. Now he has a great control voltage pedal for the vintage Korg synthesizer he recently restored! [Scissorfeind] knows his way around a synth, but if you’re looking to get started on a synthesizer project we have a great tutorial for you!

UController Code Profiler Debugs Your Microcontroller

When working on digital circuits that operate at high frequencies it helps to have some special tools on hand. Things like oscilloscopes and logic analyzers are priceless when something isn’t working right. Another great tool would be this hardware-based profiler that [Mike] came up with while he was working on another project.

The profiler connects to USB and shows up as a serial port. Normally [Mike] used a set of LEDs to get information about how his microcontrollers work, but for this project that wasn’t enough. The uController Code Profiler can provide the main loop running time, time functions and sections of code, keep track of variables, and a few other tasks as well, all with nanosecond resolution.

The source code isn’t provided but a hex file is available, along with a schematic and an include file, if you want to try this one out on your next project. Like this homemade logic analyzer, this could be a powerful tool in your microcontroller arsenal. Simply include the file with various pieces of your code to get it up and running!

Instrument Cluster Clock Gets The Show On The Road

While driving around one day, [Esko] noticed that the numbers and dials on a speedometer would be a pretty great medium for a clock build. This was his first project using a microcontroller, and with no time to lose he got his hands on the instrument cluster from a Fiat and used it to make a very unique timepiece.

The instrument cluster he chose was from a diesel Fiat Stilo, which [Esko] chose because the tachometer on the diesel version suited his timekeeping needs almost exactly. The speedometer measures almost all the way to 240 kph which works well for a 24-hour clock too. With the major part sourced, he found an Arduino clone and hit the road (figuratively speaking). A major focus of this project was getting the CAN bus signals sorted out. It helped that the Arduino clone he found had this functionality built-in (and ended up being cheaper than a real Arduino and shield) but he still had quite a bit of difficulty figuring out all of the signals.

In the end he got everything working, using a built-in servo motor in the cluster to make a “ticking” sound for seconds, and using the fuel gauge to keep track of the minutes. [Esko] also donated it to a local car museum when he finished so that others can enjoy this unique timepiece. Be sure to check out the video below to see this clock in action, and if you’re looking for other uses for instrument clusters that you might have lying around, be sure to check out this cluster used for video games.

The mechanics in dashboards are awesome, and produced at scale. That’s why our own [Adam Fabio] is able to get a hold of that type of hardware for his Analog Gauge Stepper kit. He simply adds a 3D printed needle, and a PCB to make interfacing easy.

Continue reading “Instrument Cluster Clock Gets The Show On The Road”

Optics Laboratory Made From LEGO

16A lot of engineers, scientists, builders, makers, and hackers got their start as children with LEGO. Putting those bricks together, whether following the instructions or not, really brings out the imagination. It’s not surprising that some people grow up and still use LEGO in their projects, like [Steve] who has used LEGO to build an optics lab with a laser beam splitter.

[Steve] started this project by salvaging parts from a broken computer projector. Some of the parts were scorched beyond repair, but he did find some lenses and mirrors and a mystery glass cube. It turns out that this cube is a dichroic prism which is used for combining images from the different LCD screens in the projector, but with the right LEGO bricks it can also be used for splitting a laser beam.

The cube was set on a LEGO rotating piece to demonstrate how it can split the laser at certain angles. LEGO purists might be upset at the Erector set that was snuck into this project, but this was necessary to hold up the laser pointer. This is a great use of these building blocks though, and [Steve] finally has his optics lab that he’s wanted to build for a while. If that doesn’t scratch your LEGO itch, we’ve also featured this LEGO lab which was built to measure the Planck constant.

Solar-Cell Laser Communication System

Forget the soup cans connected by a piece of string. There’s now a way to communicate wirelessly that doesn’t rely on a physical connection… or radio. It’s a communications platform that uses lasers to send data, and it’s done in a way that virtually anyone could build.

This method for sending information isn’t exactly new, but this project is one of the best we’ve seen that makes it doable for the average tinkerer. A standard microphone and audio amplifier are used to send the signals to the transmitter, which is just a typical garden-variety laser that anyone could find for a few dollars. A few LEDs prevent the laser from receiving too much power, and a solar cell at the receiving end decodes the message and outputs it through another amplifier and a speaker.

Of course you will need line-of-sight to get this communications system up and running, but as long as you have that taken care of the sky’s the limit. You can find incredibly powerful lasers lying around if you want to try to increase the communication distance, and there are surprisingly few restrictions on purchasing others that are 1W or higher. You could easily increase the range, but be careful not to set your receiving station (or any animals, plants, buildings, etc) on fire!

Continue reading “Solar-Cell Laser Communication System”

Disassembled Mouse Keeps Track Of Gas Meter

After building devices that can read his home’s electricity usage, [Dave] set out to build something that could measure the other energy source to his house: his gas line. Rather than tapping into the line and measuring the gas directly, his (much safer) method was to simply monitor the gas meter itself.

The major hurdle that [Dave] had to jump was dealing with an ancient meter with absolutely no modern electronics like some other meters have that make this job a little easier. The meter has “1985” stamped on it which might be the manufacturing date, but for this meter even assuming that it’s that new might be too generous. In any event, the only option was to build something that could physically watch the spinning dial. To accomplish this, [Dave] used the sensor from an optical mouse.

The sensor is surrounded by LEDs which illuminate the dial. When the dial passes a certain point, the sensor alerts an Arduino that one revolution has occurred. Once the Arduino has this information, the rest is a piece of cake. [Dave] used KiCad to design the PCB and also had access to a laser cutter for the enclosure. It’s a great piece of modern technology that helps integrate old analog technology into the modern world. This wasn’t [Dave]’s first energy monitoring system either; be sure to check out his electricity meter that we featured a few years ago.