Nyan Cat

Embroidered Nyan Cat Brings A Meme To The Real World

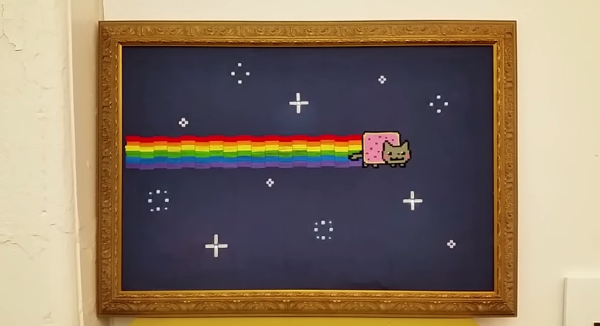
Have you ever come across an Internet meme and just thought to yourself, “I have to bring this into the physical world!” Well [0xb3nn] and [Knit Knit] did. They decided to take the classic nyan cat meme and bring it to life.

The frame is 24″ x 36″. Many hours went into the knitting process, but the result obviously turned out very well. The stars include 24 LED sequins to add a sparkling animation effect. These were sewn onto the back of the work using conductive thread. They are bright enough to shine through to the front where needed. These connect back to an Arduino Pro Mini 5V board.

The Arduino is also connected to a capacitive touch sensor. This allows the user to simply place their hand over the nyan cat image to start the animation. No need for physical buttons or switches to take away from the visual design. An Adafruit AudioFX sound board was used to play back a saved nyan cat theme song over a couple of speakers. The source code for this project is available on github. Be sure to watch the demo video below. Continue reading “Embroidered Nyan Cat Brings A Meme To The Real World”

A Tool For Spying On Serial Data

[Piotr] was working on a recent Arduino project when he ran into a problem. He was having trouble getting his Arduino Pro Mini to communicate with an ESP8266 module. He needed a way to snoop on the back and forth serial communications. Since he didn’t have a specialized tool for this task, [Piotr] ended up building his own.

spying-on-serial-thumb
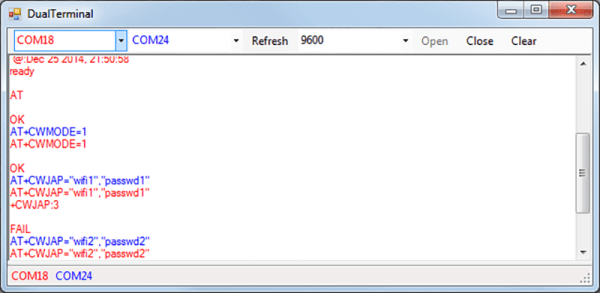
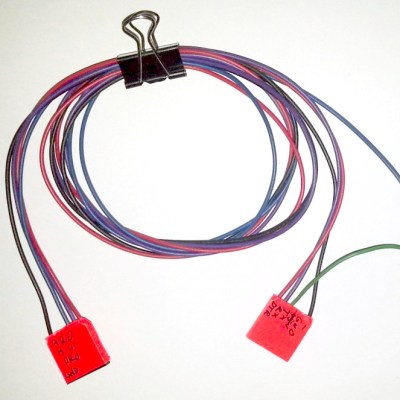
The setup is pretty simple. You start with a standard serial cable containing the TX, RX, DTR, and GND wires. This cable connects the Arduino to the ESP8266 WiFi module. The TX and RX lines are then tapped into. Each wire is routed to the RX pin of two different serial to USB adapters. This way, the data being sent from the Arduino shows up on one COM port and the data being transmitted from the module shows up on the other.

The next piece of the puzzle was coming up with a way to see the data more clearly. [Piotr] could have opened two serial terminals simultaneously, but this wasn’t ideal because it would be difficult to compare the timing of the data. Instead, [Piotr] spent less than an hour writing his own simple serial terminal. This one connects to two COM ports at the same time and prints the data on the same screen. The data from each COM port is displayed in a separate color to make it easy to differentiate. The schematic and source code to this project can be found on [Piotr’s] website.

Open Source, DIY Soldering Robot

After [Brian] starting selling his own Raspberry Pi expansion boards, he found himself with a need for a robot that could solder 40-pin headers for him. He first did what most people might do by looking up pre-built solutions. Unfortunately everything he found was either too slow, too big, or cost as much as a new car. That’s when he decided to just build his own soldering robot.

The robot looks similar to many 3D printer designs we’ve seen in the past, with several adjustments. The PCBs get mounted to a flat piece of aluminum dubbed the “PCB caddy”. The PCBs are mounted with custom-made pins that thread into the caddy. Once the PCBs are in place, they are clamped down with another small piece of aluminum. A computer slowly moves the caddy in one direction, moving the header’s pins along the path of the soldering irons one row at a time.

The machine has two soldering irons attached, allowing for two pins to be soldered simultaneously. The irons are retracted as the PCB caddy slides into place. They irons are then lowered onto the pins to apply heat. Two extruders then push the perfect amount of solder onto each pin. The solder melts upon contact with the hot pins, just as it would when soldered by hand.

The system was originally designed to be run on a Windows 8.1 tablet computer, but [Brian] found that the system’s internal battery would not charge while also acting like a USB host. Instead, they are running the Windows WPF application on full PC. All of the software and CAD files can be found on [Brian’s] github page. Also be sure to check out the demo video below. Continue reading “Open Source, DIY Soldering Robot”

Arduino GPS

A Simple And Inexpensive GPS Navigation Device

There are plenty of GPS navigation units on the market today, but it’s always fun to build something yourself. That’s what [middelbeek] did with his $25 GPS device. He managed to find a few good deals on electronics components online, including and Arduino Uno, a GPS module, and a TFT display.

In order to get the map images on the device, [middelbeek] has to go through a manual process. First he has to download a GEOTIFF of the area he wants mapped. A GEOTIFF is a metadata standard that allows georeferencing information to be embedded into a TIFF image file.  [middelbeek] then has to convert the GEOTIFF into an 8-bit BMP image file. The BMP images get stored on an SD card along with a .dat file that describes the boundaries of each BMP. The .dat file was also manually created.

The Arduino loads this data and displays the correct map onto the 320×240 TFT display. [middelbeek] explains on his github page that he is currently unable to display data from two map files at once, which can lead to problems when the position moves to the edge of the map. We suspect that with some more work and tuning this system could be improved and made easier to use, of course for under $25 you can’t expect too much.

Thin Client Hack

Hacking A Thin Client To Gain Root Access

[Roberto] recently discovered a clever way to gain root access to an HP t520 thin client computer. These computers run HP’s ThinPro operating system. The OS is based on Linux and is basically just a lightweight system designed to boot into a virtual desktop image loaded from a server. [Roberto’s] discovery works on systems that are running in “kiosk mode”.

The setup for the attack is incredibly simple. The attacker first stops the virtual desktop image from loading. Then, the connection settings are edited. The host field is filled with garbage, which will prevent the connection from actually working properly. The real trick is in the “command line arguments” field. The attacker simply needs to add the argument “&& xterm”. When the connection is launched, it will first fail and then launch the xterm program. This gives the attacker a command shell running under the context of whichever user the original software is running as.

The next step is to escalate privileges to root. [Roberto] discovered a special command that the default user can run as root using sudo. The “”hpobl” command launches the HP Easy Setup Wizard. Once the wizard is opened, the attacker clicks on the “Thank You” link, which will then load up the HP website in a version of Firefox. The final step is to edit Firefox’s default email program association to xterm. Now when the attacker visits an address like “mailto:test@test.com”, Firefox (running as root) launches xterm with full root privileges. These types of attacks are nothing new, but it’s interesting to see that they still persist even in newer software.

Race Conditions Exploit Granted Free Money On Web Services

[Josip] has been playing around with race conditions on web interfaces lately, finding vulnerabilities on both Facebook and Digital Ocean. A race condition can occur when a piece of software processes multiple threads using a shared resource.

For example, [Josip] discovered that he was able to manipulate page reviews using just a single Facebook account. Normally, a user is permitted to leave just one review for any given Facebook page. This prevents a single user from being able to skew the page’s overall ranking by making a bunch of positive or negative reviews. The trick to manipulating the system was to intercept the HTTP request that submitted the page review. The request was then replayed over and over in a very short amount of time.

Facebook’s servers ended up processing some of these requests simultaneously, essentially unaware that multiple requests had come in so close together. The result was that multiple reviews were submitted, artificially changing the pages overall ranking even though only one review actually showed up on the page for this user. The user can then delete their single review, and repeat this cycle over and over. It took Facebook approximately two months to fix this vulnerability, but in the end it was fixed and [Josip] received a nice bounty.

The Digital Ocean hack was essentially the exact same process. This time instead of hacking page reviews, [Josip] went after some free money. He found that he was able to submit the same promotional code multiple times, resulting in a hefty discount at checkout time. Digital Ocean wasted no time fixing this bug, repairing it within just ten days of the disclosure.

Apple II Watch

Strapping An Apple II To Your Body

Now that the Apple wristwatch is on its way, some people are clamoring with excitement and anticipation. Rather than wait around for the commercial product, Instructables user [Aleator777] decided to build his own wearable Apple watch. His is a bit different though. Rather than look sleek with all kinds of modern features, he decided to build a watch based on the 37-year-old Apple II.

The most obvious thing you’ll notice about this creation is the case. It really does look like something that would have been created in the 70’s or 80’s. The rectangular shape combined with the faded beige plastic case really sells the vintage electronic look. It’s only missing wood paneling. The case also includes the old rainbow-colored Apple logo and a huge (by today’s standards) control knob on the side. The case was designed on a computer and 3D printed. The .stl files are available in the Instructable.

This watch runs on a Teensy 3.1, so it’s a bit faster than its 1977 counterpart. The screen is a 1.8″ TFT LCD display that appears to only be using the color green. This gives the vintage monochromatic look and really sells the 70’s vibe. There is also a SOMO II sound module and speaker to allow audio feedback. The watch does tell time but unfortunately does not run BASIC. The project is open source though, so if you’re up to the challenge then by all means add some more functionality.

As silly as this project is, it really helps to show how far technology has come since the Apple II. In 1977 a wristwatch like this one would have been the stuff of science fiction. In 2015 a single person can build this at their kitchen table using parts ordered from the Internet and a 3D printer. We can’t wait to see what kinds of things people will be making in another 35 years.

Continue reading “Strapping An Apple II To Your Body”