Burned Out SKR E3 Mini Gets New Stepper Driver

It didn’t take long to figure out that a dead X axis and an message saying “TMC CONNECTION ERROR” meant that one of the stepper drivers on the SKR E3 Mini 3D printer control board had released the magic smoke. Manufacturer BigTreeTech replaced the board under warranty, and the printer was back up and running in short order. But instead of tossing it in the trash, [Simon] wondered how hard it would be to repair the dead board.

Removing the original stepper driver IC.

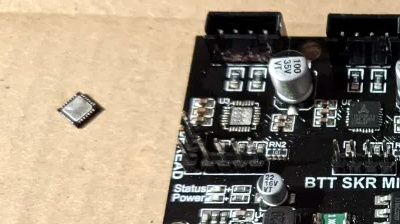
The short answer is, not very hard. There was no question as to which of the four TMC2209 drivers was shot, since the X motor was the only one experiencing a problem. The drivers unfortunately aren’t socketed on this board, but after a little kiss with the hot air, the old chip was off.

[Simon] didn’t have any spare TMC2209 chips, but the TMC2208 has the same pinout and is a drop-in replacement. The TMC2208 is rated for a bit less current, but it shouldn’t be a problem under normal circumstances.

Other than the stepper connector getting a little toasty during the installation, the swap went off without a hitch and the board was up and running again. [Simon] ended up putting the now repaired SKR E3 Mini in his Ender 3; a nice 32-bit upgrade compared to the ATmega1284 that was originally running the show. Though in the past, he’s managed to squeeze a bit more performance out of the older 8-bit board as well.

New Micro YARH.IO Designed For Skilled Operators

A few months back we brought you word of the YARH.IO, an extremely impressive Raspberry Pi portable that featured rugged good looks and a unique convertible design made possible by a removable keyboard. One of the most appealing aspects of the design was that everything was built from off-the-shelf modules; it only took a couple jumper wires and some scrap perfboard to get everything wired up inside the 3D printed enclosure.

The downside of this construction style was that the finished product was a bit chunkier than was strictly necessary. But that’s not the case with the new YARH.IO Micro. The palm-sized portable looks almost exactly like the original, though it had to ditch the removable keyboard in the shrinking process. Gone as well is the touch pad, though with the touch screen capabilities of the Pimoroni Hyper Pixel four inch IPS display, that’s not much of a problem.

What’s the catch? Well, at a glance we can tell you this one is considerably harder to build. For one thing, you’ll need to remove the Ethernet and USB connectors from the Pi 3B+. The USB ports get relocated, but Ethernet understandably has to be left on the cutting room floor. Nothing to worry about with the GPIO pins, the display takes up all of those, but you’ll probably want to wire the I2C lines to the female header on the side of the case so you can add external hardware and sensors.

You also need to nestle an Arduino Pro Micro in there to communicate status information about the battery to the operating system over I2C. If you wanted to save a little wiring you could probably leave off the DS3231 RTC module, but it depends on how often you’ll be able to sync up with NTP.

While it may be more difficult to assemble than its predecessor, it’s certainly not unapproachable. Once again, no custom PCBs or exotic components are required. You might be doing a lot more soldering (and desoldering) than you would have before, but it’s nothing that the average Hackaday reader isn’t capable of. For your troubles, you’ll get a exceptionally portable Linux machine that’s ripe for hacking and modification.

If the time and effort it will take to put together a YARH.IO is a bit more than you’re willing to invest right now, there’s always commercial alternatives like the DevTerm. But whether you go with the original or this new Micro edition, we think the satisfaction of having built the whole thing yourself will be more than worth it.

Raspberry Pi 4 Brings Cloud Gaming To Nintendo Switch

Companies like Google and Microsoft have been investing heavily in the concept of cloud gaming, where a player uses their computer or a mobile device to stream the video feed of a game that’s running on powerful machine tucked away in a data center somewhere. With this technology you can play the latest and greatest titles, even if the device you’re using doesn’t have the processing power to run it locally.

Considering the Switch is already a portable system, it’s not too surprising Nintendo doesn’t seem interested in the technology. But that didn’t stop [Stan Dmitriev] from doing a bit of experimentation on his own. With little more than a Raspberry Pi 4 and Trinket M0, he’s demonstrated that users can remotely interact with the Switch well enough to play games in real time.

The setup is fairly straightforward. A cheap HDMI capture device is used to grab the video from the Nintendo Switch dock, which is then streamed out to web with the help of the Pi’s hardware video encoder. Input from the user is sent over the Pi’s UART to the Trinket, which itself is running a firmware specifically developed for mimicking Nintendo Switch controllers. With so many elements involved, naturally some latency comes into play. The roughly 100 millisecond delay [Stan] is reporting isn’t exactly ideal for fast-paced gaming, but is certainly adequate for more relaxed titles.

On the software side of things, the project is using a SDK developed by [Stan]’s employer SurrogateTV. Right now you need to apply if you want to get your game or other interactive gadget up on the service, though he says it will be opened up to the public next year. But even without all the details, we’ve got a clear idea of how both the video capture and user input sides of the equation are being handled. For personal use, all you’d really need to do is put together a simple web interface to tie it all together.

This isn’t the first time we’ve seen a microcontroller used to interface with the Switch. Other consoles are a bit more selective about what kind of hardware they will talk to, but the Microsoft Adaptive Controller could potentially allow you to do something similar on the Xbox.

Low-Cost Head Mounted Display From FPV Gear

A common complaint we’ve seen on many of the recent cyberdeck builds is that they don’t offer any display technology more advanced than a tablet-sized IPS panel. The argument goes that to be a true deck in the Gibsonian sense, it’s got to have some kind of virtual reality interface or at least a head mounted display. Unfortunately such technology is expensive, and often not particularly hacker friendly.

But assuming you can settle for a somewhat low-tech alternative, the simple head mounted display that [Jordan Brandes] has been fiddling with is certainly a viable option. By mounting a five inch 800×480 TFT LCD to the front of a pair of goggles designed for first person view (FPV) flying, you can throw together a workable rig for around $30 USD. Add in some headphones, and you’ve got a fairly immersive experience for not a lot.

Naturally the display will show whatever HDMI signal you give it, but in his case, [Jordan] has mounted a Raspberry Pi to the back of it to make it a complete wearable computer. With a Bluetooth travel keyboard in the mix, he’s even able to get some legitimate work done with this setup. If he ends up combining this with the ultrasonic keyboard he was working on earlier in the year, he’ll be getting pretty close to jacking into cyberspace for real.

Hackers have been chasing cheap head mounted displays for years now. Back in 2007 the best you could do for this kind of money was a 300×240 black and white monocle. Getting our hands on the good stuff is still harder than we’d like, but at least we’re moving in the right direction.

Continue reading “Low-Cost Head Mounted Display From FPV Gear”

Alien Inspired Cyberdeck Packs Vintage Atari 800XL

Sticking a Raspberry Pi in a Pelican-style case and calling it a cyberdeck has become something of a meme these days, and while we certainly don’t look down on such projects, we recognize they can get a bit repetitive. But we think this one is unique enough to get a pass. Sure [eizen6] mounted a Pi inside of a rugged waterproof case, but it’s simply serving as a display for the real star of the show: a vintage Atari 800XL computer.

The overall look of the build, from the stenciled Nostromo on the back to the self-destruct warning sticker over the display is a reference to Alien. Partly because both the film and the Atari 800 were released in 1979, but also because [eizen6] says this particular aesthetic is simply the way computers should look. The visual style is also meant to signify that the project embraces the old ways despite the sprinkling of modern technology.

A custom cable lets the 800XL run on USB power.

To that end, retro aficionados will be happy to hear that the Atari appears to be completely unmodified, with [eizen6] going as far as nestling the nearly 40 year old computer in foam rather than permanently mounting it to the case. The various cables for power, video, and data have all been terminated with the appropriate connectors as well, so everything can be easily unplugged should the 8-bit machine need to be returned to more pedestrian use.

In the top half of the case, [eizen6] has mounted the Raspberry Pi 3B+, a seven inch touch screen, a USB hub, and a SIO2SD that allows loading Atari disk images from an SD card. Using a USB capture device, video from the Atari can be shown on the Pi’s display with a simple VLC command. With a USB keyboard plugged into the hub, the Pi can be put to more advanced use should the need arise. It’s also worth noting that, thanks to a custom cable, the Atari is running off of a USB power bank. With a second USB power bank dedicated to running the Pi and its LCD display, this retro cyberdeck is fully mobile.

We’ve seen plenty of modern builds that try and recapture the look and feel of retro computers, but very few that actually integrate the genuine article. While the aesthetic might not be everyone’s cup of tea, we can all appreciate the respect shown for the original hardware in this build.

2020: As The Hardware World Turns

By pretty much any metric you care to use, 2020 has been an unforgettable year. Usually that would be a positive thing, but this time around it’s a bit more complicated. The global pandemic, unprecedented in modern times, impacted the way we work, learn, and gather. Some will look back on their time in lockdown as productive, if a bit lonely. Other’s have had their entire way of life uprooted, with no indication as to when or if things will ever return to normal. Whatever “normal” is at this point.

But even in the face of such adversity, there have been bright spots for our community. With traditional gatherings out of the question, many long-running tech conferences moved over to a virtual format that allowed a larger and more diverse array of presenters and attendees than would have been possible in the past. We also saw hackers and makers all over the planet devote their skills and tools to the production of personal protective equipment (PPE). In a turn of events few could have predicted, the 2020 COVID-19 pandemic helped demonstrate the validity of hyperlocal manufacturing in a way that’s never happened before.

For better or for worse, most of us will associate 2020 with COVID-19 for the rest of our lives. Really, how could we not? But over these last twelve months we’ve borne witness to plenty of stories that are just as deserving of a spot in our collective memories. As we approach the twilight hours of this most ponderous year, let’s take a look back at some of the most interesting themes that touched our little corner of the tech world this year.

Continue reading “2020: As The Hardware World Turns”

Teardown: Creality Wi-Fi Box

Creality, makers of the Ender series of 3D printers, have released a product called Wi-Fi Box meant to cheaply add network control to your printer. Naturally I had to order one so we could take a peek, but this is certainly not a product review. If you’re looking to control your 3D printer over the network, get yourself a Raspberry Pi and install Gina Häußge’s phenomenal OctoPrint on it. Despite what Creality might want you to believe, their product is little more than a poor imitation of this incredible open source project.

Even if you manage to get it working with your printer, which judging by early indications is a pretty big if, it won’t give you anywhere near the same experience. At best it’ll save you a few dollars compared to going the DIY route, but at the cost of missing out on the vibrant community of plugin developers that have helped establish OctoPrint as the defacto remote 3D printing solution.

That being said, the hardware itself seems pretty interesting. For just $20 USD you get a palm-sized Linux computer with WiFi, Ethernet, a micro SD slot, and a pair of USB ports; all wrapped up in a fairly rugged enclosure. There’s no video output, but that will hardly scare off the veteran penguin wrangler. Tucked in a corner and sipping down only a few watts, one can imagine plenty of tasks this little gadget would be well suited to. Perhaps it could act as a small MQTT broker for all your smart home devices, or a low-power remote weather station. The possibilities are nearly limitless, assuming we can get into the thing anyway.

So what’s inside the Creality Wi-Fi Box, and how hard will it be to bend it to our will? Let’s take one apart and find out.

Continue reading “Teardown: Creality Wi-Fi Box”