Huge Seven Segment Display Made From Broken Glass

A staple of consumer devices for decades, seven segment displays are arguably one of the most recognizable electronic components out there. So it’s probably no surprise they’re cheap and easy to source for our own projects. But that doesn’t mean there isn’t room for personal interpretation.

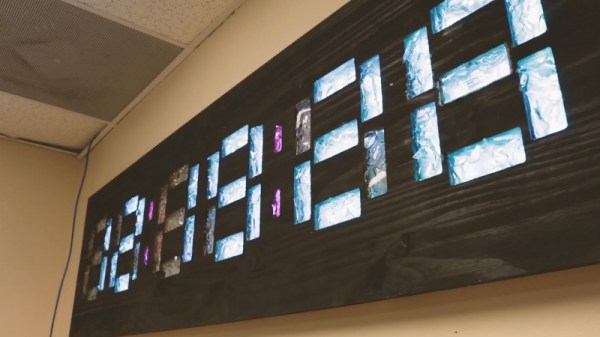
[MacCraiger] wanted to build a wall clock with the classic seven segment LED look, only his idea was to make it slightly larger than average. With RGB LED strips standing in for individual LEDs, scaling up the concept isn’t really a problem on a technical level; the tricky part is diffusing that many LEDs and achieving the orderly look of a real seven segment display.

All those segments perfectly cut out of a sheet of plywood come courtesy of a CNC router. Once the rectangles had been cut out, [MacCraiger] had to fill them with something that could soften up the light coming from the LEDs mounted behind them. He decided to break up a bunch of glass bottles into small chunks, lay them inside the segments, and then seal them in with a layer of clear epoxy. The final look is unique, almost as though the segments are blocks of ice.

At first glance the use of a Raspberry Pi Zero to control the LED strips might seem overkill, but as it turns out, [MacCraiger] has actually added in quite a bit of extra functionality. The purists might say it still could have been done with an ESP8266, but being able to toss some Python scripts on the Linux computer inside your clock certainly has its appeal.

The big feature is interoperability with Amazon’s Alexa. Once he tells the digital home assistant to set an alarm, the clock will switch over to a countdown display complete with digits that change color as the timer nears zero. He’s also written some code that slowly shifts the colors of the digits towards red as the month progresses, a great way to visualize at a glance how close you are to blowing past that end of the month deadline.

We’ve seen something of a run on custom multi-segment displays recently. Just last month we saw a clock that used some incredible 25-segment LED displays, complete with their own unique take on the on epoxy-filled diffusers.

Continue reading “Huge Seven Segment Display Made From Broken Glass”

Building A Sound Activated Shop Fan With Arduino

Whether you’re using a soldering iron or a table saw, ventilation in the shop is important. Which is why [Atomic Dairy] built a monster air cleaner called the Fanboy that looks like it should be mounted under the wing of an F-15. Realizing a simple switch on the wall wouldn’t do this potent air mover justice, they decided to build a sound activated controller for it.

It’s certainly an elegant idea. The sound created once they kick on their woodworking tools would be difficult to miss by even the most rudimentary of sound-detection hardware. At the most basic level, all they needed was a way for an Arduino to throw a relay once the noise level in the room reached a specific threshold.

Of course it ended up getting a bit more complicated than that, as tends to happen with these kinds of projects. For one, the sound doesn’t directly control the solid state relay used in the fan controller. When the microphone equipped Arduino detects enough noise, it will start a timer that keeps the fan running for two hours. If the tool keeps running, then more time gets added to the clock. This ensures that the air in the room is well circulated even after the cutting and sanding is done.

[Atomic Dairy] also added a few additional features so they could have more direct control over the fan. There’s a button to manually add more time to the clock, and another button to shut it down. There’s even support for a little wireless remote control, so the fan can be operated without having to walk over to the control panel.

We’ve seen some impressive air circulation and dust collection systems over the years, but finding a way to elegantly switch them on and off has always been a problem given the wide array of tools that could be in use at any given time. Sound activation isn’t a perfect solution, but it’s certainly one we’d consider for our own shop.

Continue reading “Building A Sound Activated Shop Fan With Arduino”

Bringing A Swap Meet 3D Printer Back From The Dead

At a recent swap meet, [digitalrice] found what appeared to be a like-new QIDI X-Plus 3D printer. It wasn’t clear what was wrong with it, but considering it retails for $900 USD, he figured the asking price of $150 was worth the gamble. As you might expect, the printer ended up being broken. But armed with experience and a supply of spare parts, he was able to get this orphaned machine back up and running.

The first and most obvious problem was that the printer’s Z axis didn’t work properly. When the printer tried to home the axis, one of the motors made a terrible noise and the coupler appeared to be spinning backwards. From his experience with other printers, [digitalrice] knew that the coupler can slip on the shaft, but that didn’t appear to be the case here. Removing the stepper motor and testing it in isolation from the rest of the machine, he was able to determine it needed replacing.

Improving the printer’s filament path.

Unfortunately, the spare steppers he had weren’t actually the right size. Rather than waiting around for the proper one to come in the mail, he took an angle grinder to the stepper’s shaft and cut off the 5 mm needed to make it fit, followed by a few passes with a file to smooth out any burrs. We’re not sure we’d recommend this method of adjustment under normal circumstances, but we can’t argue with the results.

The replaced Z motor got the printer moving, but [digitalrice] wasn’t out of the woods yet. At this point, he noticed that the hotend was hopelessly clogged. Again relying on his previous experience, he was able to disassemble the extruder assembly and free the blob of misshapen PLA, leading to test prints which looked very good.

But success was short lived. After swapping to a different filament, he found it had clogged again. While clearing this second jam, he realized that the printer’s hotend seemed to have a design flaw. The PTFE tube, which is used to guide the filament down into the hotend, didn’t extend far enough out. Right where the tube ended, the filament was getting soft and jamming up the works. With a spare piece of PTFE tube and some manual reshaping, he was able to fashion a new lining which would prevent the filament from softening in this key area; resulting in a more reliable hotend than the printer had originally.

It’s great to see this printer repaired to working condition, especially since it looks like [digitalrice] was able to fix a core design flaw. But a broken 3D printer can also serve as the base for a number of other interesting projects, should you find yourself in a similar situation. For example, replacing the extruder assembly with a digital microscope can yield some very impressive results.

A Modern Take On The “Paperclip Computer”

Back in 1968, a book titled “How to Build a Working Digital Computer” claimed that the sufficiently dedicated reader could assemble their own functioning computer at home using easily obtainable components. Most notably, the design utilized many elements that were fashioned from bent paperclips. It’s unclear how many readers actually assembled one of these so-called “Paperclip Computers”, but today we’re happy to report that [Mike Gardi] has completed his interpretation of the 50+ year old homebrew computer.

A view behind the computer’s ALU

The purist might be disappointed to see how far [Mike] has strayed from the original, but we see his embrace of modern construction techniques as a necessary upgrade. He’s recreated the individual computer components as they were described in the book, but this time plywood and wheat bulbs have given way to 3D printed panels and LEDs. While the details may be different, the end goal is the same: a programmable digital computer on a scale that can be understood by the operator.

To say that [Mike] did a good job of documenting his build would be an understatement. He’s spent the last several months covering every aspect of the build on Hackaday.io, giving his followers a fantastic look at what goes into a project of this magnitude. He might not have bent many paperclips for his Working Digital Computer (WDC-1), but he certainly designed and fabricated plenty of impressive custom components. We wouldn’t be surprised if some of them, such as the 3D printed slide switch we covered last month, started showing up in other projects.

While the WDC-1 is his latest and certainly greatest triumph, [Mike] is no stranger to recreating early digital computers. We’ve been bringing you word of his impressive replicas for some time now, and each entry has been even more impressive than the last. With the WDC-1 setting the bar so high, we can’t wait to see what he comes up with next.

Continue reading “A Modern Take On The “Paperclip Computer””

Generate 3D Printable QR Codes With This Web Tool

Since most people are carrying a camera-equipped computer in their pockets these days, QR codes can be a great way to easily share short snippets of information. You can put one on your business card so people can quickly access your contact information, or on your living room wall with your network’s SSID and encryption key. The design of QR codes also make them well suited to 3D printing, and thanks to a new web-based tool, you can generate your own custom STL in seconds.

Created by [Felix Stein], the website provides an easy to use interface for the many options possible with QR codes. Obviously you have full control over the actual content of the code, be it a simple URL or a something more specific like a pre-formatted SMS message. But you can also tweak physical parameters like size and thickness.

Once you’re happy with the 3D preview, you can have the website generate an STL for either single or multi-extrusion printers. For those of us who are puttering along with single extruder machines, you’ll need to swap the filament color at the appropriate layer manually. With so many variables involved, you’ll also need figure out which layer the swap should happen on your own.

Incidentally, this is an excellent example of where STL leaves something to be desired. When using a format like 3MF, color and material information could be baked right into the model. Once opened in a sufficiently modern slicer, all the tricky bits would automatically sorted out. Or at least, that’s what Prusa Research is hoping for.

A Very Buttoned Up Raspberry Pi Media Server

Projects that turn the Raspberry Pi into a low-cost Network Attached Storage (NAS) solution are very common; all you need is the right software, the Pi itself, and some USB storage devices. But unless you particularly like the “Medusa” look, with loose cables running all over the place, you’ll probably want to put the hardware into a suitable enclosure. Unfortunately, that’s where the somewhat unusual layout of the Pi can make things tricky.

Which is why [AraymBox] came up with this unique “capsule” enclosure for the Raspberry Pi and two USB-attached hard drives. Every effort has been made to keep the outside of this design as clean and streamlined as possible. The asymmetrical loops of wires that we so often see on other projects are gone, with everything been brought inside thanks to some clever wiring. This enclosure looks like a professional product, and if you’re willing to put in the effort, you can have one to call your own.

The good news is that the 3D printed enclosure only has four parts, albeit rather large ones, and none of which require support material. So it should be an easy print even on a relatively low-end machine. Of course, you’re not going to get that futuristic metallic look without a little work. You’ll need to do a considerable amount of sanding, filling, and paint work to get that kind of a surface finish. Then again, that rough “just printed” look has a certain cyberpunk appeal to it as well.

But the printed enclosure is only half the battle. Inside, [AraymBox] has soldered the USB to SATA adapter cables directly to the Raspberry Pi to keep things tight and compact. A micro USB breakout board was then used to add a power connector on the back of the device where the Ethernet and USB ports are, solving the issue of having one lonely USB cable coming out of the side of the case.

In the past we’ve seen other attempts to create a 3D printable enclosure for Pi servers, with varying levels of success. While some would argue that the better solution is to just throw the Pi and the drives in a large enough enclosure that it doesn’t matter what the wiring looks like, we appreciate the effort that some hackers are willing to put in to make something custom.

Raspberry Pi Serves Up 24 Hour Simpsons Channel

Commercial-free video on demand was every couch potato’s dream for decades, and now we’ve got it. But nostalgia has a funny way of making some folks miss the old days, even if we know it’s technically be a step backwards. Wanting to recreate the TV watching experience circa 1998, [probnot] has come up with a way to run his very own television channel.

With the Raspberry Pi and a digital modulator, he’s got the only house on the block that’s wired to show The Simpsons all day. He has absolutely no control over which episode plays next, he can’t pause it, and its in presented in standard definition (a nightmare for anyone who grew up in the Netflix era) but a familiar viewing experience for the rest of us.

Where we’re going, we don’t need HDMI.

The key to this project is the Channel Plus Model 3025 modulator. It takes the feed from the antenna and mixes in two composite video sources on user-defined channels. All [probnot] had to do was find a channel that wouldn’t interfere with any of the over-the-air stations. The modulator has been spliced into the house’s coax wiring, so any TV connected to the wall can get in on the action. There’s no special setup required: when he wants to watch The Simpsons he just tunes the nearest TV to the appropriate channel.

Providing the video for the modulator is a Raspberry Pi, specifically, the original model that featured composite video output. While the first generation Pi is a bit long in the tooth these days, playing standard definition video is certainly within its capabilities. With a USB flash drive filled with a few hundred episodes and a bit of scripting it’s able to deliver a never-ending stream direct from Springfield. There’s still that second channel available on the modulator as well, which we’re thinking could be perfect for Seinfeld or maybe The X-Files.

Interestingly, this isn’t the first time we’ve seen a Raspberry Pi used to provide a never-ending stream of The Simpsons. But compared to previous attempts which had to be directly connected to the TV, we like the idea of using the modulator and creating a more authentic experience.

Continue reading “Raspberry Pi Serves Up 24 Hour Simpsons Channel”