Zip Tie Quadcopter Frame Is As Cheap As They Come

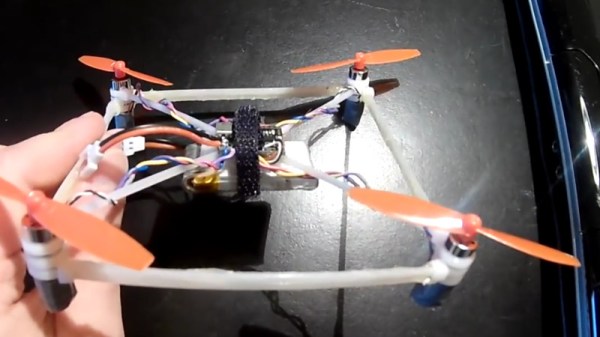
We’ve seen some cheap quadcopter builds over the years, but this one takes the cake. After seeing somebody post a joke about building a quadcopter frame out of zip ties and hot glue, [IronMew] decided to try it for real. The final result is a micro quadcopter that actually flies half-way decently and seems to be fairly resistant to crash damage thanks to the flexible structure.

The first attempts at building the frame failed, as the zip ties (unsurprisingly) were too flexible and couldn’t support the weight of the motors. Eventually, [IronMew] realized that trying to replicate the traditional quadcopter frame design just wasn’t going to work. Rather than a body with arms radiating out to hold the motors, the layout he eventually came up with is essentially the reverse of a normal quadcopter frame.

Zip ties reinforced with a healthy coating of hot glue are arranged into a square, with a motor at each corner. Then four zip ties are used to support the central “pod” which holds the battery and electronics. No attempt is made to strengthen this part of the frame, and as such the heavy central pod hangs down a bit in flight. [IronMew] theorizes that this might actually be beneficial in the end, as he believes it could have a stabilizing effect when it comes time to record FPV video.

He mentions that he’s still struggling to get the PID values setup properly in the flight computer, but in the video after the break you can see that it’s flying fairly well for a first attempt. We wouldn’t recommend you tear into a bag of zip ties when it comes time to build your first quadcopter, but it does go to show that there’s plenty of room for experimentation.

We’ve covered a number of unique quadcopter frames if you’re looking for something to set your next build apart from the rest. If you’ve got a big enough bed you can 3D print a very nice frame, but if you’ve got more time than equipment, you could always cut one out of a piece of plywood.

Continue reading “Zip Tie Quadcopter Frame Is As Cheap As They Come”

Adding Optics To A Consumer Thermal Camera

[David Prutchi] writes in to tell us about his recent experiments with building lenses for thermal imaging cameras, which to his knowledge is a first (at least as far as DIY hardware is concerned). With his custom designed and built optics, he’s demonstrated the ability to not only zoom in on distant targets, but get up close and personal with small objects. He’s working with the Seek RevealPro, but the concept should work on hardware from other manufacturers as well.

In his detailed whitepaper, [David] starts by describing the types of lenses that are appropriate for thermal imaging. Glass doesn’t transmit the wavelengths that thermal camera is looking for, so the lenses need to be made of either germanium or zinc selenide. These aren’t exactly the kind of thing you can pick up at the local camera shop, and even small lenses made of these materials can cost hundreds of dollars. He suggests keeping an eye out on eBay for surplus optics you could pull them out of to keep costs down.

Creating the macro adapter is easy enough, you simply put a convex lens in front of the thermal camera. But telephoto is a bit more involved, and the rest of the whitepaper details the math and construction techniques used to assemble it the optics. [David] gives a complete bill of materials and cost breakdown for his telephoto converter, but prepare for a bout of sticker shock: the total cost with all new hardware is nearly $500 USD. The majority of that is for the special lenses though, so if you can score some on the second-hand market it can drop the cost significantly.

We’ve seen an impressive array of thermal camera hacks and projects recently, no doubt due to the falling prices of consumer-level imaging hardware. Given their utility as a diagnostic tool, a thermal camera might be something worth adding to your bag of tricks.

Desperately Trying To Find A Use For The ChugPlug

[AkBKukU] writes in to tell us of his experiments with the rather vile-sounding “ChugPlug”, an odd portable AC power bank designed for the express purpose of powering MacBook chargers. It would seem more efficient to simply build a DC power bank with a MagSafe connector to cut out the charger all together, but presumably there is some market for this particular niche device. Especially at the $15 they are currently selling for on Amazon.

Unfortunately, the ChugPlug that [AkBKukU] bought doesn’t seem to work. After some experimenting he found that it appears to only be outputting 80 VAC, obviously too low for many devices to function. But he reasoned that some things, like switch mode power supplies or restive loads, might still work. He just needed to come up with a way to plug them into the ChugPlug.

If his testing setup gives you a case of sweaty palms, you aren’t alone. He breaks open a dead MacBook charger to recover the female AC connector, and then solders that directly to an AC grounding adapter. The resulting pigtail lets [AkBKukU] plug in various AC loads while allowing him to probe the wires with his multimeter and oscilloscope.

Once he’s satisfied his hack works conceptually, that is, he’s able to plug arbitrary AC loads into this purpose-built battery pack, he follows up with a less dangerous looking adapter. Making use of the shell of the dead MacBook charger and what some might describe as a salacious amount of hot glue, he produces a compact and relatively safe looking device that will let him use his handicapped ChugPlug as a general purpose source of AC power.

It’s not the most elaborate portable power supply we’ve ever seen, and certainly wouldn’t be our first choice in an emergency, but at least [AkBKukU] managed to wring some use out of the thing in the end.

Continue reading “Desperately Trying To Find A Use For The ChugPlug”

Customizing STLs For Off-Brand Devices

[Rob Clarke] needed a mount for his off-brand action camera, but it’s not exactly the kind of thing with a bustling accessory market. To make matters worse, it turns out the camera is so low-key that he couldn’t find a 3D printable mount for it either. Luckily, a check with his calipers confirmed his camera is just about the same size as an old GoPro Hero 3, so all he had to do was modify an existing design to fit his needs.

As anyone who’s worked with STL files will tell you, they are a pain to modify. An STL is essentially a completed solid model, and not really meant to be fiddled around with. It’s a bit like trying to take an edited image and get back to the layers that were used to create it in Photoshop or GIMP. The final output has been “flattened”, so that granular control is lost.

That being said, [Rob] got rather lucky in this case. He found a GoPro mount that was about 90% there, he just needed to adjust the depth and change the positioning of the holes on the side. He loaded the STL into SketchUp, deleted the two sides, and replaced them with new surfaces. This gave him a clean slate to add the appropriate openings for his camera’s USB port and microSD card. To adjust the depth of the mount, he simply stretched the model out on the Z axis.

[Rob] event went ahead and released his modified STLs as a remix of the original case he found on Thingiverse for anyone else that has the same camera. That’s what we love to see.

If you’re interested in learning more about using SketchUp for designing 3D printed parts, check out this excellent guide by our very own [Brian Benchoff].

Continue reading “Customizing STLs For Off-Brand Devices”

Evolution Of The Worlds Oldest Computer Festival

The Trenton Computer Festival (TCF) doesn’t have the name recognition of big technology conferences like DEF CON or HOPE. It’s not even as well known as smaller more localized conferences like DerbyCon, ShmooCon, or the Hackaday Superconference. In fact, there’s a good chance that most readers have never even heard of TCF. But despite not holding a place in the hacker lexicon, TCF has plenty to boast about. Its played host to technology luminaries from Bill Gates to Richard Stallman, and now in its 43rd year, holds the title as the longest continually running technology festival in the world.

Bill Gates giving the keynote at TCF in 1989

When originally conceived in 1976, the show was devoted to the dawning age of the personal computer, but since then has evolved into a celebration of technology as a whole. When TCF kicks off on March 17th, there won’t be a media blitz or huge corporate sponsorship. There won’t be a simultaneous online stream of the event, and the only badges worn by speakers or attendees will be of the paper variety.

What you will find at TCF is a full schedule of talks given by people who are passionate about technology in its varied forms. These run the gamut from quantum computing to lock picking, from Arduino to Space Shuttle avionics.

At the heart of TCF is co-founder and current Chair Dr Allen Katz. I recently had the opportunity to speak with Dr Katz about the challenges of running a conference of this type, and the secret to keeping relevant in a wildly changing technology landscape.

Continue reading “Evolution Of The Worlds Oldest Computer Festival”

Hot Air Surgery Revives A Cheap Windows Tablet

[Jason Gin] recently wrote in to tell us about his adventures replacing the eMMC storage chip on a cheap Windows tablet, and we have to say, it’s an impressive amount of work for a device which apparently only cost him $15. Surely much better pieces of hardware have been tossed in the trash for less serious failures than what ailed his DigiLand DL801W tablet. We’d love to see the lengths this guy would go to restore something a bit higher up the food chain.

As any good hacker knows, you can’t fix the problem until you understand it. So the first step [Jason] took was to conduct some troubleshooting. The tablet would only boot to the EFI shell, which didn’t do him much good since there was no on-screen keyboard to interact with it. But he had the idea of trying to connect a USB keyboard via an OTG adapter, and sure enough that got him in. Once he was able to enter commands into the EFI shell, he attempted to read from a few different sectors of the eMMC drive, only to get the same nonsense repeating data. So far, not looking good.

But before he fully committed to replacing the eMMC drive, he wanted a second opinion. Using the same USB OTG adapter, he was able to boot the tablet into a Windows 10 environment, and from there got access to some drive diagnostic tools. The software reported that not only was the drive reporting to be half the appropriate size, but that writing to the chip was impossible.

With the fate of the tablet’s Foresee NCEMBS99-16G eMMC chip now confirmed, [Jason] decided it was time to operate. After pulling the tablet apart and masking off the PCB with Kapton tape to protect it from the heat, he slowly went in with his hot air rework station to remove the failed chip. But rather than put another low-end chip in its place, he used this opportunity to replace it with a Samsung KLMBG4GEND-B031. Not only does this chip have twice the capacity of the original, it should be noticeably faster.

With the new Samsung eMMC chip installed, [Jason] put the tablet back together and was able to successfully install Windows 10 onto it. Another piece of tech saved from the big landfill in the sky.

If the casual confidence of this particular repair wasn’t enough of a clue, this isn’t the first time he’s showed some unruly eMMC chips who’s boss.

Love Open Source But Hate People? Get OpenKobold

[Tadas Ustinavičius] writes in to tell us of his latest project, which combines his two great loves of open source and annoying people: OpenKobold. Named after the German mythical spirit that haunts people’s homes, this tiny device is fully open source (hardware and software) and ready to torment your friends and family for up to a year on a CR1220 battery.

The design of the OpenKobold is quite simple, and the open source nature of the project makes this an excellent case study for turning an idea into a fully functional physical object.

Beyond the battery and the buzzer module, the OpenKobold utilizes a PIC12F675, a transistor, and a few passive components. This spartan design allows for a PCB that measures only 25 x 20 mm, making it very easy to hide but fiendishly difficult to try to track down later on.

But the real magic is in the software. The firmware that [Tadas] has written for the PIC not only randomizes how often the buzzer goes off, but how long it will sound for. This makes predicting the OpenKobold with any sort of accuracy very difficult, confounding the poor soul who’s searching their home or office for this maddening little device.

Hackers have a long and storied history of creating elaborate pranks, putting the OpenKobold in very good company. From randomly replaying signals from a remote control to building robotic cardboard burglars, we’ve seen our fair share of elaborate pranks from the community.