Quantifying Latency In Cheap RC Transmitters

For those just starting out in the world of RC, a low cost transmitter like the Flysky FS-i6S can be very compelling. But is buying a cheap transmitter setting yourself up for failure down the line? The general feel in the RC community has been that cheaper transmitters have higher latency or “lag” on their inputs, which is precisely the kind of thing you want to avoid when flying along at 40+ MPH. As such, the general wisdom has been that your transmitter is one area where you don’t want to cheap out.

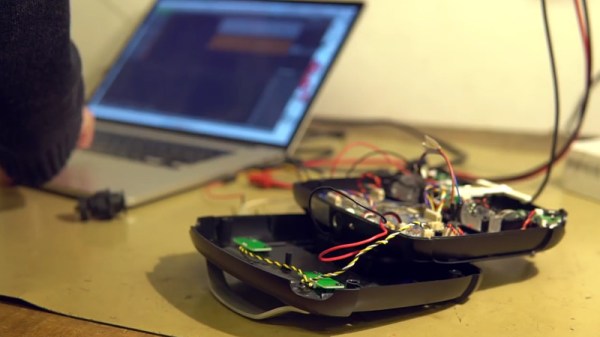
Wanting to put that theory to the test, [Marek Baczynski] set out to compare the response time between the Flysky FS-i6S and the more established Taranis X9D. In the video after the break, he uses his Saleae logic analyzer to time how long it takes movement on the transmitter sticks to get interpreted as servo commands at the receiver.

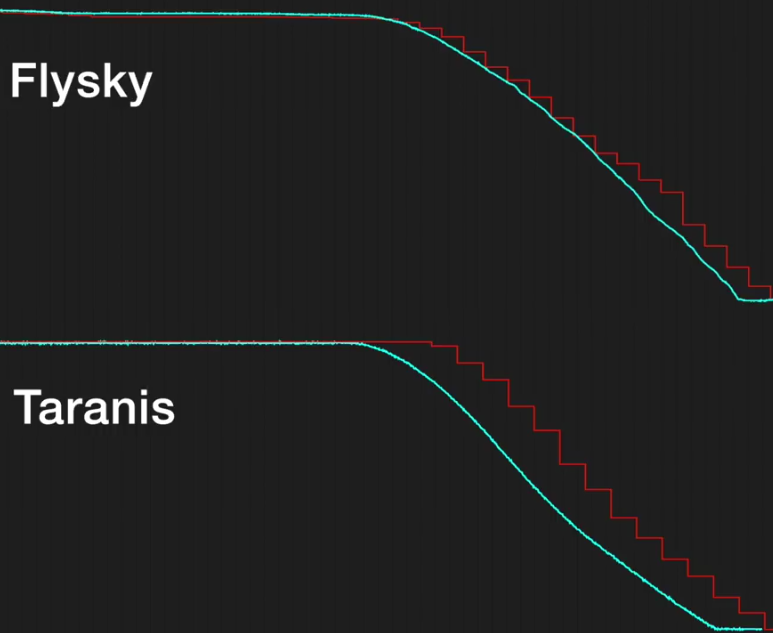
[Marek] connects the logic analyzer directly to the gimbals of both transmitters, allowing him to see user input before any processing is done by the electronics. It’s particularly interesting to see how the smooth analog curves of the gimbals are converted to a “staircase” digital output.

The final results of the latency test end up being fairly surprising. To put it simply: the cheaper Flysky radio not only more accurately interprets the user’s input, but does it considerably faster than the Taranis. [Marek] says he was so surprised by these results that he re-ran the test three times to verify.

But even taking into account the apparently higher fidelity of the cheap radio, he cautions you shouldn’t swap out your gear just yet. Higher end transmitters have a number of other features which make them worth hanging on to, even if the newer generation of radios is slightly faster. The real takeaway from this video is that if you’re just getting into the RC game, these cheaper transmitters aren’t necessarily the kiss of death the community makes them out to be.

Experiments like this and the recent detailed analysis of common hobby motors show just how seriously people take the world of RC. It’s unlikely this single experiment will quell the debate about “cheap” RC transmitters, but perhaps it’s a start.

Continue reading “Quantifying Latency In Cheap RC Transmitters”

Arduino BabyTV Is Big Fun At Low Resolution

What kind of TV do you have? An older 720p model, or the now standard 1080p? Perhaps you’ve made the leap to the next generation, and are rocking a 4K display in the living room. All those are are fine and dandy if you just want to watch the local sportball contest, but where’s the challenge in that? With all the technology and modular components we have access to anymore, nowadays all the real hackers are making their own TVs.

Of course, when [Nikolai] built his very own LED TV, he did have to make a few concessions. For one thing, there’s no tuner on this model. Oh, and there’s the small issue of only having a 16×16 resolution. It might not be your idea of the perfect display, but it’s just perfect for his newborn son.

That’s right, [Nikolai] got his entry for the “Hacker Parent of the Year” award in early, and built an LED display for his son that he’s calling “BabyTV”.

Rather than the shows, trash, advertisements that they play on the kid channels, this TV only shows animated characters from retro games. We’ll concede that this project might be an elaborate Clockwork Orange style attempt at hypnotizing his son to instill an appreciation for classic gaming. But we’ll allow it.

To make his BabyTV go, [Nikolai] used a 16×16 WS2812B LED panel and an Arduino Nano. Two rotary encoders are used to allow adjusting brightness and change the character currently being shown on the screen. As a particularly clever hack, the Arduino has an IR sensor attached and is constantly watching for any signals. If an IR signal is detected, the BabyTV switches to the next image. So if Junior has a standard IR remote in his hands, any button he presses will cause the display to change to the next “channel”.

Historically speaking we haven’t seen much stuff for children here at Hackaday, but 2018 seems to be changing that. Recent projects like the incredible scratch built mini excavator and gorgeous AT-ST high chair would seem to indicate we’re currently witnessing a generation of hackers become parents. Don’t panic folks, but we might be getting old.

Continue reading “Arduino BabyTV Is Big Fun At Low Resolution”

SpaceX Joins In The Long History Of Catching Stuff From Space

On February 22nd, a Falcon 9 rocket lifted off from Vandenberg Air Force Base in California and successfully delivered into orbit an Earth-observation satellite operated by the Spanish company Hisdesat. Compared to the media coverage received by the launch of the Tesla-laden Falcon Heavy earlier in the month, this mission got very little attention. But that’s hardly surprising. With respect to Hisdesat, the payload this time around was not terribly exciting, and even the normally dramatic landing of the Falcon 9’s first stage was skipped in favor of simply allowing the booster to crash into the ocean.

As far as SpaceX launches go, this one was about as low-key as they come. It wouldn’t be a surprise if this is the first time some readers are even hearing about it. But while it didn’t invoke the same media circus as the images of a spacesuit-wearing mannequin traveling into deep space, there was still a historic “first” performed during this mission.

In an effort to increase the re-usability of the Falcon 9 booster, SpaceX attempted to catch the payload fairing (essentially a large protective nose cone) with a huge net as it fell from space. The most interesting thing about this new chapter in the quest for a fully reusable rocket system is that while SpaceX is generally considered to be pioneers in the world of bringing hardware back from space, this particular trick dates all the way back to the 1960’s.

Continue reading “SpaceX Joins In The Long History Of Catching Stuff From Space”

This 3D-Printed Robotic Vacuum Sucks

After you’ve taken a moment to ponder the turn of phrase used in the title, take a look at this scratch-built robotic vacuum created by [theking3737]. The entire body of the vacuum was 3D printed, and all of the internal electronics are off-the-shelf modular components. We can’t say how well it stacks up against the commercial equivalents from iRobot and the like, but it doesn’t look like it would be too hard to build one yourself to find out.

The body of this rather concerned-looking robot was printed on a DMS DP5 printer, which is a neat trick as it only has a build platform of 200 mm x 200 mm. Once all the pieces were printed, a 3D pen was used to “weld” the sections together. The final result looks a bit rough, but should give a bond that’s just as strong as the printed parts themselves.

The robot has four sets of ultrasonic range finders to detect walls and obstacles, though probably not in the positions you would expect. The right side of the robot has two sets of sensors, while the left side only gets one. We aren’t sure the reasoning behind the asymmetrical layout, but presumably the machine prefers making right turns.

Control is provided by an Arduino Mega and the ever-reliable HC-05 Bluetooth module. A companion Android application was written which allows configuring the robot without having to plug into the Arduino every time you want to tweak a setting.

We can’t say we’ve seen that many DIY robotic vacuums here at Hackaday, but we’ve certainly featured our fair share of hacks for the commercially available models.

Fully 3D Printed Nerf Thirst Zapper

In case you weren’t aware, there is a whole community out there that revolves around customizing NERF guns. In that community is a subculture that builds their own NERF guns, and within that group is a sub-subculture that 3D prints NERF guns. So next time you are contemplating how esoteric your little corner of the hacking world is, keep that in mind.

Anyway, [Wekster] is currently making his way in the world of 3D printed one-off NERF guns, and has unveiled his latest creation: a fully 3D printed “Thirst Zapper” from Fallout 4. Except for the springs, each and every piece of this gun was printed on his CR-10 printer. You could even wind your own springs if you really wanted to, and keep the whole thing in-house. Because if you’re going to do something this niche, you might as well go all in.

Even if you aren’t a member of the NERF-elite, the video [Wekster] has put together for this project is a fantastic look at what it takes to design, print, and finish a custom build. From creating the model to mixing the paint to match the in-game model, this video has a little something for everyone.

This isn’t the first time we’ve covered 3D printed NERF guns, but it’s surely the most ornate we’ve ever seen. Interestingly, the bar is set pretty high for Fallout-themed builds in general, so perhaps there’s some unwritten rule out there in regards to Fallout prop builds.

Continue reading “Fully 3D Printed Nerf Thirst Zapper”

Stretched PC Case Turned GPU Cryptominer

We don’t do financial planning here at Hackaday, so we won’t weigh in on the viability of making money mining cryptocurrency in such a volatile market. But we will say that if you’re going to build a machine to hammer away at generating Magical Internet Monies, you might as well make it cool. Even if you don’t turn a profit, at least you’ll have something interesting to look at while you weep over your electricity bill.

Sick of seeing the desktop machine he built a decade ago gathering dust, [plaggle24w5] decided to use it as the base for a cryptocurrency mining rig. Of course, none of the original internals would do him any good, but the case itself ended up being a useful base to expand on. With the addition of some 3D printed components, he stretched out the case and installed an array of video cards.

To start with, all the original plastic was ripped off, leaving just the bare steel case. He then jammed a second power supply into the original optical drive bays to provide the extra power those thirsty GPUs would soon be sucking down. He then designed some 3D printed arms which would push out the side panel of the case far enough that he could mount the video cards vertically alongside the case. Three case fans were then added to the bottom to blow air through the cards.

While [plaggle24w5] mentions this arrangement does work with the case standing up, there’s obviously not a lot of air getting to the fans on the bottom when they’re only an inch or so off the ground. Turning the case on its side, with the motherboard parallel to the floor, allows for much better airflow and results in a measurable dip in operating temperature. Just hope you never drop anything down onto the exposed motherboard…

Mining Bitcoin on desktop computers might be a distant memory, but the latest crop of cryptocurrencies are (for now) giving new players a chance to relive those heady early days.

3D Printing Brings A Child’s Imagination To Life

Telling somebody that you’re going to make their dreams come true is a bold, and potentially kind of creepy, claim. But it’s one of those things that isn’t supposed to be taken literally; it doesn’t mean that you’re actually going to peer into their memories, extract an idea, and then manifest it into reality. That’s just crazy talk, it’s a figure of speech.

Original sketch of the CURV II

As it turns out, there’s at least one person out there who didn’t get the memo. Remembering how his father always told him about the elaborate drawings of submarines and rockets he did as a young boy, [Ronald] decided to 3D print a model of one of them as a gift. Securing his father’s old sketchpad, he paged through until he found a particularly well-developed idea of a personal sub called the CURV II.

The final result looks so incredible that we hear rumors manly tears may have been shed at the unveiling. As a general rule you should avoid making your parents cry, but if you’re going to do it, you might as well do it in style.

Considering that his father was coming up with detailed schematics for submarines in his pre-teen days, it’s probably no surprise [Ronald] has turned out to be a rather accomplished maker himself. He took the original designs and started working on a slightly more refined version of the CURV II in SolidWorks. Not only did he create a faithful re-imagining of his father’s design, he even went as far as adding an interior as well as functional details such as the rear hatch. Continue reading “3D Printing Brings A Child’s Imagination To Life”