Looks Like A Pi Zero, Is Actually An ESP32 Development Board

ATMegaZero ESP32- S2, showing optional color-coded 40-pin header (top)

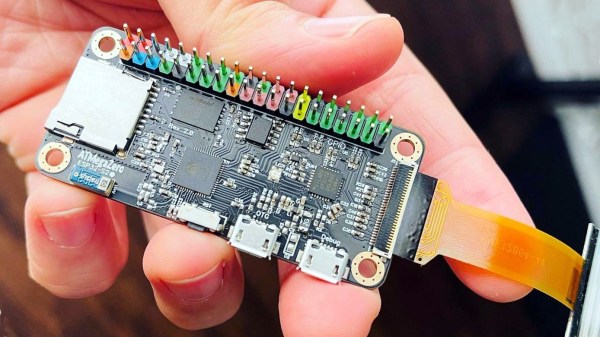
The ATMegaZero ESP32-S2 is currently being funded with a campaign on GroupGets, and it’s a microcontroller board modeled after the Raspberry Pi Zero’s form factor. That means instead of the embedded Linux system most of us know and love, it’s an ESP32-based development board with the same shape and 40-pin GPIO header as the Pi Zero. As a bonus, it has some neat features like a connector for inexpensive SSD1306 and SH1106-based OLED displays.

Being able to use existing accessories can go a long way towards easing a project’s creation, and leveraging that is one of the reasons for sharing the Pi Zero form factor. Ease of use is also one of the goals, so the boards will ship with CircuitPython (derived from MicroPython), and can also be used with the Arduino IDE.

If a microcontroller board using the Pi Zero form factor looks a bit familiar, you might be remembering the original ATMegaZero which was based on the Atmel ATMega32U4, but to get wireless communications one needed to attach a separate ESP8266 module. This newer board keeps the ATMegaZero name and footprint, but now uses the Espressif ESP32-S2 to provide all the necessary functions.

CircuitPython has been a feature in a wide variety of projects and hacks we’ve seen here at Hackaday, and it’s a fine way to make a microcontroller board easy to use right out of the box.

An Arduino With A Floppy Drive

For many of us the passing of the floppy disk is unlamented, but there remains a corps of experimenters for whom the classic removable storage format still holds some fascination. The interface for a floppy drive might have required some complexity back in the days of 8-bit microcomputers, but even for today’s less accomplished microcontrollers it’s a surprisingly straightforward hardware prospect. [David Hansel] shows us this in style, with a floppy interface, software library, and even a rudimentary DOS, for the humble Arduino Uno.

The library provides functions to allow low level work with floppy disks, to read them sector by sector. In addition it incorporates the FatFS library for MS-DOS FAT file-level access, and finally theĀ ArduDOS environment which allows browsing of files on a floppy. The pictures show a 3.5″ drive, but it also supports 5.25″ units and both DD and HD drives. We can see that it will be extremely useful to anyone working with retrocomputer software who is trying to retrieve old disks, and we look forward to seeing it incorporated in some retrocomputer projects.

Of course, Arduino owners needn’t have all the fun when it comes to floppy disks, the Raspberry Pi gets a look-in too.

This DIY Split-Flap Display Does Both Time And Weather

With little more than four economical stepper motors, a Raspberry Pi Zero, and a 3D printer, [Thomas Barlow] made himself an awfully slick Smart Flip Clock that can display not only the time, but also weather data as well. This is done by adding a few extra graphics to some of the split-flaps, so numbers can also be used to indicate temperature and weather conditions succinctly. Displaying the time has to do without a colon (so 5:18 displays as 518), but being able to show temperature and weather conditions more than makes up for it.

32 degrees and a mix of sun and cloud

According to the project’s GitHub repository, it looks as though each split-flap has thirteen unique positions. The first ten are for numerals 0 through 9, and the rest are either blank, or used to make up a few different weather icons with different combinations. A Python script runs on the Raspberry Pi and retrieves weather data from OpenWeather, and the GPIO header drives the display via four geared stepper motors and driver boards. The rest of the hardware is 3D printed, and [Thomas] helpfully provides CAD models in STEP format alongside the STL files.

The basic design of a split-flap display is really quite versatile, and enterprising hackers have been putting delightful new twists on them for years. There has been a split-flap display used as a kind of flip-book animation, and we’ve also had the pleasure of seeing an entire Tarot deck used for esoteric, automated readings.

Shipping A CRT: Lessons Learned

Old CRT computer enthusiast [x86VileR] recently tracked down an IBM 5153 monitor for which he had been searching several years. Unfortunately shipping a heavy glass CRT isn’t easy. In fact, it took [VileR] three tries to get a functioning monitor delivered intact and working. The first one seemed reasonably protected in its packaging, but arrived so banged up that the CRT had become dislodged inside the monitor and the neck broke off! The second attempt was packaged even better, and he was sure it would arrive problem-free. Alas, it too arrived all banged up and broken.

This one clearly had superior packaging, so I find it difficult to account for this truly stupendous level of damage. The most promising theory is that several people jumped on it simultaneously, just before the delivery truck ran it over. As my friend put it, it would’ve arrived in better shape if he had just smashed it himself before boxing it up.

Double-boxing appears to be the answer, although it might result in a box too large to ship depending on your courier’s rules. Short of building custom wooden crates, do you have any packing tips for shipping heavy and fragile items? Thanks to [J.R. Dahlman] for sending us the tip.

An Attempt At 3D Printing A Hybrid Rocket Engine

Liquid fuelled engines are throttleable and monstrously powerful, but highly complex. Meanwhile, solid rocket engines are simple and cheap, but once you light them, they’re going full-bore until burnout. Hybrid rocket engines offer perks from both worlds, with simple solid fuel and the ability to throttle down by regulating oxidizer flow. Naturally, [Integza] decided he should try and 3D print one.

The build came about somewhat by accident, as the 3D printed casing of one of [Integza’s] liquid-fuelled rockets continued burning once the fuel was turned off. This prompted the realization that he could 3D print rocket fuel, and simply supply oxygen, creating a hybrid rocket. Thus ensued much experimentation, going so far as to create custom sugar-loaded resin for more power and experimenting with ABS as a potential fuel.

Most of the rockets self-destructed within a few seconds and thrust was minimal, but the basic concept should be a goer. As always, [Integza] is struggling with the thermal limitations of plastics, but we fully expect he’ll one day get to a flight ready engine. His previous experiments show he certainly doesn’t give up. Video after the break.

Continue reading “An Attempt At 3D Printing A Hybrid Rocket Engine”

RGB LED Rings Teach Old Dash New Tricks

We’ve seen several so-called “digital dash” upgrades over the years that either augment, or completely replace, a vehicle’s original dashboard indicators with new displays. Whether its seven segment LEDs or a full-on graphical interface powered by the Raspberry Pi, the end result is the same: a dashboard that looks wildly different than it did when the car rolled off the assembly line.

But this LED dashboard project from [Flyin’ Miata] takes a slightly different approach. Rather than replace the analog gauges entirely, rings of RGB LEDs of the same diameter were placed behind their matte black faces. When the LEDs are off you’d never notice them, but once they kick on, the light is clearly visible through the material.

LEDs can easily shine through the gauge face.

So far, it looks like most of the work seems to have been put into the tachometer. The firmware running on the CAN equipped Adafruit Feather M4 can do things such as light up a dynamic redline based on current engine temperature. It will also light up the LEDs to follow the analog gauge as it moves around, which might not have much practical application, but certainly looks cool.

On the speedometer side, the LEDs seem to be used primarily as warning indicators. As demonstrated in the video below, the whole gauge can light up bright red to indicate a critical situation such as low oil pressure. If you wanted to, the system could also be configured with different colors corresponding to various possible fault conditions.

Compared to some of the more aggressive dashboard updates we’ve seen, this is an interesting compromise that helps retain the look of the original instrumentation. Of course, depending on the make and model of the car, you might be able to sneak in a small LCD screen without anyone noticing.

Continue reading “RGB LED Rings Teach Old Dash New Tricks”

A $50 CNC

In theory, there’s isn’t much to building a CNC machine. Hook a bit to a motor and move the motor around with some lead screws and stepper motors. Easy. But, of course, the devil is in the details. [DAZ] made a nice-looking and inexpensive rig that probably isn’t the most precise CNC in the world, but it looks like it does a good enough job and he claims he spent about $50 on it. The video below shows some of the work it has done, and it doesn’t look bad.

This isn’t a rainy afternoon project. You’ll need to cut some wood and 3D print many parts. The drives use M8 threaded rod. Electronics is just an Arduino running standard software.

The steppers looked pretty light duty, and we wondered if it would have been worthwhile to trade them out for beefier ones instead of modifying the ones used for bipolar operation. Still, the results did look good for $50. The 775 spindle is another place you could probably spend a little more and get something better. Non-printed linear rails, and a better screw? The point is that you’ve got a basis to build from.

Continue reading “A $50 CNC”