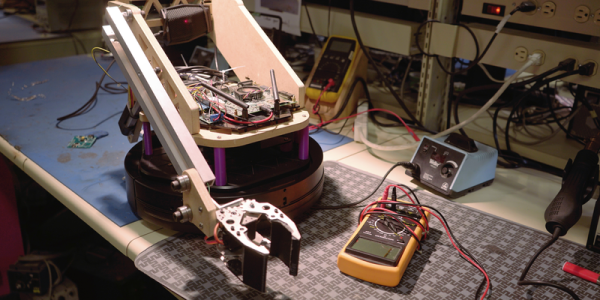
[Jack Qiao] wanted an autonomous robot that could be handy around an ever-changing shop. He didn’t want a robot he’d have to baby sit. If he said, ‘bring me the 100 ohm resistors’, it would go find and bring them to him.
He iterated a bit, and ended up building quite a nice robot platform for under a thousand dollars. It’s got a realsense camera and a rangefinder from a Neato robotic vacuum. In addition to a mircrophone, it has a whole suite of additional sensors in its base, which is a stripped down robotic vacuum from a Korean manufacturer. A few more components come together to give it an arm and a gripper.
The thinking is done on a Nvidia Jetson TK1 board. The cores on the integrated graphics card are used to perform faster computer vision calculations. The software is all ROS based.
As can be seen in the video after the break. The robot uses SLAM techniques to successfully navigate and complete tasks such as fetch resistors, get water, and more. [Jack Qiao] is happy with his robot, and we would be too.
Some of us need a bit of help to get up in the mornings. This can come in the form of a sunrise lamp, which simulates the light of the sunrise to fool our poor sleep-deprived brains into waking up in the depths of winter. [Lincoln Johnson] found the ones he tried were not bright enough to wake him, so he decided to build his own: a 10,000-lumen monster that can wake him up from across the room.
It uses a lot of LEDS: 5 meters of 5630 LED strip, which pulls a circuit bending 72 watts when running at full blast. This monstrosity is powered by an Arduino Pro, which is programmed to slowly increase the brightness over a period of 30 minutes, thus simulating the sunrise. It uses PWM control to fade the LEDs, and also includes a dot matrix display to show the time. Honestly, if you are able to sleep through this thing blasting your eyes, you are probably dead.
If you enjoy building radio projects you may have noticed something slightly worrying over the last few years in your component supply. Variable capacitors are no longer as plentiful as they used to be. There was a time when all radio receivers contained at least one, now with the advent of the varicap diode and the frequency synthesiser the traditional tuning capacitor is a rare breed. They are still made, but they’re not cheap and they won’t appear so readily in your junk box any more.
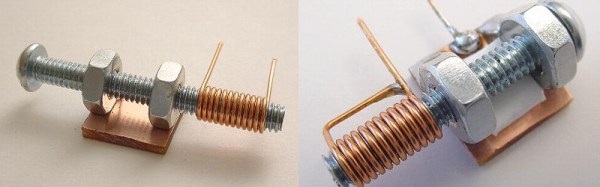
Fortunately a variable capacitor is a surprisingly simple device, and one you can make yourself if you are of a mind to do so. [Patrick] did just that with his home-made capacitor, in this case of a few tens of pF and suitable as a low-power trimmer capacitor or in a single-chip FM radio.
Rather than make a set of interlocking vanes as you’d find in a commercial design, he has gone for a screw in a tube. The capacitance is set by the length by which the screw is inserted into the tube. And his tube is not a tube in the traditional sense, instead he has used a coil of enamelled copper wire wound on the screw thread, whose insulation forms the dielectric. It looks wrong to use a coil in this way as you’d expect a similar coil to form the inductive part of a tuned circuit, but this coil is shorted out to prevent its inductance becoming a factor at the frequency in question.
It’s evidently not the answer to all variable capacitor problems, but it’s a neat piece of lateral thinking and it will make a simple working capacitor from readily available parts.
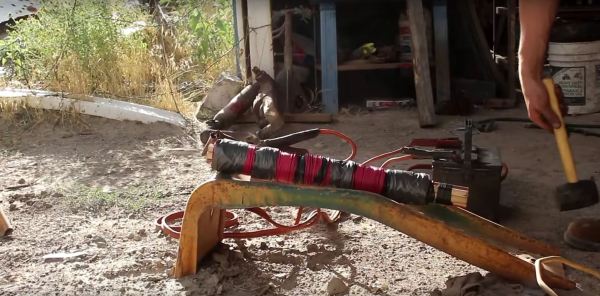
Coilguns used to be the weapons of science fiction. Nowadays, whenever we see someone build one in their workspace it always serves as an inspiring reminder that the future is now. YouTuber [Cody’sLab] has done just that, assembling a rudimentary — but beefy — coilgun in his workshop.
The one in the video is based off an old design that used a 12V battery and without any fancy electronics. This new model has five coil stages along its two-foot length. Four wooden dowels and two copper tubes are arranged in a hexagonal shape to form the barrel and accelerator rails. The coils are each 100 feet of 14-gauge thin coated copper wire, all connected to a common ground. Still lacking any complex electronics, this version eventually gets its projectile launched a good few dozen feet. The ‘bullet’ is a piece of steel with some brass to prevent it spinning in the barrel, while a hole has been drilled in it to accommodate a spring which keeps the two graphite brushes contacting the copper tubes.
The first test proved to be a little underwhelming, and [Cody] had to try something drastic — so he hooked it up to an arc welder to fire the projectile using 22V and 200A.
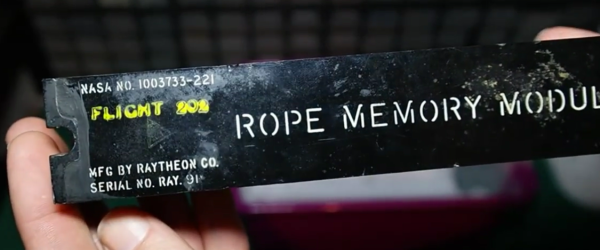
On August 25th, 1966, an Apollo Command Module was launched aboard a Saturn IB rocket in mission AS-202. This mission was intended to immediately precede the ill-fated Apollo 1 mission, the AS-202 was unmanned, serving as a test of flight hardware, fuel cells, and the guidance and navigation control systems. This mission used the first Apollo Guidance Computer ever flown, and this mission was vital to testing the computer that would take men to the moon.
While the software from the later missions exists and is available on Github, the earlier Block I spacecraft, including the unmanned Apollo 4 and Apollo 6 missions, are poorly documented. [Francois Rautenbach] was lucky enough to get his hands on the rope memory modules from the AS-202 mission. Now he’s investigating these modules with oscilloscopes and x-rays to recreate some of the first software that was flown in space.
The procedure to extract the data from these rope memory modules is a bit harder than reading a bit of Flash off a chip. Rope memory is weird, but with a contraption made out of a lot of relays and an oscilloscope, [Francois] was able to capture data from these memory modules.
Of course, [Francois] first needed to figure out the pinout for the gigantic backplane connector on each of these memory modules. To do that, he checked out a Block II AGC, read the schematics very carefully, and reverse engineered a connector that isn’t made anymore. The next step was x-raying the rope memory modules to see how they were assembled. Even though these memory modules contain the only extant copy of the Block I AGC software, even reading one bit off of these modules is an amazing case of technological archeology.
The answer to the obvious question — where did these modules come from — is exactly what you would expect. These memory modules were picked up off a scrap heap forty years ago. The gentleman who found these modules was kind enough to give them to [Francois]. Check out the videos below for [Francois]’ video logs. If you’re into slightly more destructive testing of forgotten Apollo flight hardware, [Fran Blanche] tore down a few modules from the Apollo Launch Vehicle Digital Computer a few years ago.
One problem with engineering education today is a lack of experimental teaching. Oh sure you may have a project or two, but it’s not the focus of the program because it’s hard to standardize a test around. Typically sections of the field are taught in a highly focused theoretical course by a professor or graduate student with a specialization in that section. Because classes treat individual subject areas, it’s entirely possible to get a really good understanding of two pieces of the same puzzle, but never realize that they fit together to make a picture. It’s only when a freshly minted engineer gets out into the real world that they start to make the connections between seemingly disparate fields of knowledge.
This is why Carroll Smith’s book “Engineer to Win” is so good. He spent a lifetime as a practicing engineer in a field where a small failure could mean the death of a friend. So when he set out to write a book, he wrote a book that related everything needed to properly conceptualize and solve the mechanical engineering problems in his field.
One warning though; the book is not for the faint of heart. If you want to learn something difficult well, then this is book for you. Carroll skips the comforting analogies and gives the information exactly. It can get a little dense, but he makes the assumption that the reader is there to learn and, most importantly, understand. This takes work.
For example, you can’t really understand why a rolled bolt is stronger than a bolt cut on a screw machine until you understand how metal works on a crystalline level. The same goes for metal fatigue, brittle fractures, ductile failures, and all the maladies that metal can suffer. The difference between an engineer and a technician is this deep understanding. Otherwise the equations learned are just parts in a toolbox and not paint on an artist’s palette.
This is why the first half of the book is dominated by all things metallurgical. The book starts with the simple abstractions of the crystalline structures of metal. Unlike my materials class in university, it maintains a practical bend to the presentation of the information throughout the whole process. For example, it moves on to what all this practically means for metals undergoing stresses and failures before it launches into a (short) digression on how metals are made and their history.
However, if racecar plumbing and fasteners are kinda your thing, “Carroll Smith’s Nuts, Bolts, Fasteners and Plumbing Handbook” is also a fantastic read.
This first half of the book touches on non-ferrous metals and their proper use as well. After that comes some of the best explanations of metal fatigue, fasteners, and metal bonding I’ve ever read. When the failure of a joint causes a mechanism to fail in a toaster that’s one thing, but when it fails in a racecar people get hurt. Carroll is very exacting in what constitutes a forgivable oversight in engineering, and what does not.
Once the book has finished conveying a working understanding of metals and fasteners it seems to fracture into a pot-luck of different racecar-related topics. During my first reading of the book I resisted this strange turn of events. For example, I didn’t really want to read about racecar plumbing in the eighties, or what kind of springs and aerofoils Carroll likes. However, when I reread those sections in a more focused manner, I realized that many of them were teaching the practical application of the knowledge learned in the previous chapters. How does the metal make a good spring? Why is one kind of plumbing better than another?
Importantly, the anecdotes at the end of the book impart an understanding of the importance of professionalism in engineering. What is the true responsibility of an engineer? He teaches not to take the trust others place in your skills for granted. He teaches to trust in the skills of others. The book teaches humility as an engineer. He shows the kind of person one can become after a lifetime of earnest study in their craft.
Thanks to reader, [Dielectric], for recommending the book to me. Also, from the bit of research I’ve done, the older motorworks edition is generally considered to have better quality reproductions of the diagrams than the newer printings of the book.
What do you get when you combine an arc cigarette lighter and some scrap glass and metal? [NightHawkInLight] created a simple plasma cutter project along with some hot glue and a few simple tools.
If you aren’t a smoker, an arc lighter uses a high voltage spark to light the cigarette. He essentially cannibalizes it for use as a power supply. Any similar high-voltage power supply should work just as well. He also uses the same cigarette lighter power supply for an arc pen, that we covered earlier.