A Low Cost, Dead Tree Touch Screen

Remember the “paperless office”? Neither do we, because despite the hype of end-to-end digital documents, it never really happened. The workplace is still a death-trap for trees, and with good reason: paper is cheap, literally growing on trees, and it’s the quickest and easiest medium for universal communication and collaboration. Trouble is, once you’re done scribbling your notes on a legal pad or designing the Next Big Thing on a napkin, what do you do with it?

If you’re anything like us, the answer to that question is misplacing or destroying the paper before getting a chance to procrastinate transcribing it into some useful digital form. Wouldn’t paper that automatically digitizes what you draw or write on it be so much better? That’s where this low-cost touch-sensitive paper (PDF link) is headed, and it looks like it has a lot of promise. Carnegie-Mellon researchers [Chris Harrison] and [Yang Zhang] have come up with cheap and easy methods of applying conductive elements to sheets of ordinary paper, and importantly, the methods can scale well to the paper mill to take advantage of economies of scale at the point of production. Based on silk-screened conductive paints, the digitizer uses electrical field tomography to locate touches and quantify their pressure through a connected microcontroller. The video below shows a prototype in action.

Current cost is 30 cents a sheet, and if it can be made even cheaper, the potential applications range from interactive educational worksheets to IoT newspapers. And maybe if it gets really cheap, you can make a touch-sensitive paper airplane when you’re done with it.

Continue reading “A Low Cost, Dead Tree Touch Screen”

Turn Failed Prints Into Office Fun With A Paper Airplane Maker

If you’re anything like us, you feel slightly guilty when you send a job to a printer only to find that twenty pages have printed wrong. Maybe it’s a typo, maybe it’s the dreaded landscape versus portrait issue. Whatever it is, trees died for your mistake, and there’s nothing you can do about it except to recycle the waste. But first, wipe that guilt away by using this one-stroke paper airplane maker to equip the whole office for an epic air battle.

We have to admit, automated paper handling has always fascinated us. The idea that a printer can reliably (sometimes) feed individual sheets of a stack is a testament to good design, and don’t even get us started about automatic paper folding. [Jerry de Vos]’ paper airplane maker doesn’t drive the sheets through the folder — that’s up to the user. But the laser-cut plywood jig does all the dirty work of creating a paper airplane. The sheet is clipped to an arm that pulls the paper through a series of ramps and slots that force the paper gently into the five folds needed for the classic paper dart. It’s fascinating to watch, and even though everyone seems to be using it very gingerly lest the paper tear, we can see how adding some rollers and motors from a scrapped printer could entirely automate the process. Think of the fun a ream of paper could provide around the office then.

Oh, wait…

Continue reading “Turn Failed Prints Into Office Fun With A Paper Airplane Maker”

Marquee Display Uses Six Dozen Surplus VFD Tubes To Great Effect

The quest to repurpose surplus parts into new and interesting displays never ends, it seems. And the bigger the display, the better, with extra points for using some really obscure part, like these surplus Russian vacuum-fluorescent tubes turned into a marquee display.

As [tonyp7] freely admits, this is a pet project that’s just for the fun of it, made possible by the flood of surplus parts on the market these days. The VFD tubes are IV-25s, Russian tubes that can be had by the fistful for a song from the usual sources. The seven small elements in the tube were intended to make bar graph displays like VU meters, but [tonyp7] ganged up twelve side by side to make 84-pixel displays. The custom driver board for each matrix needs three of the old SN75518 driver chips, in 40-pin DIPs no less. A 3D-printed bracket holds the tubes and the board for each module; it looks like a clock is the goal, with six modules ganged together. But the marquee display shown below is great too, and we look forward to seeing the finished project.

From faux-Nixies made with LEDs to flip-segment displays driven by relay logic to giant seven-segment LEDs that can be 3D-printed, we really like the trend to unique displays. What are you dreaming up?

Continue reading “Marquee Display Uses Six Dozen Surplus VFD Tubes To Great Effect”

Completely Scratch-Built Electronic Speed Controller

Driving a brushless motor requires a particular sequence. For the best result, you need to close the loop so your circuit can apply the right sequence at the right time. You can figure out the timing using a somewhat complex circuit and monitoring the electrical behavior of the motor coils. Or you can use sensors to detect the motor’s position. Many motors have the sensors built in and [Electronoobs] shows how to drive one of these motors in a recent video that you can watch below. If you want to know about using the motor’s coils as sensors, he did a video on that topic, earlier.

The motor in question was pulled from an optical drive and has three hall effect sensors onboard. Having these sensors simplifies the drive electronics considerably.

Continue reading “Completely Scratch-Built Electronic Speed Controller”

The One-Transistor Flip-Flop

A flip-flop is one of the most basic digital electronic circuits. It can most easily be built from just two transistors, although they can and have been built out of vacuum tubes, NAND and NOR gates, and Minecraft redstone. Conventional wisdom says you can’t build a flip-flop with just one transistor, but here we are. [roelh] has built a flip-flop circuit using only one transistor and some bizarre logic that’s been slowly developing over on hackaday.io.

[roelh]’s single transistor flip-flop is heavily inspired by a few of the strange logic projects we’ve seen over the years. The weirdest, by far, is [Ted Yapo]’s Diode Clock, a digital clock made with diode-diode logic. This is the large-scale proof of concept for the unique family of logic circuits [Ted] came up with that only uses bog-standard diodes to construct arbitrary digital logic.

The single-transistor flip-flop works just like any other flip-flop — there are set and reset pulses, and a feedback loop to keep the whatever state the output is in alive. The key difference here is the addition of a clock signal. This clock, along with a few capacitors and a pair of diodes, give this single transistor the ability to store a single bit of information, just like any other flip-flop.

This is, without a doubt, a really, really weird circuit but falls well into territory that is easily understood despite being completely unfamiliar. The key question here is, ‘why?’. [roelh] says this could be used for homebrew CPUs, although this circuit is trading two transistors for a single transistor, two diodes, and a few more support components. For vacuum tube-based computation, this could be a very interesting idea that someone at IBM in the 40s had, then forgot to write down. Either way, it’s a clever application of diodes and an amazing expression of the creativity that can be found on a breadboard.

Shutter Bug Goes Extreme With Scratch-Built Film Camera

Should a camera build start with a sand mold and molten aluminum? That’s the route [CroppedCamera] took with this thoroughly impressive camera project.

When we think of cameras these days, chances are we picture the ones that live inside the phones in our pockets. They’re the go-to image capture devices for most of us, but even for the more photographically advanced among us, when a more capable camera is called for, it’s usually an off-the-shelf DSLR from Canon, Nikon, or the like. Where do hand-built cameras fall in today’s photography world? They’re a great way to add a film option to your camera collection.

[CroppedCamera] previously built a completely custom large-format view camera, but for this build he decided that something a bit more portable might do. The body of the camera is scratch-built from aluminum, acting as the lightproof box to hold the roll film and mount the leaf-shutter lens. There’s an impressive amount of metalwork here — sand casting, bending, TIG welding, and machining all came into play, and most of them new skills to [CroppedCamera]. We were especially impressed with the shrink-fit of the lens cone to the body. It’s unconventional looking for sure, but not without its charm, and it’s sure to make a statement dangling around his neck.

It’s tough to find non-digital DIY camera builds around here — best we could do were these laser-cut plywood modular cameras. Then again, you can’t beat this wearable camera for functional style.

Continue reading “Shutter Bug Goes Extreme With Scratch-Built Film Camera”

To Ferrule Or Not To Ferrule?

We recently posted about a spectacular 3D-printer fire that was thankfully caught and extinguished before spreading to the hacker’s house or injuring his family. Analyzing the remains of the printer, the hacker determined that the fire was caused when a loose grub screw let the extruder’s heater cartridge fall out and touch the ABS fan shroud. It ran full-on and set things on fire.

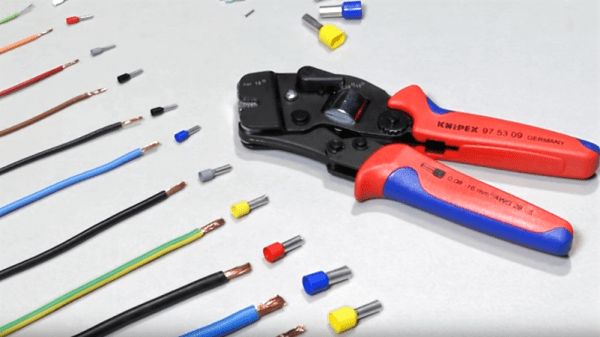
A number of us have similar 3D printers, so the comments for this article were understandably lively, but one comment stood out by listing a number of best practices for wiring, including the use of ferrules. In particular, many 3D printers connect the heated bed, which draws a lot of current, with screw terminals to the motherboard. While not the cause of the fire in the original post, melted terminal blocks are a common complaint with many DIY 3D printer kits, and one reason is that simply jamming thick stranded wire into a screw terminal and hoping for the best can result in increased resistance, and heat, at the joint. In such situations, the absolutely right thing to do is to crimp on a ferrule. So let’s talk about that.


Continue reading “To Ferrule Or Not To Ferrule?”