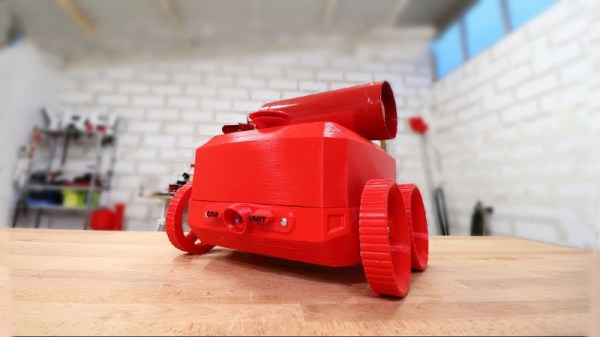
Japanese Fire-Fighting Dragon Rides Water Jets

If you are building a robot to fight fires, why not use the water that you are fighting fires with to propel your robot? That seems to be the idea behind the Dragon Fire Fighting robot built by [Professor Satoshi Tadokoro], and his team at Tadohoku University. Their dragon robot is raised by the same directed jets of water that are used to stop the fire.

The three-meter robot also uses these jets of water to steer, moving the dragon’s head by firing water jets at angles. I’m not sure how practical it really is, though: the jets that the robot uses to steer could do as much damage as the fire itself if it wasn’t used carefully. The idea is to attach it to the end of a ladder or crane used by firefighters, so it can explore a building on fire without anyone having to step inside.

The robot was built as part of the Tough Robotics Challenge, a program that is looking to build robots that can help in disasters. Japan is one of the most disaster-prone places on the planet, thanks to earthquakes, nuclear meltdowns, and Godzilla attacks, so the program is looking to build robots that can help out. Some of the concepts they are looking at include cyborg animals, a listening drone that can help find survivors after a disaster using a sensitive microphone array and a serpentine robot that can map pipes and underground structures.

[Via TechXplore and Qes]


Continue reading “Japanese Fire-Fighting Dragon Rides Water Jets”

Turning That Old Hoverboard Into A Learning Platform

[Isabelle Simova] is building Hoverbot, a flexible robotics platform using Ikea plastic trays, JavaScript running on a Raspberry Pi and parts scavenged from commonly available hoverboards.

Self-balancing scooters a.k.a. Hoverboards are a great source of parts for such a project. Their high torque, direct drive brushless motors can drive loads of 100 kg or more. In addition, you also get a matching motor controller board, a rechargeable battery and its charging circuit. Most hoverboard controllers use the STM32F103, so flashing them with your own firmware becomes easy using a ST-link V2 programmer.

The next set of parts you need to build your robot is sensors. Some are cheap and easily available, such as microphones, contact switches or LDRs, while others such as ultrasonic distance sensors or LiDAR’s may cost a lot more. One source of cheap sensors are car parking assist transducers. An aftermarket parking sensor kit usually consists of four transducers, a control box, cables and display. Using a logic analyzer, [Isabelle] shows how you can poke around the output port of the control box to reverse engineer the data stream and decipher the sensor data. Once the data structure is decoded, you can then use some SPI bit-banging and voltage translation to interface it with the Raspberry Pi. Using the Pi makes it easy to add a cheap web camera, microphone and speakers to the Hoverbot.

Ikea is a hackers favourite, and offers a wide variety of hacker friendly devices and supplies. Their catalog offers a wide selection of fine, Swedish engineered products which can be used as enclosures for building robots. [Isabelle] zeroed in on a deep, circular plastic tray from a storage table set, stiffened with some plywood reinforcement. The tray offers ample space to mount the two motors, two castor wheels, battery and the rest of the electronics. Most of the original hardware from the hoverboard comes handy while putting it all together.

The software glue that holds all this together is JavaScript. The event-driven architecture of Node.js makes it a very suitable framework to use for Hoverbot. [Isabelle] has built a basic application allowing remote control of the robot. It includes a dashboard which shows live video and audio streams from the robot, buttons for movement control, an input box for converting text to speech, ultrasonic sensor visualization, LED lighting control, message log and status display for the motors. This makes the dashboard a useful debugging tool and a starting point for building more interesting applications. Check the build log for all the juicy details. Which other products from the Ikea catalog can be used to build the Hoverbot? How about a robotic Chair?

Continue reading “Turning That Old Hoverboard Into A Learning Platform”

Servo Becomes Mini Linear Actuator

RC servos are a common component in many robotics projects, but [Giovanni Leal] needed linear motion instead of the rotary actuation that servos normally offer. The 3D Printed Mini Linear Actuator was developed as a way to turn a mini servo into a linear actuator, giving it more power in the process.

A servo uses a potentiometer attached to the output shaft in order to sense position, and the internal electronics take care of driving the motor to move the shaft to the desired angle. [Giovanni] took apart an economical mini servo and after replacing the motor with a 100:1 gear motor and using it to power a compact 3D printed linear actuator, he used the servo’s potentiometer to read the linear actuator’s position. As a result, the linear actuator can exert considerably more force than the original servo while retaining exactly the same servo interface. You can see one being assembled and tested in the video embedded below, which is part of [Giovanni]’s entry for The 2018 Hackaday Prize.

Continue reading “Servo Becomes Mini Linear Actuator”

3D Printed Tank Has Slick Tread Design

Tank projects are great because while every tank design is the same in a fundamental way, there’s nevertheless endless variety in the execution and results. [Hoo Jian Li]’s 3D Printed Tank is smartly laid out and has an unusual tank tread that shows off some slick curves.

The tank itself is remotely controlled over Bluetooth with a custom controller that uses the common HC-05 Bluetooth radio units. The treads are driven by four hobby gearmotors with custom designed wheels, and run over an idler wheel in the center of the body. There isn’t any method of taking up slack in the track and a ripple in the top surface of the track is visible as it drives, but the tank is small enough that it doesn’t seem to mind much. STL files and source code is available on GitHub; unfortunately the repository lacks a wiring diagram but between the low component count, photos, and source code that’s not a show-stopper.

Tank treads see a lot of variation, from 3D printed designs for tracks that use a piece of filament as hinges to an attempt to use a conveyor belt as a tank tread for a go-kart. Some tank projects even eschew treads altogether and go for a screw drive.

A HID For Robots

Whether with projects featured here or out in the real world, we have a tendency to focus most upon the end product. The car, solar panel, or even robot. But there’s a lot more going on behind the scenes that needs to be taken care of as well, whether it’s fuel infrastructure to keep the car running, a semiconductor manufacturer to create silicon wafers, or a control system for the robot. This project is one of the latter: a human interface device for a robot arm that is completely DIY.

While robots are often automated, some still need human input. The human input can be required all the time, or can be used to teach the robot initially how to perform a task which will then be automated. This “keyboard” of sorts built by [Ahmed] comes with a joystick, potentiometer, and four switch inputs that are all fully programmable via an Arduino Due. With that, you can perform virtually any action with whatever type of robot you need, and since it’s based on an Arduino it would also be easy to expand.

The video below and project page have all the instructions and bill of materials if you want to roll out your own. It’s a pretty straightforward project but one that might be worth checking out since we don’t often feature controllers for other things, although we do see them sometimes for controlling telescopes rather than robots.

Continue reading “A HID For Robots”

Modular Robotics Made Easier With ROS

A robot is made up of many hardware components each of which requires its own software. Even a small robot arm with a handful of servo motors uses a servo motor library.

Add that arm to a wheeled vehicle and you have more motors. Then attach some ultrasonic sensors for collision avoidance or a camera for vision. By that point, you’ve probably split the software into multiple processes: one for the arm, another for the mobility, one for vision, and one to act as the brains interfacing somehow with all the rest. The vision may be doing object recognition, something which is computationally demanding and so you now have multiple computers.

Break all this complexity into modules and you have a use case for ROS, the Robot Operating System. As this article shows, ROS can help with designing, building, managing, and even evolving your robot.

Continue reading “Modular Robotics Made Easier With ROS”

DIY Submersible Aims For Low Cost, Ease Of Operation

If you’re like us, a body of water is a source of wonder and awe. The wonder comes from imagining what lies hidden below the surface, and the awe is from the fear of trying to find out and becoming one of those submerged objects on a permanent basis. So if you want to explore the depths in relative comfort and safety, a DIY remotely operated underwater vehicle might be the thing you need to build.

Most ROV builds these days seem to follow more or less similar designs, which is probably because they all share project goals similar to those of [dcolemans]: build something to take a look around under the water, make it easy to operate, and don’t spend a ton of money. To achieve that, he used 1/2″ PVC pipe and fittings to build the frame and painted it yellow for visibility. A dry tube for the electronics was fashioned from 4″ ABS pipe. The positive buoyancy provided by the dry tube is almost canceled out by the water flooding the frame through weep holes and the lead shot ballast stored in the landing skids. Propulsion is provided by bilge pump cartridges with 3D-printed ducted propellers. A nice touch is a separate topside control box with a screen for the ROV’s camera that talks to a regular RC controller, along with simplified controls and automatic station keeping. Check out the recent swimming pool test in the video below.

There’s a lot going on under the sea, and plenty of ways to explore it. You could deploy sensors shaped like clams, zap underwater lice with lasers, or even glide your way to a Hackaday Prize.

Continue reading “DIY Submersible Aims For Low Cost, Ease Of Operation”