3D Miniature Chess Pieces Made With A Laser Cutter

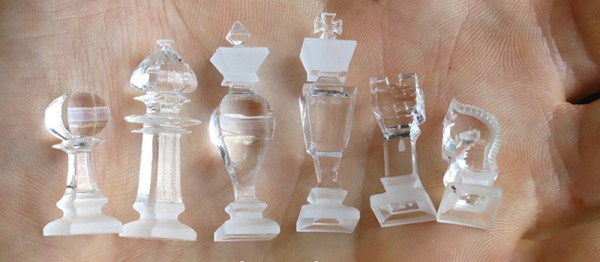
When you think of laser cutters, you generally don’t think of 3d parts. Well, at least not without using something like glue, nuts and bolts, or tabs and slots to hold multiple parts together. [Steve Kranz] shows you how to make these very tiny 3D chess pieces by making 2 passes at right angles to thick acrylic. The first pass cuts one side’s profile, then the part is rotated 90 degrees and a second pass is cut, giving the part more of a “real” 3D look, rather than something cut out of a flat sheet. If you’re having a hard time imagining how it works, his pictures do a great job of explaining the process. He even added some engraving to give the chess pieces for a selective frosted look. We think it’s a cool idea, and well executed too!

But that got us to thinking (always dangerous) that we’ve seen rotary attachments for laser cutters, but they are mainly for etching cylindrical objects like champagne flutes and beer bottle. What if you added a rotating “3rd” axis to a laser cutter that could hold a block of material and rotate it while being cut? (Much like a traditional 4th Axis on a CNC machine). Would the material also need to be raised and lowered to keep the laser focused? Surely software that is aimed at 3D CNC would be needed, something like Mach3 perhaps. A quick Google search show that there are some industrial machines that more-or-less do 3D laser cutting, but if you, or someone you know of, has attached a 3rd axis to a desktop laser, let us know in the comments, we would love to see it.

(via Adafruit)

Portabilizing The Kinect

Way back when the Kinect was first released, there was a realization that this device would be the future of everything 3D. It was augmented reality, it was a new computer interface, it was a cool sensor for robotics applications, and it was a 3D scanner. When the first open source driver for the Kinect was released, we were assured that this is how we would get 3D data from real objects into a computer.

Since then, not much happened. We’re not using the Kinect for a UI, potato gamers were horrified they would be forced to buy the Kinect 2 with the new Xbox, and you’d be hard pressed to find a Kinect in a robot. 3D scanning is the only field where the Kinect hasn’t been over hyped, and even there it’s still a relatively complex setup.

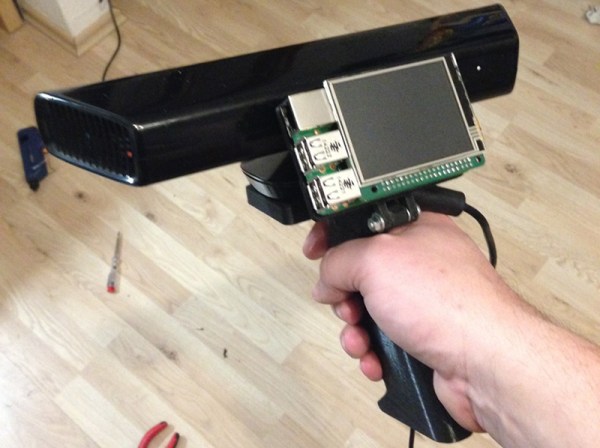
This doesn’t mean a Kinect 3D scanner isn’t an object of desire for some people, or that it’s impossible to build a portabilzed version. [Mario]’s girlfriend works as an archaeologist, and having a tool to scan objects and places in 3D would be great for her. Because of this, [Mario] is building a handheld 3D scanner with a Raspberry Pi 2 and a Kinect.

This isn’t the first time we’ve seen a portablized Kinect. Way back in 2012, the Kinect was made handheld with the help of a Gumstix board. Since then, a million tiny ARM single board computers have popped up, and battery packs are readily available. It was only a matter of time until someone stepped up to the plate, and [Mario] was the guy.

The problem facing [Mario] isn’t hardware. Anyone can pick up a Kinect at Gamestop, the Raspberry Pi 2 should be more than capable of reading the depth sensor on the Kinect, and these parts can be tied together with 3D printed parts. The real problem is the software, and so far [Mario] has Libfreenect compiling without a problem on the Pi2. The project still requires a lot of additional libraries including some OpenCV stuff, but so far [Mario] has everything working.

You can check out his video of the proof of concept below.

Continue reading “Portabilizing The Kinect”

Quantel

Retrotechtacular: The Early Days Of CGI

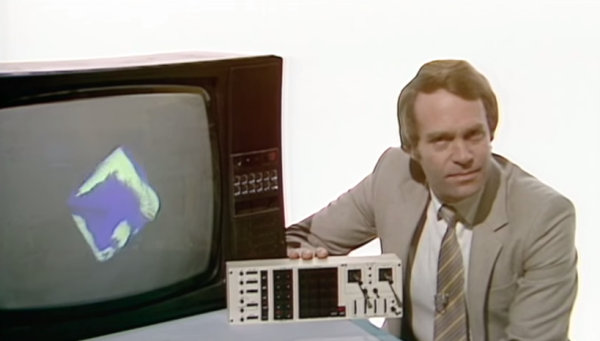
We all know what Computer-Generated Imagery (CGI) is nowadays. It’s almost impossible to get away from it in any television show or movie. It’s gotten so good, that sometimes it can be difficult to tell the difference between the real world and the computer generated world when they are mixed together on-screen. Of course, it wasn’t always like this. This 1982 clip from BBC’s Tomorrow’s World shows what the wonders of CGI were capable of in a simpler time.

In the earliest days of CGI, digital computers weren’t even really a thing. [John Whitney] was an American animator and is widely considered to be the father of computer animation. In the 1940’s, he and his brother [James] started to experiment with what they called “abstract animation”. They pieced together old analog computers and servos to make their own devices that were capable of controlling the motion of lights and lit objects. While this process may be a far cry from the CGI of today, it is still animation performed by a computer. One of [Whitney’s] best known works is the opening title sequence to [Alfred Hitchcock’s] 1958 film, Vertigo.

Later, in 1973, Westworld become the very first feature film to feature CGI. The film was a science fiction western-thriller about amusement park robots that become evil. The studio wanted footage of the robot’s “computer vision” but they would need an expert to get the job done right. They ultimately hired [John Whitney’s] son, [John Whitney Jr] to lead the project. The process first required color separating each frame of the 70mm film because [John Jr] did not have a color scanner. He then used a computer to digitally modify each image to create what we would now recognize as a “pixelated” effect. The computer processing took approximately eight hours for every ten seconds of footage. Continue reading “Retrotechtacular: The Early Days Of CGI”

Fish Feeder

3D Printed Fish Feeder

[Helios Labs] recently published version two of their 3D printed fish feeder. The system is designed to feed their fish twice a day. The design consists of nine separate STL files and can be mounted to a planter hanging above a fish tank in an aquaponics system. It probably wouldn’t take much to modify the design to work with a regular fish tank, though.

The system is very simple. The unit is primarily a box, or hopper, that holds the fish food. Towards the bottom is a 3D printed auger. The auger is super glued to the gear of a servo. The 9g servo is small and comes with internal limiters that only allow it to rotate about 180 degrees. The servo must be opened up and the limiters must be removed in order to enable a full 360 degree rotation. The servo is controlled by an Arduino, which can be mounted directly to the 3D printed case. The auger is designed in such a way as to prevent the fish food from accidentally entering the electronics compartment.

You might think that this project would use a real-time clock chip, or possibly interface with a computer to keep the time. Instead, the code simply feeds the fish one time as soon as it’s plugged in. Then it uses the “delay” function in order to wait a set period of time before feeding the fish a second time. In the example code this is set to 28,800,000 milliseconds, or eight hours. After feeding the fish a second time, the delay function is called again in order to wait until the original starting time.

hologram

Dead Simple Hologram Effect

We’ve all seen holograms in movies, and occasionally we see various versions of the effect in real life. The idea of having a fully three-dimensional image projected magically into space is appealing, but we haven’t quite mastered it yet. [Steven] hasn’t let that stop him, though. He’s built himself a very simple device to display a sort of hologram.

His display relies on reflections. The core of the unit is a normal flat screen LCD monitor laid on its back. The other component looks like a four-sided pyramid with the top cut off. The pyramid is made from clear plastic transparency sheets, held together with scotch tape. It’s placed on top of the LCD with the narrow end facing down.

[Steven] then used the open source Blender program to design a few 3D animations. Examples include a pterodactyl flying and an approximation of the classic Princess Leia hologram from Star Wars Episode 4. The LCD screen displays the animation from four different angles at once. The images are displayed up and onto the transparency sheet, which then get reflected to your eyes. The result is an image that looks almost as if it’s floating in space if viewed from the proper angle. If you move around the screen you can see the image from all four sides, which helps to sell the effect. Not bad for a few dollars worth of parts. Continue reading “Dead Simple Hologram Effect”

Hackaday Links Column Banner

Hackaday Links: December 21, 2014

Most of the incredible flight simulator enthusiasts with 737 cockpits in their garage are from the US. What happens when they’re from Slovenia? They built an A320 cockpit. The majority of the build comes from an old Cyprus Airways aircraft, with most of the work being wiring up the switches, lights, and figuring out how to display the simulated world out of the cockpit.

Google Cardboard is the $4 answer to the Oculus Rift – a cardboard box and smartphone you strap to your head. [Frooxius] missed being able to interact with objects in these 3D virtual worlds, so he came up with this thing. He adapted a symbol tracking library for AR, and is now able to hold an object in his hands while looking at a virtual object in 3D.

Heat your house with candles! Yes, it’s the latest Indiegogo campaign that can be debunked with 7th grade math. This “igloo for candles” will heat a room up by 2 or 3 degrees, or a little bit less than a person with an average metabolism will.

Last week, we saw a post that gave the Samsung NX300 the ability to lock the pictures taken by the camera with public key cryptography. [g3gg0] wrote in to tell us he did the same thing with a Canon EOS camera.

The guys at Flite Test put up a video that should be handy for RC enthusiasts and BattleBot contenders alike. They’re tricking out transmitters, putting push buttons where toggle switches should go, on/off switches where pots should go, and generally making a transmitter more useful. It’s also a useful repair guide.

[Frank Zhao] made a mineral oil aquarium and put a computer in it. i7, GTX 970, 16GB RAM, and a 480GB SSD. It’s a little bigger than most of the other aquarium computers we’ve seen thanks to the microATX mobo, and of course there are NeoPixels and a bubbly treasure chest.

WirePrint

WirePrint Is A Physical ‘Print Preview’ For 3D Printers

3D printers may be old news to most of us, but that’s not stopping creative individuals from finding new ways to improve on the technology. Your average consumer budget 3D printer uses an extrusion technology, whereby plastic is melted and extruded onto a platform. The printer draws a single two-dimensional image of the print and then moves up layer by layer. It’s an effective and inexpensive method for turning a computer design into a physical object. Unfortunately, it’s also very slow.

That’s why Hasso Plattner Institute and Cornell University teamed up to develop WirePrint. WirePrint can slice your three-dimensional model into a wire frame version that is capable of being printed on an extrusion printer. You won’t end up with a strong final product, but WirePrint will help you get a feel for the overall size and shape of your print. The best part is it will do it in a fraction of the time it would take to print the actual object.

This is a similar idea to reducing the amount of fill that your print has, only WirePrint takes it a step further. The software tells your printer to extrude plastic in vertical lines, then pauses for just enough time for it to cool and harden in that vertical position. The result is much cleaner than if this same wire frame model were printed layer by layer. It also requires less overall movement of the print head and is therefore faster.

The best part about this project is that it’s a software hack. This means that it can likely be used on any 3D printers that use extrusion technology. Check out a video of the process below to see how it works. Continue reading “WirePrint Is A Physical ‘Print Preview’ For 3D Printers”