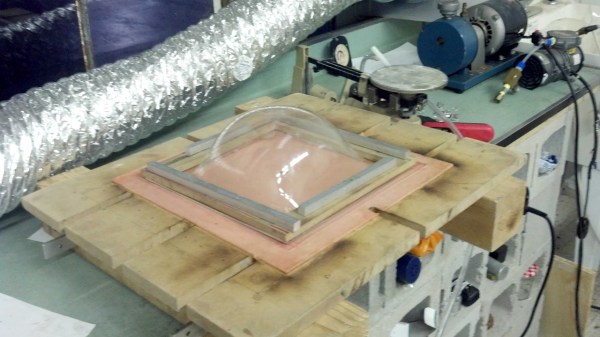
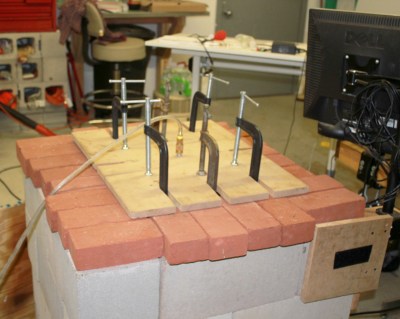
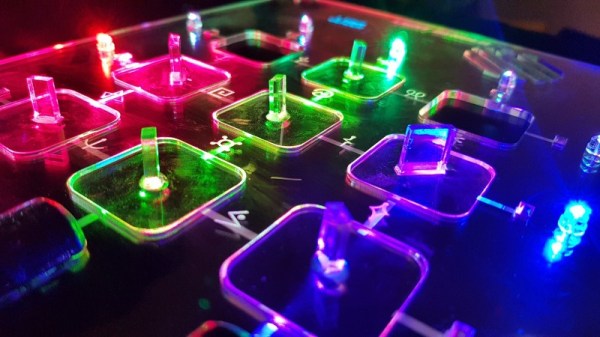
Blown plastic from a plastics blow oven

Blowing Arcylic Canopies Using Stuff From Around The Shop

Blowing an acrylic sheet after heating it is an easy way to make a smooth and transparent canopy or bubble for anything from clams to light fixtures. [Michael Barton-Sweeney] does it using plastic blow ovens he made cheaply, mainly from stuff which most of us already have in our workshops.

Plastics blow ovenAll you need is a way to heat the plastic, to then clamp it down around the edges, and finally to blow air into it as you would when blowing up a balloon. Of course, there are things to watch out for such as making sure the plastic is heated evenly and letting it cool slowly afterward but he covers all that on his hackaday.io page.

He’s also on his second plastics blow oven. The first one worked very well and is perhaps the easiest to make, building up an enclosure of CMUs (cinder blocks) and brick. He had success heating it with both propane and with electric current run through Kanthal wire. But the CMUs absorbed a lot of heat, slowing down the process. So for his second one he made a cast concrete enclosure with aluminum reflectors inside to focus the heat more to where needed.

We’re not sure of everything he’s blown acrylic bubbles for but we first learned of his ovens from the transparent clams in his underwater distributed sensor network. In fact, he was inspired to do plastics blowing from a childhood memory of the Air Force museum in Dayton, Ohio, where they visited the restoration hanger and watched the restorers blowing bubbles for a B-17 ball turret.

Though if you want to go smaller and simpler for something like a light fixture then you can get away with using a toaster oven, a PVC pipe, and a toilet flange.

Spared No Expense: Cloning The Jurassic Park Explorer

While you’d be hard pressed to find any serious figures on such things, we’d wager there’s never been a vehicle from a TV show or movie that has been duplicated by fans more than the Staff Jeeps from Jurassic Park. Which is no great surprise: not only do they look cool, but it’s a relatively easy build. A decent paint job and some stickers will turn a stock Wrangler into a “JP Jeep” that John Hammond himself would be proud of.
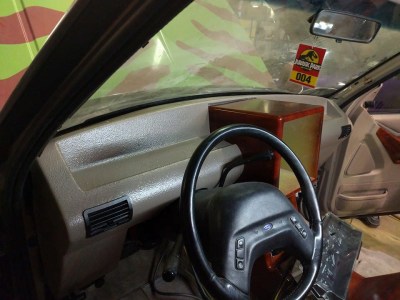
While no less iconic, there are far fewer DIY builds of the highly customized Ford Explorer “Tour Vehicles”. As a rather large stretch of the film takes place within them, the interiors were much more detailed and bears little resemblance to the stock Explorer. Building a truly screen accurate Jurassic Park Tour Vehicle was considered so difficult that nobody has pulled it off since the movie came out in 1993. That is until [Brock Afentul] of PropCulture decided to take on the challenge.

In an epic journey spanning five years, [Brock] has created what he believes is the most accurate Jurassic Park Tour Vehicle ever produced; and looking at the side by side shots he’s done comparing his Explorer to the ones from the movie, it’s hard to disagree. A massive amount of work went into the interior, leaving essentially nothing untouched. While previous builds have tried to modify the stock dashboard to look like the one from the movie, he built a completely new dash from MDF and foam and coated it in fiberglass. The center console featuring the large display was also faithfully reproduced from the movie, and runs screen accurate animations, maps, and tour information. The seats also had to be replaced, multiple times in fact, as he had a considerable amount of trouble getting somebody to upholster them to his standards.
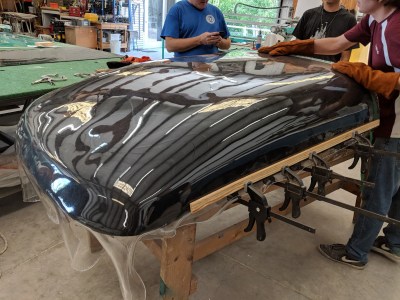
But perhaps the most difficult component of all was the clear acrylic roof bubble. These were critical to filming the movie, as they not only let the viewer see down into the Tour Vehicles but also let the characters see out during the iconic tyrannosaurus attack. But because the roof bubble was created only for the movie and never existed as a real aftermarket product, it usually gets ignored in Tour Vehicle builds. It’s simply too difficult to produce for most people. The omission of the bubble was always considered a case of artistic license; in the same way nobody expects a replica DeLorean from Back to the Future to actually fly or travel through time.

But [Brock] wanted to take his Tour Vehicle all the way, so he partnered up with a local glass shop that let him rent time in their oven so he could heat up acrylic sheets. Once heated to the appropriate temperature, they could be removed and wrapped around a mold to make the bubble. The process took weeks to perfect, but in the end he and a few friends got the hang of it and were able to produce a gorgeous roof bubble that they fitted to the already very impressive Explorer.

While previous Jurassic Park Tour Vehicle replicas were unquestionably awesome, this build really does take it to the next level. Short of equipping the garage with a movie-accurate super computer, it’s hard to see how the bar can get any higher.
Antique Lighthouse Lens Via CNC

Before the invention of the high-powered LED, and even really before the widespread adoption of electric lights in general, lighthouses still had the obligation of warning ships of dangers while guiding them into various safe harbors. They did this with gas lights and impressive glass lenses known as Fresnel lenses which helped point all available light in the correct direction while reducing weight and material that would otherwise be used in a conventional lens.

Now, a company in Florida is using acrylic in reproductions of antique Fresnel lenses. At first glance, it seems like acrylic might not be the best substitute for glass, but the company is able to achieve extreme precision using a CNC machine and then polishing and baking the acrylic which makes it transparent and excellent for use in lighthouse lenses like this. The reproduction lenses are built out of brass, and the lens elements are glued in place with a special adhesive. It’s a convincing replication worthy of use in any lighthouse.

Be sure to check out the video below to see how these lenses are built, and although we’re not entirely sure what exactly is being sprayed on the lenses when they are being polished, perhaps someone in the comments section can illuminate that for us. Of course, there are other uses for Fresnel lenses than in lighthouses, and we’ve seen some great examples of them put to use for many different applications.

Continue reading “Antique Lighthouse Lens Via CNC”

Lasers, Mirrors, And Sensors Combine In An Optical Bench Game

Who would have thought you could make a game out of an optical bench? [Chris Mitchell] did, and while we were skeptical at first, his laser Light Bender game has some potential. Just watch your eyes.

The premise is simple: direct the beam of a colored laser to the correct target before time runs out. [Chris] used laser-cut acrylic for his playfield, which has nine square cutouts arranged in a grid. Red, green, and blue laser pointers line the bottom of the grid, with photosensors and RGB LEDs lining the grid on the other three sides. Play starts with a random LED lighting up in one of the three colors, acting as a target. The corresponding color laser comes on, and the player has to insert mirrors or pass-through blocks in the grid to create a path to the target. The faster you hit the CdS cell, the higher your score. It’s simple, but it looks really engaging. We can imagine all sorts of upgrades, like lighting up two different targets at once, or adding a beamsplitter block to hit two targets with the same color. Filters and polarizers could add to the optical fun too.

We like builds that are just for fun, especially when they’re well-crafted and have a slight air of danger. The balloon-busting killbots project we featured recently comes to mind.

Continue reading “Lasers, Mirrors, And Sensors Combine In An Optical Bench Game”

Curved Wood LED Lamp Needs No Fancy Tools

Those of us who aren’t familiar with woodworking might not expect that this curved wood and acrylic LED lamp by [Marija] isn’t the product of fancy carving, just some thoughtful design and assembly work. The base is a few inches of concrete in a plastic bowl, then sanded and given a clear coat. The wood is four layers of beech hardwood cut on an inverted jigsaw with the middle two layers having an extra recess for two LED strips. After the rough-cut layers were glued together, the imperfections were rasped and sanded out. Since the layers of wood give a consistent width to the recess for the LEDs, it was easy to cut a long strip of acrylic that would match. Saw cutting acrylic can be dicey because it can crack or melt, but a table saw with a crosscut blade did the trick. Forming the acrylic to match the curves of the wood was a matter of gentle heating and easing the softened acrylic into place bit by bit.

Giving the clear acrylic a frosted finish was done with a few coats of satin finish clear coat from a spray can, which is a technique we haven’t really seen before. Handy, because it provides a smooth and unbroken coating along the entire length of the acrylic. This worked well and is a clever idea, but [Marija] could still see the LEDs and wires inside the lamp, so she covered them with some white tape. A video of the entire process is embedded below.

Continue reading “Curved Wood LED Lamp Needs No Fancy Tools”

RGB Disk Goes Interactive With Bluetooth; Shows Impressive Plastic Work

[smash_hand] had a clear goal: a big, featureless, white plastic disk with RGB LEDs concealed around its edge. So what is it? A big ornament that could glow any color or trippy mixture of colors one desires. It’s an object whose sole purpose is to be a frame for soft, glowing light patterns to admire. The disk can be controlled with a simple smartphone app that communicates over Bluetooth, allowing anyone (or in theory anything) to play with the display.

The disk is made from 1/4″ clear plastic, which [smash_hand] describes as plexiglass, but might be acrylic or polycarbonate. [smash_hands] describes some trial and error in the process of cutting the circle; it was saw-cut with some 3-in-1 oil as cutting fluid first, then the final shape cut with a bandsaw.

The saw left the edge very rough, so it was polished with glass polishing compound. This restores the optical properties required for the edge-lighting technique. The back of the disc was sanded then painted white, and the RGB LEDs spaced evenly around the edge, pointing inwards.

The physical build is almost always the difficult part in a project like this — achieving good diffusion of LEDs is a topic we talk about often. [smash_hands] did an impressive job and there are never any “hot spots” where an LED sticks out to your eye. With this taken care of, the electronics came together with much less effort. An Arduino with an HC-05 Bluetooth adapter took care of driving the LEDs and wireless communications, respectively. A wooden frame later, and the whole thing is ready to go.

[smash_hands] provides details like a wiring diagram as well as the smartphone app for anyone who is interested. There’s the Arduino program as well, but interestingly it’s only available in assembly or as a raw .hex file. A video of the disk in action is embedded below.

Continue reading “RGB Disk Goes Interactive With Bluetooth; Shows Impressive Plastic Work”

Cat Plays The Silver Ball For Treats

It’s pretty easy to train a dog to do things for treats. They’re eager to please. But a cat? Most cats have better things to do than learn tricks no matter how many treats are involved. But if you make an autonomous game out of learning a trick, they just might go for it.

That’s the idea behind Touchy Fishy, a pinball machine for cats. It’s the newest iteration of treat-dispensing machines that [Kim] made for his cat, MIDI. The previous version was shaped like a dog’s head with a joystick for a nose. MIDI was so adept at pulling the joystick toward herself that [Kim] decided to try a new design using a lever.

Humans like challenges, too, and [Kim] wanted to make something purely mechanical this time around. The final product is mostly springs and laser-cut acrylic. MIDI pulls the spring-loaded lever downward, launching a pinball upward in an arc. At the top of its trajectory is a spinner enclosed in a circle. When the pinball hits the spinner, it sweeps a treat toward an opening, and the treat falls down where MIDI can eat it. The best part? The spinner also returns the captive pinball to its starting point, so MIDI can play until [Kim] gets tired of dropping treats into the hole. Watch MIDI claw her way to the high score after the break.

Most of the cat-related projects we’ve seen were built to keep hungry cats from sitting on their owner’s chests at 3AM, demanding to be fed. Here’s one that goes a step further by putting the cat to work collecting wiffle balls which it uses to pay for small amounts of kibble.

Continue reading “Cat Plays The Silver Ball For Treats”