Drill Thrice, Solder Once

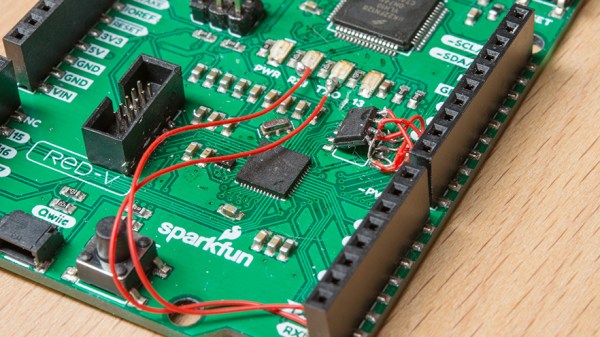
If you design printed circuit boards, then you will have also redesigned printed circuit boards. Nobody gets it right the first time, every time. Sometimes you can solder a scrap of 30gauge wire, flip a component 180°, or make a TO-92 transistor do that little pirouette thing where the legs go every-which-way. If you angered the PCB deities, you may have to access a component pad far from an edge. [Nathan Seidle], the founder of Sparkfun, finds himself in this situation, but all hope is not lost.

Our first thought is to desolder everything, then take a hot iron and tiny wires to each pad. Of course, this opens up a lot of potential for damage to the chip, cold joints, and radio interference. Accessing the pin in vivo has risks, but they are calculated. The idea is to locate the pin, then systematically drill from the backside and expose the copper. [Nate] also discovers that alcohol will make the PCB transparent so you can peer at the underside to confirm you have found your mark.

In a real, “fight fire with fire” idea, you can rework with flex PCBs or push your PCB Fu to the next level and use PCBs as your enclosure.

Make An Electroplating Marker, Because Plating Complex Objects Is Hard

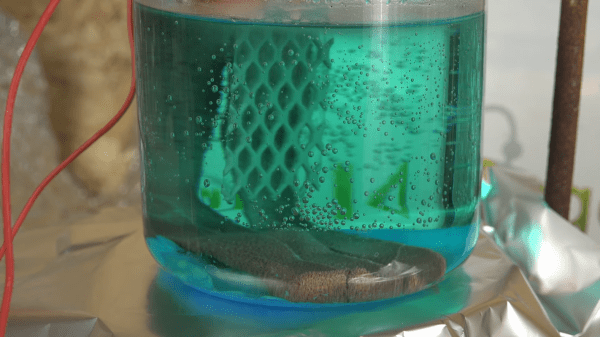
If an object is conductive or has been given a conductive coating, it can be given a metal skin via electroplating. Electroplating is a simple process that is perfectly accessible to anyone in possession of vinegar, salt, a power supply, and some metal such as copper or nickel.

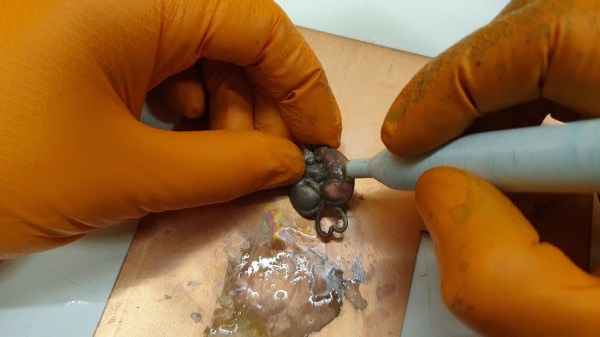
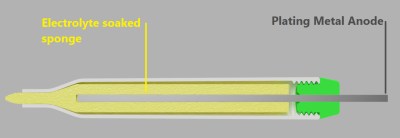
The process might be simple, but as with all such things there are a few gotchas. One of them is this: because electricity follows the path of least resistance, recessed areas of an object may not electroplate well (or at all) no matter how long the object is left immersed. To address this, [Brodie Fairhall] designed a 3D printed electroplating marker. The marker is essentially a more refined version of brush plating, and allows more precision and control than full immersion in an electrolyte bath.

[Brodie] created an excellent video that explains all one needs to start electroplating, and demonstrates using his marker to electroplate complex recessed shapes. Watch him coat a 3D-printed cat pendant in both copper and nickel in the video embedded below. It’s concise, well-edited, and chock full of useful tips.

Continue reading “Make An Electroplating Marker, Because Plating Complex Objects Is Hard”

Epoxy Fix For A Combusted PCB

When the Magic Smoke is released, chances are pretty good that you’ve got some component-level diagnosis to do. It’s usually not that hard to find the faulty part, charred and crusty as it likely appears. In that case, some snips, a new non-crusty part, and a little solder are usually enough to get you back in business.

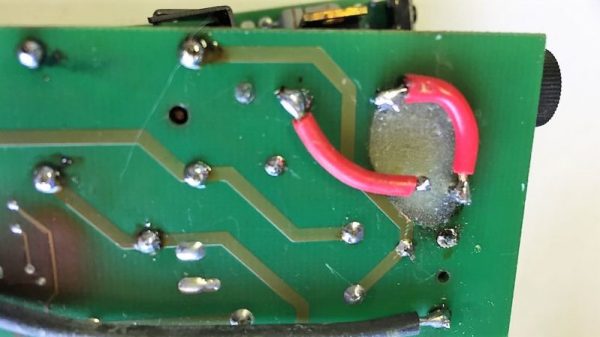
But what if the smoke came not from a component but from the PCB itself? [Happymacer] chanced upon this sorry situation in a power supply for an electric gate opener. Basking in the Australian sunshine for a few years, the opener started acting fussy at first, then not acting at all. Inspection of its innards revealed that some unlucky ants had shorted across line and neutral on the power supply board, which burned not only the traces but the FR4 of the board as well. Rather than replace the entire board, [Happymacer] carefully removed the carbonized (and therefore conductive) fiberglass and resin, leaving a gaping hole in the board. He fastened a patch for the hole from some epoxy glue; Araldite is the brand he used, but any two-part epoxy, like JB Weld, should work. One side of the hole was covered with tape and the epoxy was smeared into the hole, and after a week of curing and a little cleanup, it was ready for duty. The components were placed into freshly drilled holes, missing traces were replaced with wire, and it seems to be working fine.

This seems like a great tip to keep in mind for when catastrophe strikes your boards. There are more extreme ways to do it, of course, but perhaps none so flexible. After all, epoxy is versatile stuff.

Touch Anything And Everything

Powering IoT devices is often a question of batteries or mains power, but in rare exceptions to this rule there is no power supply (PDF Warning). At the University of Wisconsin-Madison and the University of California, San Diego, researchers have gone the extra mile to make advanced backscatter devices, and these new tags don’t need the discrete components we have seen in previous versions. They are calling it LiveTag, and it doesn’t need anything aside from a layer of foil printed or etched on a flexible ceramic-PTFE laminate. PTFE is mostly seen in the RF sector as a substrate for circuit boards.

We have seen some of the wild creations with wifi backscatter that range from dials to pushbuttons. RF backscatter works by modulating the RF signals in which we are continuously swimming. Those radio waves power the device and disrupt the ambient signals, which disruption can be detected by a receiver. With a BOM that looks like a statement more than a list, integration with many devices becomes a cost-effective reality. Do not however broadcast important data because you cannot expect great security from backscatter.

[Via IEEE Spectrum]

Chemistry And Lasers Turn Any Plastic Surface Into A PCB

On the face of it, PCB production seems to pretty much have been reduced to practice. Hobbyists have been etching their own boards forever, and the custom PCB fabrication market is rich with vendors whose capabilities span the gamut from dead simple one-side through-hole boards to the finest pitch multilayer SMD boards imaginable.

So why on Earth would we need yet another way to make PCBs? Because as [Ben Krasnow] points out, the ability to turn almost any plastic surface into a PCB can be really handy, and is not necessarily something the fab houses handle right now. The video below shows how [Ben] came up with his method, which went down a non-obvious path that was part chemistry experiment, part materials science. The basic idea is to use electroless copper plating, a method of depositing copper onto a substrate without using electrolysis.

This allows non-conductive substrates — [Ben] used small parts printed with a Formlabs SLA printer — to be plated with enough copper to form solderable traces. The chemistry involved in this is not trivial; there are catalysts and surfactants and saturated solutions of copper sulfate to manage. And even once he dialed that in, he had to figure out how to make traces and vias with a laser cutter. It was eventually successful, but it took a lot of work. Check out the video below to see how he got there, and where he plans to go next.

You’ve got to hand it to [Ben]; when he decides to explore something, he goes all in. We appreciate his dedication, whether he’s using candles to explore magnetohydrodynamics or making plasma with a high-speed jet of water.

Continue reading “Chemistry And Lasers Turn Any Plastic Surface Into A PCB”

Sharpies And Glue Sticks Fight The Gummy Metal Machining Blues

“Gummy” might not be an adjective that springs to mind when describing metals, but anyone who has had the flutes of a drill bit or end mill jammed with aluminum will tell you that certain metals do indeed behave in unhelpful ways. But a new research paper seeks to shed light on the gummy metal phenomenon, and may just have machinists stocking up on office supplies.

It’s a bit counterintuitive that harder metals like steel are often easier to cut than softer metals; especially aluminum but also copper, nickel alloys, and some stainless steel alloys. But it happens, and [Srinivasan Chandrasekar] and his colleagues at Purdue University wanted to find out why, and what can be done about it. So the first job was to get up close and personal with the interface between a cutting tool and metal stock, to observe the dynamics of cutting. In a fascinating bit of video, they saw that softer metals tend to fold in sinuous patterns rather than breaking on defined shear planes.

Source: American Physical Society.

Having previously noted that cutting through Dykem, a common machinist’s marking fluid, changes chip formation in soft metals, the researchers tested everything from Sharpies to adhesive tape and even correction fluid, and found that they all helped to reduce the gumming action to some degree. Under their microscope they can clearly see that chips form differently once the cutting edge hits the treated surface, tending to act more brittle and ejecting rather than folding. They also noted a marked decrease in cutting force for the treated metal, and much-improved surface finish to boot.

Will Sharpies and glue sticks enter the book of old machinist’s tricks like gauge-block wringing? Only time will tell. But for now, this is a pretty fascinating bit of research that you might be able to put to the test in your shop. Let us know what you find in the comments.

Continue reading “Sharpies And Glue Sticks Fight The Gummy Metal Machining Blues”

Harley-Hardened Wire Helps High-Gain Antenna Hack

What does a Harley-Davidson motorcycle have to do with building antennas? Absolutely nothing, unless you happen to have one and need to work-harden copper wire to build a collinear antenna for LoRa.

We’ll explain. Never being one to settle, [Andreas Spiess] needed a better antenna for his LoRa experiments. Looking for high gain and an omnidirectional pattern, he bought a commercial colinear antenna, which is a wire with precisely spaced loops that acts like a stack of dipoles. Sadly, in a head-to-head test [Andreas] found that the commercial antenna was no better than lower gain antennas in terms of range, and so he decided to roll his own.

Copper wire is a great material for antennas since it can be easily formed without special tools and it solders like a champ. But the stuff you get at the home center is nowhere near stiff enough for a free-standing vertical whip. This is where the Harley came in: [Andreas] used his Hog to stretch out the 1.75-mm diameter (a little bigger than #14 AWG) copper wire. Not only did the work-hardening stiffen the wire, it reduced its diameter to the 1.4 mm needed for the antenna design. His vector network analyzer told him that ground-plane elements and a little fiddling with the loop diameter were needed to get the antenna to resonate at 868 MHz, but in the end it looks like the antenna is on track to deliver 5-dBi of gain.

Of course there are plenty of other ways to stretch out a wire — you could just stretch it out with hanging weights, or even with a go-kart motor-powered winch if you’re ambitious. But if you’ve got a bike like that, why not flaunt it?

Continue reading “Harley-Hardened Wire Helps High-Gain Antenna Hack”