Small Jet Engine Model From Students Who Think Big

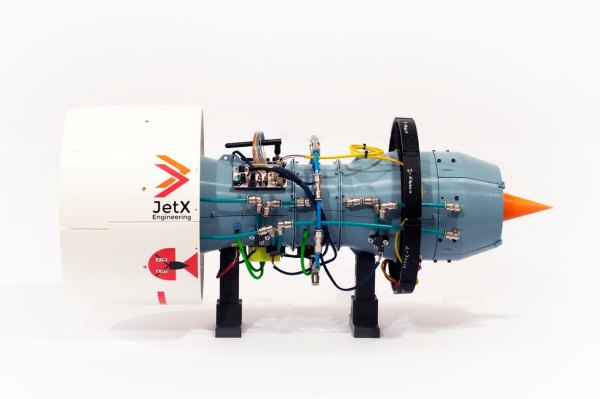
We love to highlight great engineering student projects at Hackaday. We also love environment-sensing microcontrollers, 3D printing, and jet engines. The X-Plorer 1 by JetX Engineering checks all the boxes.

This engineering student exercise took its members through the development process of a jet engine. Starting from a set of requirements to meet, they designed their engine and analyzed it in software before embarking on physical model assembly. An engine monitoring system was developed in parallel and integrated into the model. These embedded sensors gave performance feedback, and armed with data the team iterated though ideas to improve their design. It’s a shame the X-Plorer 1 model had to stop short of actual combustion. The realities of 3D printed plastic meant airflow for the model came from external compressed air and not from burning fuel.

Also worth noting are the people behind this project. JetX Engineering describe themselves as an University of Glasgow student club for jet engine enthusiasts, but they act less like a casual gathering of friends and more like an aerospace engineering firm. The ability of this group to organize and execute on this project, including finding sponsors to fund it, are skills difficult to teach in a classroom and even more difficult to test with an exam.

After X-Plorer 1, the group has launched two new project teams X-Plorer 2 and Kronos. They are also working to expand to other universities with the ambition of launching competitions between student teams. That would be exciting and we wish them success.

Continue reading “Small Jet Engine Model From Students Who Think Big”

Fully-functional Oscilloscope On A PIC

When troubleshooting circuits it’s handy to have an oscilloscope around, but often we aren’t in a lab setting with all of our fancy, expensive tools at our disposal. Luckily the price of some basic oscilloscopes has dropped considerably in the past several years, but if you want to roll out your own solution to the “portable oscilloscope” problem the electrical engineering students at Cornell produced an oscilloscope that only needs a few knobs, a PIC, and a small TV.

[Junpeng] and [Kevin] are taking their design class, and built this prototype to be inexpensive and portable while still maintaining a high sample rate and preserving all of the core functions of a traditional oscilloscope. The scope can function anywhere under 100 kHz, and outputs NTSC at 30 frames per second. The user can control the ground level, the voltage and time scales, and a trigger. The oscilloscope has one channel, but this could be expanded easily enough if it isn’t sufficient for a real field application.

All in all, this is a great demonstration of what you can accomplish with a microcontroller and (almost) an engineering degree. To that end, the students go into an incredible amount of detail about how the oscilloscope works since this is a design class. About twice a year we see a lot of these projects popping up, and it’s always interesting to see the new challenges facing students in these classes.

Continue reading “Fully-functional Oscilloscope On A PIC”

Sensing Soil Moisture: You’re Doing It Wrong!

If you compulsively search online for inexpensive microcontroller add-ons, you will see soil moisture measurement kits. [aka] built a greenhouse with a host of hacked hardware including lights and automatic watering. What caught our attention among all these was Step 5 in their instructions where [aka] explains why the cheap soil sensing probes aren’t worth their weight in potting soil. Even worse, they may leave vacationers with a mistaken sense of security over their unattended plants.

The sensing stakes, which come with a small amplifier, work splendidly out of the box, but if you recall, passing current through electrodes via moisture is the recipe for electrolysis and that has a pretty profound effect on metal. [Aka] shows us the effects of electrolysis on these probes and mentions that damaged probes will cease to give useful information which could lead to overworked pumps and flooded helpless plants.

There is an easy solution. Graphite probes are inexpensive to make yourself. Simply harvest them from pencils or buy woodless pencils from the art store. Add some wires and hold them with shrink tube, and you have probes which won’t fail you or your plants.

Here’s some garden automation if this only whet your whistle, and here’s a robotic friend who takes care of the weeds for you.

Weather Station Needs Almost No Batteries

While the ESP8266 has made its way into virtually every situation where a low-cost WiFi solution is needed, it’s not known as being a low-power solution due to the amount of energy it takes to run WiFi. [Alex] took this design constraint as more of a challenge though, and with the help of an ATtiny microcontroller was able to develop a weather station using an ESP8266 that only needs new batteries every 2-4 years.

While the ESP8266 module consumes a bit of power, the ATtiny excels in low-power mode. To take advantage of this, [Alex] designed the weather station using the ATtiny to gather data every two minutes, store the data in a buffer, and upload all of it in bursts every hour using the ESP8266. This means that the power-hungry WiFi chip can stay off most of the time, drastically limiting the power demands of the station. [Alex] mostly details the setup of the ATtiny and the ESP8266 on his project page, so this could be applied anywhere that low power and network connectivity are required.

As for the weather reporting capabilities, the station is equipped to measure temperature, light, and humidity. Presumably more could be added but this might increase the power demands for the weather station as a whole. Still, changing batteries once a year instead of once every two years might be a worthwhile trade-off for anyone else attempting such an ambitious project. Other additions to the weather station that we’ve seen before might include a low-power display, too.

Which Microcontroller Is Best Microcontroller?

Let’s say you’re working on a project, and you need a microcontroller. Which chip do you reach for? Probably the one you’re most familiar with, or at least the one whose programmer is hiding away in a corner of your desk. Choosing a microcontroller is a matter of convenience, but it doesn’t have to be this way. There are dozens of different ARM cores alone, hundreds of 8051 clones, and weirder stuff including the Cypress PSoC and TI’s MSP430. Which one is best? Which microcontroller that costs under a dollar is best? That’s the question [Jay Carlson] tried to answer, and it’s the best microcontroller shootout we’ve ever read.

[Jay] put together a monster of a review of a dozen or so microcontrollers that cost no more than a dollar. Included in this review are, from Atmel: the ATtiny1616, ATmega168PB, and the ATSAMD10. From Cypress, the PSoC 4000S. From Freescale, the KE04 and KL03. Holtek’s HT-66, and the Infineon XMC1100. From Microchip, the PIC16, PIC24, and PIC32. From Nuvoton, the N76, and M051. The NXP LPC811, Renesas RL-78, Sanyo LC87, and Silicon Labs EFM8. ST’s STM32F0 and STM8. STCMicro’s STC8, and finally TI’s MSP430. If you’re keeping score at home, most of these are either ARM or 8051-style cores, but the AVRs and PICs bump up the numbers for ‘proprietary’ core designs.

This review begins the same as all tech reviews, with a sampling of tech specs. Everything is there, including the amount of RAM to the number of PWM channels. [Jay] is going a bit further with this review and checking out the development environments, compilers, dev tools, and even the performance of different cores in three areas: blinking bits, a biquad filter, and a DMX receiver. There’s an incredible amount of work that went into this, and right now, this is the best resource we’ve seen for a throwdown of microcontrollers.

With all this data and the experience of going through a dozen different microcontroller platforms, what’s [Jay]’s takeaway? The STM32F0 is great, the Atmel/Microchip SAM D10 has great performance but you’ll be relying on some third-party libraries. The pure Microchip parts — the PIC16, PIC24, and PIC32 — have infinite product lifetimes, a wide range of packages, and a huge community but use a clunky IDE, and expensive compilers. The Cypress PSoC was just okay, and the PSoC5 or PSoC6 would be better. Surprises from this test include the Renesas RL-78 and its high performance, low cost, and the most power-efficient 5V part in the test.

With all that said, what’s the best microcontroller? That’s a dumb question, because the best microcontroller will always be the best microcontroller for that application. Or whatever you have sitting around in the parts drawer, we were never quite clear on what the answer actually is. That said, this is a new high water mark for microcontroller reviews, and we hope [Jay] will continue his research into microcontrollers that cost more than a dollar.

Fridge Alarm Speaks, And Saves Power & Food

One of the most power-hungry devices in our homes, besides the air conditioner or heater, is our refrigerator and freezer. It’s especially so if the door doesn’t close all the way or the magnetic seal doesn’t seat properly. [Javier] took to solving a recurring problem with his personal fridge by attaching an alarm to the door to make sure that it doesn’t consume any more power than it absolutely needs.

At its core the device is straightforward. A micro switch powers a small microcontroller only when the door is open. If the door is open for too long, the microcontroller swings into action. The device then powers up a small wireless card (which looks like a variant of the very well-documented ESP module), that communicates with his microwave of all things, which in turn alerts him with an audible, spoken alarm that the refrigerator hasn’t closed all the way. It’s all powered with a battery that will eventually need to be recharged.

While there are certainly easier ways to implement an alarm, the use of the spoken alarm is a nice touch for this project, and the power savings that can be realized are not insignificant. There’s also the added benefit that [Javier] can prevent his freezer from frosting over. If you’re in the mood for other great fridge hacks, there are other exciting, novel, and surely one-of-a-kind ways to trick out your refrigerator.

Continue reading “Fridge Alarm Speaks, And Saves Power & Food”

7-Segment Digits Slide Stylishly On This OLED Clock

Over at Sparkfun, [Alex] shared an OLED clock project that’s currently in progress but has a couple interesting twists. The first is the use of a small OLED screen for each digit, to which [Alex] added a stylistic touch. Digits transition by having segments slide vertically in a smooth animated motion. It’s an attractive effect, and the code is available on his github repository for anyone who wants to try it out.

[Alex] also found that by using an ESP32 microcontroller and synchronizing the clock via NTP over WiFi, the added cost of implementing a real-time clock in hardware becomes unnecessary. Without an RTC, time would drift by a few seconds every day and require a reset. At the moment the clock requires the SSID and password to be hardcoded, but [Alex] would prefer to allow this to be configured via a web page and could use some help. If you have implemented a web server on the ESP32, [Alex] would like to know how you handled multiple pages. “I’ve been scratching my head throughout the build on how to get this done,” he writes. “With the ESP8266, there’s on(const String &uri, handler function), but that seems to have been removed on the ESP32.” If you can point [Alex] in the right direction, be sure to pipe up.

OLED displays and clocks often go together, as we have seen with projects like the DIY OLED Smart Watch, but it’s nice to see someone using the OLED’s strengths to add some visual flair to an otherwise plain display.