Repairing A Samsung 24″ LCD Monitor With Funky Color Issues

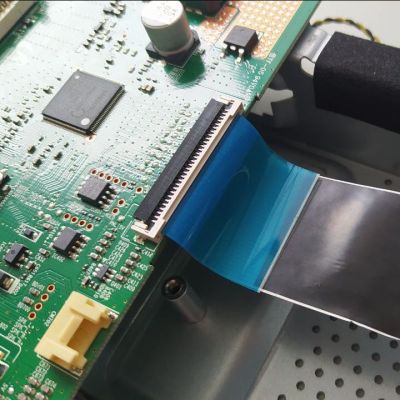
The old cable in place on the Samsung monitor. (Credit: MisterHW)

Dumpster diving is one of those experiences that can net you some pretty cool gear for a reasonable price. Case in point the 24″ Samsung S24E650XW LCD monitor that [MisterHW] saved from being trashed. Apparently in very good condition with no visible external damage, the unit even powered up without issues. It seemed like a golden find until he got onto the Windows desktop and began to notice quaint red shimmering in darker areas and other issues that made it clear why the monitor had been tossed. Of course, the second best part about dumpster diving is seeing whether you can repair such issues.

Prior to disassembly it had been noted that percussive maintenance and bending of the frame changed the symptoms, suggesting that something was a bit loose inside. After taking the back cover and shielded enclosure off, a quick visual inspection of the boards and cables quickly revealed the likely suspect: broken traces on one of the cables.

Apparently somewhere during the assembly step in the factory the cable had been pushed against the PCB’s edge, causing the initial damage. Based on the listed assembly date the monitor had only been in use for a few years before it was tossed, so likely the symptoms would have begun and worsened as one after another of the traces gradually cracked and broke due to vibrations, thermal expansion, etc.

This issue made fixing the monitor very simple, however, assuming a suitable replacement cable could be found. The broken cable is a 30P 1.0 pitch PFC, with EBay throwing up a cable with similar specs for a Thomson brand TV. One purchase and anxious wait later, the replacement cable was installed as in the featured image alongside the old cable. Perhaps unsurprisingly it restored the monitor to full working order, demonstrating once again that dumpster diving is totally worth it.

Custom Pneumatic Cylinders Lock This Monitor Arm In Place

Few consumer-grade PCs are what you’d categorize as built to last. Most office-grade machines are as likely as not to give up the ghost after ingesting a few too many dust bunnies, and the average laptop can barely handle a few drops of latte and some muffin crumbs before croaking. Sticking a machine like that in the shop, especially a metal shop, is pretty much a death sentence.

And yet, computers are so useful in the shop that [Lucas] from “Cranktown City” built this neat industrial-strength monitor arm. His design will look familiar to anyone with a swing-arm mic or desk light, although his home-brew parallelogram arm is far sturdier thanks to the weight of the monitor and sheet-metal enclosure it supports. All that weight exceeded the ability of the springs [Lucas] had on hand, which led to the most interesting aspect of the build — a pair of pneumatic locks. These were turned from a scrap of aluminum rod and an old flange-head bolt; when air pressure is applied, the bolt is drawn into the cylinder, which locks the arm in place. To make it easy to unlock the arm, a pneumatic solenoid releases the pressure on the system at the touch of a button. The video below has a full explanation and demonstration.

While we love the idea, there are a few potential problems with the design. The first is that this isn’t a fail-safe design, since pressure is needed to keep the arm locked. That means if the air pressure drops the arm could unlock, letting gravity do a number on your nice monitor. Second is the more serious problem [Lucas] alluded to when he mentioned not wanting to be in the line of fire of those locks should something fail and the piston comes flying out under pressure. That could be fixed with a slight design change to retain the piston in the event of a catastrophic failure.

Problems aside, this was a great build, and we always love [Lucas]’ seat-of-the-pants engineering and his obvious gift for fabrication, of which his wall-mount plasma cutter is a perfect example.

Continue reading “Custom Pneumatic Cylinders Lock This Monitor Arm In Place”

Keep Tabs On PC Use With Custom Analog Voltmeter

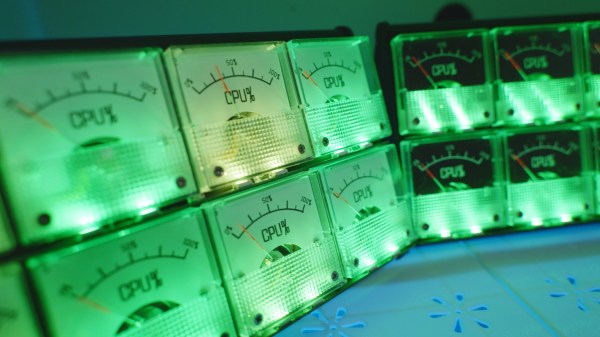
With the demands of modern computing, from video editing, streaming, and gaming, many of us will turn to a monitoring system of some point to keep tabs on CPU usage, temperatures, memory, and other physical states of our machines. Most are going to simply display on the screen but this data can be sent to external CPU monitors as well. This retro-styled monitor built on analog voltmeters does a great job of this and adds some flair to a modern workstation as well.

The build, known as bbMonitor, is based on the ESP32 platform which controls an array of voltmeters via PWM. The voltmeters have been modified with a percentage display to show things like CPU use percentage. Software running on the computers sends this data in real time to the ESP32 so the computer’s behavior can be viewed at a glance. Each voltmeter is also augmented with RGB LEDs that change color from green to red as use increases as well. The project’s creator, [Corebb], also notes that the gauges will bounce around if the computer is under heavy load but act more linearly when under constant load, also helping to keep an eye on computer status.

While the build does seem to rely on a Windows machine to run the software for export to the monitor, all of the code is open-sourced and available on the project’s GitHub page and could potentially be adapted for other operating systems. And, as far as the voltmeters themselves go, there have been similar projects in the past that use stepper motors as a CPU usage monitor instead.

Continue reading “Keep Tabs On PC Use With Custom Analog Voltmeter”

Spying On The ESP32’s GPIO

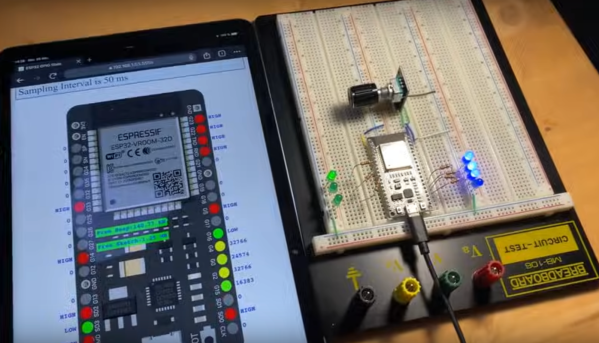
The ESP32 has been a go-to microcontroller platform for a while now, thanks to its versatile capabilities, integrated Wi-Fi and Bluetooth connectivity, and low power consumption. It’s ideal for a wide range of projects especially those revolving around IoT, partially because of all of the libraries and tools available for it now. The latest tool from [The Last Outpost Workshop] adds a feature we didn’t know we wanted until now: a webserver showing real-time updates of what all of the GPIO pins are doing.

The live GPIO pin monitoring library sets up the ESP32 to stream information about what all of the pins are doing in real time to a webserver, which displays the information as a helpful graphic. The demonstration in the video below shows and example troubleshooting a situation where the code is correct but there’s a mistake in the wiring, helping to quickly identify the problem and hopefully eliminating a wild goose chase for a bug in the software. The library can be quickly installed using the Arduino IDE and only requires the use of one other library and a few lines of code to get everything up and running.

As far as a debugging tool goes, something like this could save a lot of us a significant amount of time, especially with how easy it is to set up. A real-time look into the pins and their behavior, including those set up for PWM, is invaluable for plenty of situations. Of course if you’re building something like a real-time operating system that needs responses within a very specific interval you may want to look at more in-depth strategies for probing the GPIO.

Thanks to [Bob] for the tip!

Continue reading “Spying On The ESP32’s GPIO”

Latency Meter For Accurate Gaming

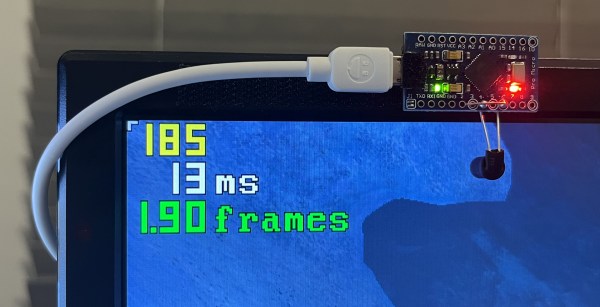
The gaming world experienced a bit of a resurgence in 2020 that is still seen in the present day. Even putting aside the effects from the pandemic, the affordability and accessibility has arguably never been better. Building a gaming PC can have its downsides, though, and a challenging issue to troubleshoot is input lag or input latency. This is something that’s best measured with standalone hardware, and if this is an issue on your setup you may want to take a look at this latency meter.

Unlike other measurement devices that use the time between a mouse button input and the monitor’s display of a bullet or shooting event, this one looks at mouse movement and the change in the scene instead. This makes it much more versatile than other methods since it’s independent of specific actions, and can be used in any game without any specific events needed to perform the measurement. A camera phototransistor is placed on the monitor’s top edge and the Arduino-based device sends mouse commands to the computer while measuring the time between those commands and the shift in the image on the monitor.

The project is open source, so with the right hardware it’s possible to build one to troubleshoot latency issues or just to learn more about a particular hardware configuration’s behavior. Arduinos and other microcontrollers have been doing all kinds of things by pretending to be human interface devices like this for a while now. One of our favorites of late was this effects pedal that replicates musical effects on mice and keyboards.

FPGA Runs IBM 5151 MDA Display

When it comes to driving a display, you can do all kinds of fancy tricks with microcontrollers to get an image up. Really, though, FPGAs are the weapon of choice for playing with these kinds of signals. [Ted Fried] put one to great work driving an ancient IBM 5151 MDA display, and shared his results on Hackaday.io.

The build relies on a Digilent Arty Z7-20 SOC FPGA development board, which has a beefy 600 MHz ARM processor on board. It also packs 500 MB of DRAM—more than enough for storing pixel data for an ancient display.

To drive the old display, [Ted] whipped up a state machine on the FPGA. It’s tasked with fetching display data from RAM and creating the appropriate timings for the MDA display interface. The images are stored directly in an array in C code running on the ARM core. From there, they are copied into the FPGA’s RAM for trucking out to the display. The 720×350 images are stored as 1 bit per pixel, and are created by converting the original JPEGs into single-bit bitmaps in GIMP, before final conversion into a C code array via utility of [Ted’s] own design.

If you’ve ever wanted to display your images in resplendent amber or green, then this could be the project for you. It’s also just a great way to learn about using FPGAs and interfacing with alternative display technologies. If you’ve been whipping up your own retro display hacks, don’t hesitate to drop us a line.

DisplayPort: A Better Video Interface

Over the years, we’ve seen a good number of interfaces used for computer monitors, TVs, LCD panels and other all-things-display purposes. We’ve lived through VGA and the large variety of analog interfaces that preceded it, then DVI, HDMI, and at some point, we’ve started getting devices with DisplayPort support. So you might think it’s more of the same. However, I’d like to tell you that you probably should pay more attention to DisplayPort – it’s an interface powerful in a way that we haven’t seen before.

By [Belkin+Abisys], CC BY-SA 3.0
The DisplayPort (shortened as DP) interface was explicitly designed to be a successor to VGA and DVI, originating from the VESA group – an organization created by multiple computer-display-related players in technology space, which has previously brought us a number of smaller-scale computer display standards like EDID, DDC and the well-known VESA mount. Nevertheless, despite the smaller scale of previous standards, DisplayPort has since become a hit in computer display space for a number of reasons, and is more ubiquitous than you might realize.

You could put it this way: DisplayPort has all the capabilities of interfaces like HDMI, but implemented in a better way, without legacy cruft, and with a number of features that take advantage of the DisplayPort’s sturdier architecture. As a result of this, DisplayPort isn’t just in external monitors, but also laptop internal displays, USB-C port display support, docking stations, and Thunderbolt of all flavors. If you own a display-capable docking station for your laptop, be it classic style multi-pin dock or USB-C, DisplayPort is highly likely to be involved, and even your smartphone might just support DisplayPort over USB-C these days. Continue reading “DisplayPort: A Better Video Interface”